当前位置:网站首页>Face detection based on Dlib
Face detection based on Dlib
2022-07-08 02:21:00 【So come on】
1、dlib Basic concepts of
1. Dlib Is a deep learning open source tool , be based on C++ Development , Also support Python Development interface .
2. because Dlib It has good support for facial feature extraction , There are many trained face feature extraction models for developers to use , therefore Dlib Face recognition development is very suitable for face project development .
3. HOG Direction gradient histogram (Histogram of Oriented Gradient)
(1)HOG It's a feature descriptor , It is usually used to extract features from image data . It is widely used in object detection of computer vision tasks .
(2) The role of feature descriptors : It is a simplified representation of an image , Only the most important information about the image .
2、dlib Method of library installation
1. open pycharm
2.File—>settings—>Project Interpreter
Choose your installation python3.6.1 Version as interpreter
3. Click the right side. + Number , Enter dlib, And then in the lower right corner Specify version Check the box in front , Select the version after checking 19.6.1( It is the same as the version just installed )
4. Click on the bottom left corner Install Package Installation , If it doesn't work once, install it several times
( Once again remind : The version you just installed must be selected )
3、dlib The use of
1、 Recognize images
# 1 Import library
import cv2
import dlib
import numpy as np
import matplotlib.pyplot as plt
# 2 Method : display picture
def show_image(image, title):
img_RGB = image[:, :, ::-1] # BGR to RGB
plt.title(title)
plt.imshow(img_RGB)
plt.axis("off")
# 3 Method : Draw a face rectangle
def plot_rectangle(image, faces):
for face in faces:
cv2.rectangle(image, (face.left(), face.top()), (face.right(), face.bottom()), (255,0,0), 4)
# Draw a rectangular , Two coordinates
return image
def main():
# 4 Read a picture
img = cv2.imread("21.jpg")
# 5 Gray scale conversion
gray = cv2.cvtColor(img, cv2.COLOR_BGR2GRAY)
# 6 call dlib Detectors in the library
detector = dlib.get_frontal_face_detector()
dets_result = detector(gray, 1) # 1 : Represents doubling the image
# 7 Draw a rectangular box for the detected face
img_result = plot_rectangle(img.copy(), dets_result)
# 8 Create a canvas
plt.figure(figsize=(9, 6))
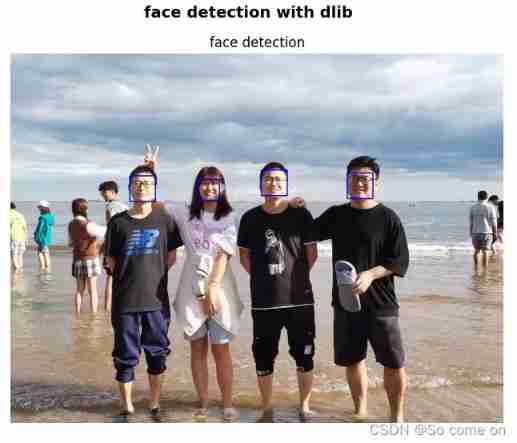
plt.suptitle("face detection with dlib", fontsize=14, fontweight="bold")
# 9 Show the final detection effect
show_image(img_result, "face detection")
plt.show()
if __name__ == '__main__':
main()2、 Computer camera recognition
# 1  Import library
import cv2
import dlib

# 2  Method : Draw a face rectangle
def plot_rectangle(image, faces):
    for face in faces:
        cv2.rectangle(image, (face.left(), face.top()), (face.right(), face.bottom()), (255,0,0), 4)
    return image

def main():
    # 3  Turn on the camera , Read video
    capture = cv2.VideoCapture(0)
    # 4  Judge whether the camera works normally
    if capture.isOpened() is False:
        print("Camera Error !")
    # 5  The camera turns on normally : Cycle through every frame
    while True:
        ret, frame = capture.read()
        if ret:
            gray = cv2.cvtColor(frame, cv2.COLOR_BGR2GRAY) # BGR to GRAY

            # 6  call dlib Detectors in the library
            detector = dlib.get_frontal_face_detector()
            det_result = detector(gray, 1)  #  Detect the picture , Return a result
            # 7  Draw test results
            dets_image = plot_rectangle(frame, det_result)  #   Original pictures and test results    Draw the result on the picture .

            # 8  Display the final detection effect in real time
            cv2.imshow("face detection with dlib", dets_image)

            # 9  Key "ESC", sign out , Turn off camera
            if cv2.waitKey(1) == 27:
                break

    # 10  Release all resources
    capture.release()
    cv2.destroyAllWindows()

if __name__ == '__main__':
main()边栏推荐
- 2022年5月互联网医疗领域月度观察
- Project deployment (I): selection of mobile operators
- Kwai applet guaranteed payment PHP source code packaging
- Learn face detection from scratch: retinaface (including magic modified ghostnet+mbv2)
- See how names are added to namespace STD from cmath file
- LeetCode精选200道--链表篇
- 咋吃都不胖的朋友,Nature告诉你原因:是基因突变了
- Applet running under the framework of fluent 3.0
- A comprehensive and detailed explanation of static routing configuration, a quick start guide to static routing
- JVM memory and garbage collection-3-runtime data area / method area
猜你喜欢
#797div3 A---C

Xmeter newsletter 2022-06 enterprise v3.2.3 release, error log and test report chart optimization
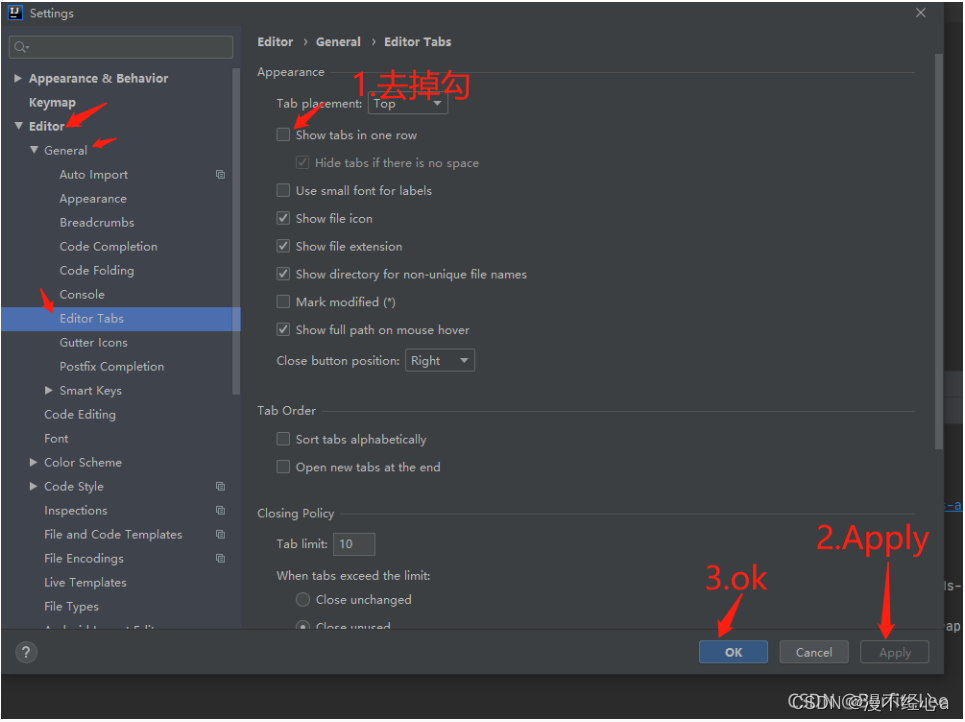
idea窗口不折叠
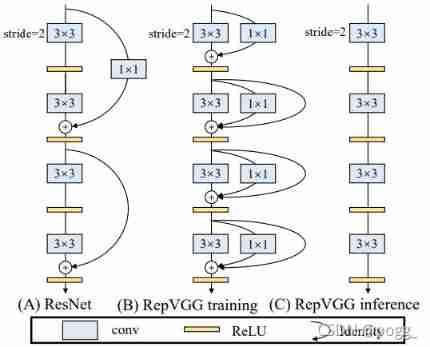
Yolov5 Lite: experiment and thinking of repovgg re parameterization on the industrial landing of Yolo

Mqtt x newsletter 2022-06 | v1.8.0 release, new mqtt CLI and mqtt websocket tools

喜欢测特曼的阿洛
JVM memory and garbage collection-3-direct memory
企业培训解决方案——企业培训考试小程序
![[reinforcement learning medical] deep reinforcement learning for clinical decision support: a brief overview](/img/45/5f14454267318bb404732c2df5e03c.jpg)
[reinforcement learning medical] deep reinforcement learning for clinical decision support: a brief overview
For friends who are not fat at all, nature tells you the reason: it is a genetic mutation
随机推荐
Learn CV one from scratch activation function
Applet running under the framework of fluent 3.0
[knowledge map paper] r2d2: knowledge map reasoning based on debate dynamics
Spock单元测试框架介绍及在美团优选的实践_第三章(void无返回值方法mock方式)
Introduction to Microsoft ad super Foundation
[knowledge atlas paper] minerva: use reinforcement learning to infer paths in the knowledge base
Learn face detection from scratch: retinaface (including magic modified ghostnet+mbv2)
Force buckle 4_ 412. Fizz Buzz
Introduction to QT: video player
[knowledge map paper] Devine: a generative anti imitation learning framework for knowledge map reasoning
1331:【例1-2】后缀表达式的值
力扣5_876. 链表的中间结点
文盘Rust -- 给程序加个日志
Xiaobai tutorial: Raspberry pie 3b+onnxruntime+scrfd+flask to realize public face detection system
EMQX 5.0 发布:单集群支持 1 亿 MQTT 连接的开源物联网消息服务器
Beaucoup d'enfants ne savent pas grand - chose sur le principe sous - jacent du cadre orm, non, ice River vous emmène 10 minutes à la main "un cadre orm minimaliste" (collectionnez - le maintenant)
金融业数字化转型中,业务和技术融合需要经历三个阶段
Yolov5 Lite: ncnn+int8 deployment and quantification, raspberry pie can also be real-time
如何用Diffusion models做interpolation插值任务?——原理解析和代码实战
Clickhouse principle analysis and application practice "reading notes (8)