当前位置:网站首页>平衡二叉树详解 通俗易懂
平衡二叉树详解 通俗易懂
2022-07-06 09:18:00 【邓嘉文Jarvan】
平衡二叉树(AVL)
阅读之前请先了解 二叉搜索树
Golang 交流群关注公众号 邓嘉文Jarvan
平衡二叉树定义:任意节点的子树的高度差都小于等于 1
1. 为什么使用「平衡二叉树」
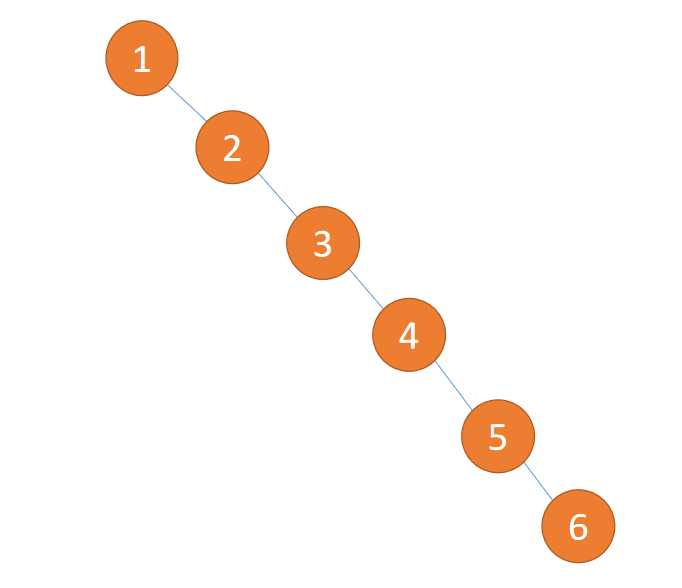
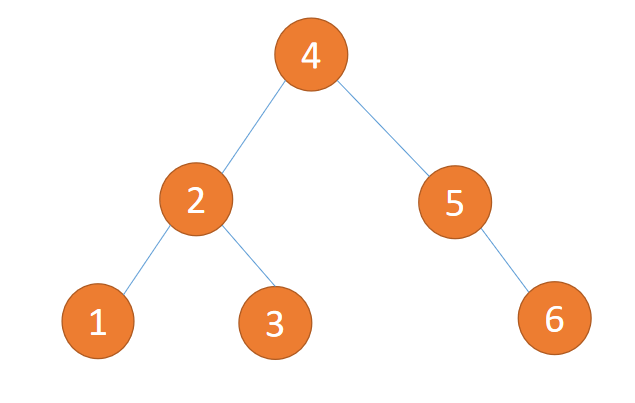
二叉树能提高查询的效率 O(logn),但是当你插入 {1,2,3,4,5,6} 这种数据的时候,你的二叉树就像一个「链表」一样,搜索效率变为 O(n)
于是在 1962 年,一个姓 AV 的大佬(G. M. Adelson-Velsky) 和一个姓 L 的大佬( Evgenii Landis)提出「平衡二叉树」(AVL) 。
于是插入 {1,2,3,4,5,6} 这种数据结果如下图所示:
2. 判断「平衡二叉树」
判断「平衡二叉树」的 2 个条件:
- 1. 是「二叉排序树」
- 2. 任何一个节点的左子树或者右子树都是「平衡二叉树」(左右高度差小于等于 1)
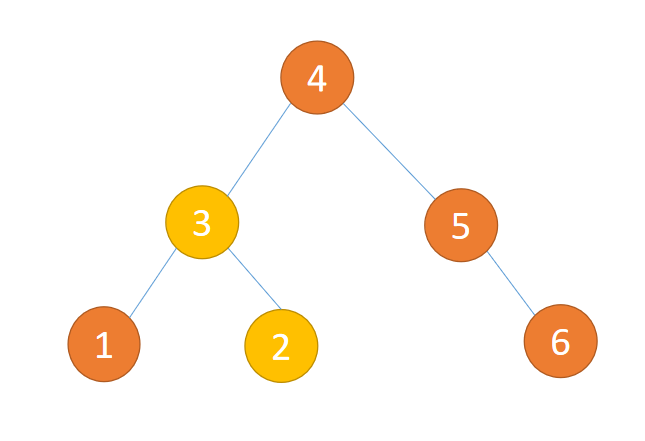
(1)下图不是「平衡二叉树」因为它不是「二叉排序树」违反第 1 条件
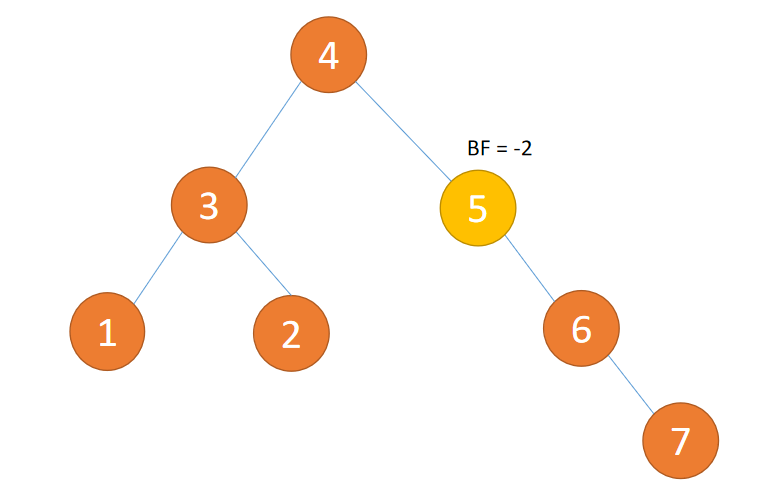
(2)下图不是「平衡二叉树」因为有节点子树高度差大于 1 违法第 2 条件
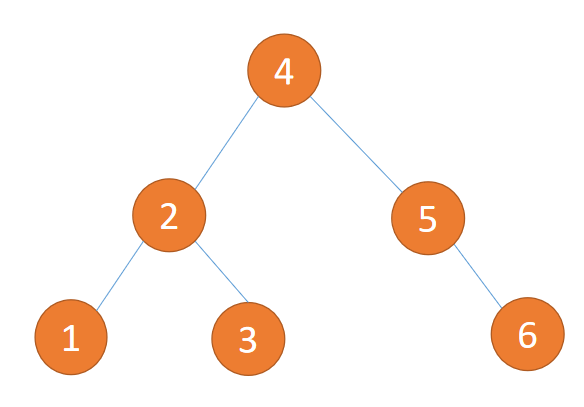
(3)下图是「平衡二叉树」因为符合 1、2 条件
3. 相关概念
3.1 平衡因子 BF
定义:左子树和右子树高度差
计算:左子树高度 - 右子树高度的值
别名:简称 BF(Balance Factor 而不是 Boy Friend)
一般来说 BF 的绝对值大于 1,,平衡树二叉树就失衡,需要「旋转」纠正
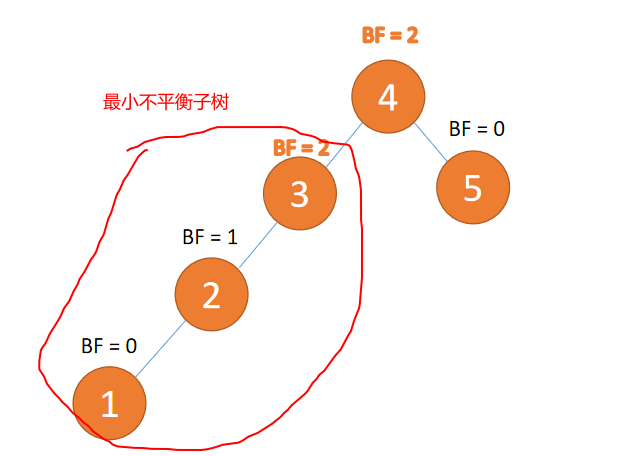
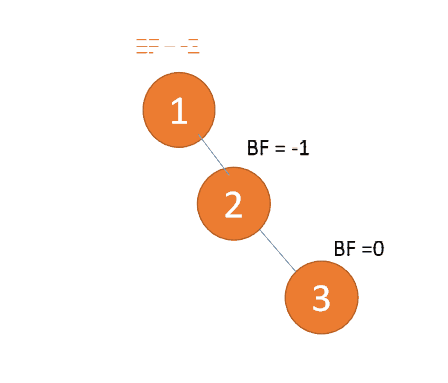
3.2 最小不平衡子树
距离插入节点最近的,并且 BF 的绝对值大于 1 的节点为根节点的子树。
「旋转」纠正只需要纠正「最小不平衡子树」即可
例子如下图所示:
4. 二种旋转方式
2 种「旋转」方式:
- 左旋
- 旧根节点为新根节点的左子树
- 新根节点的左子树(如果存在)为旧根节点的右子树
- 右旋:
- 旧根节点为新根节点的右子树
- 新根节点的右子树(如果存在)为旧根节点的左子树
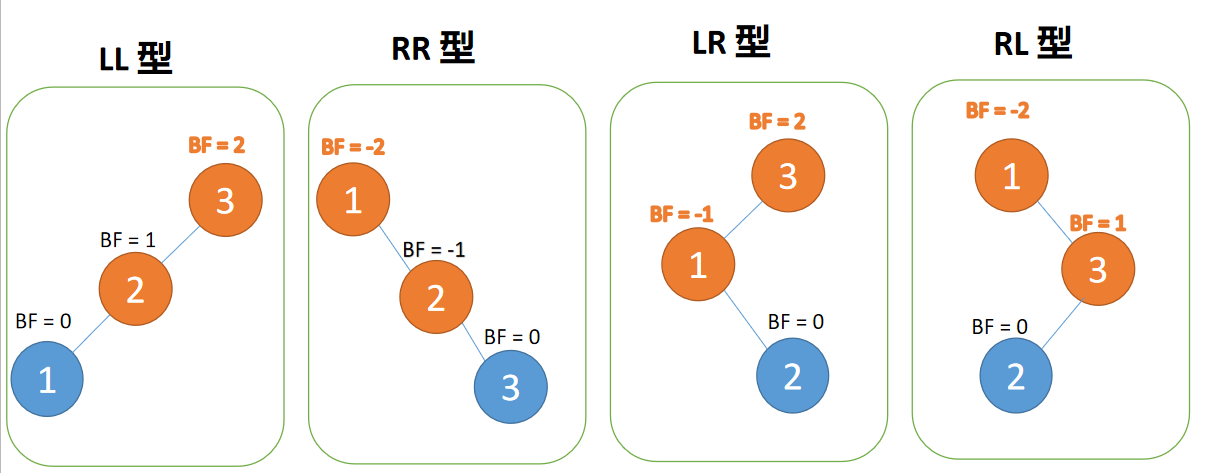
4 种「旋转」纠正类型:
- LL 型:插入左孩子的左子树,右旋
- RR 型:插入右孩子的右子树,左旋
- LR 型:插入左孩子的右子树,先左旋,再右旋
- RL 型:插入右孩子的左子树,先右旋,再左旋
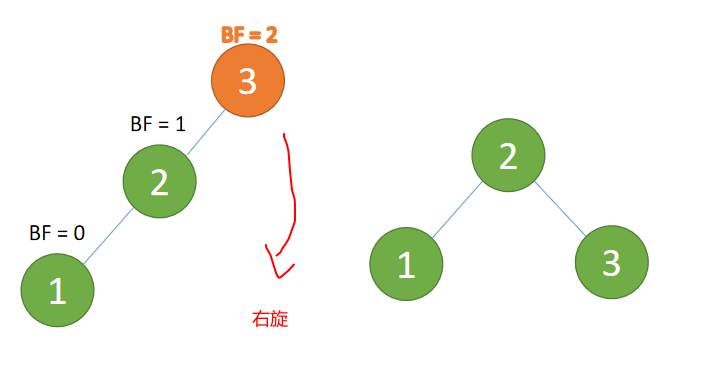
4.1 LL 型失衡「右旋」
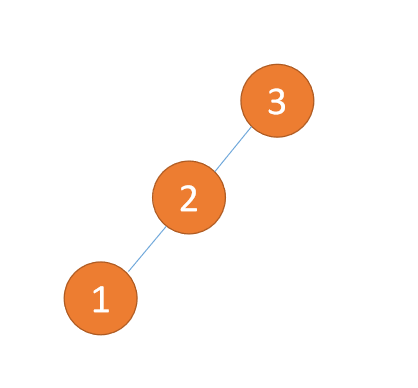
第三个节点「1」插入的 时候,BF(3) = 2,BF(2) = 1LL 型失衡,右旋,根节点顺时针旋转
(1)最小不平衡子树「右旋」
右旋
- 旧根节点(节点 3)为新根节点(节点 2)的右子树
- 新根节点的 右子树(如果存在)为旧根节点的左子树
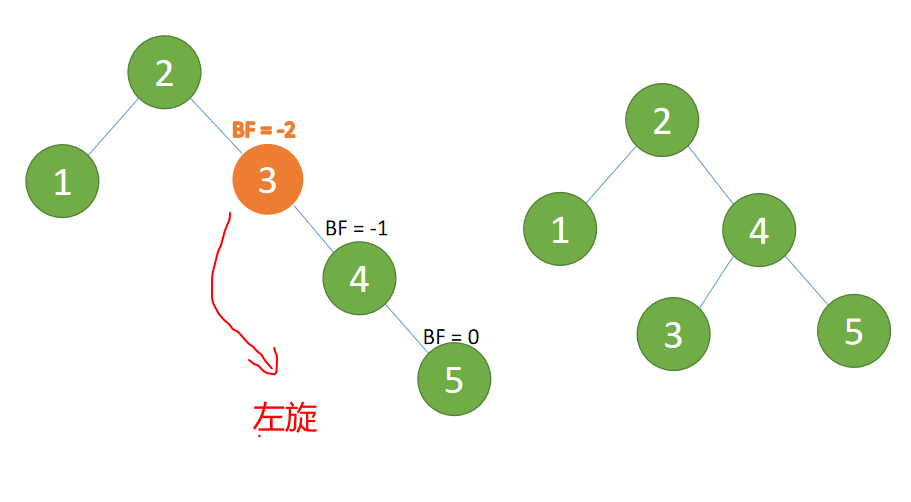
4.2 RR 型失衡「左旋」
第三个节点「3」插入的 时候,BF(1)=-2 BF(2)=-1,RR 型失衡,左旋,根节点逆时针旋转
(1)最小不平衡子树左旋
左旋
- 旧根节点(节点 1)为新根节点(节点 2)的左子树
- 新根节点的左子树(如果存在)为旧根节点的右子树
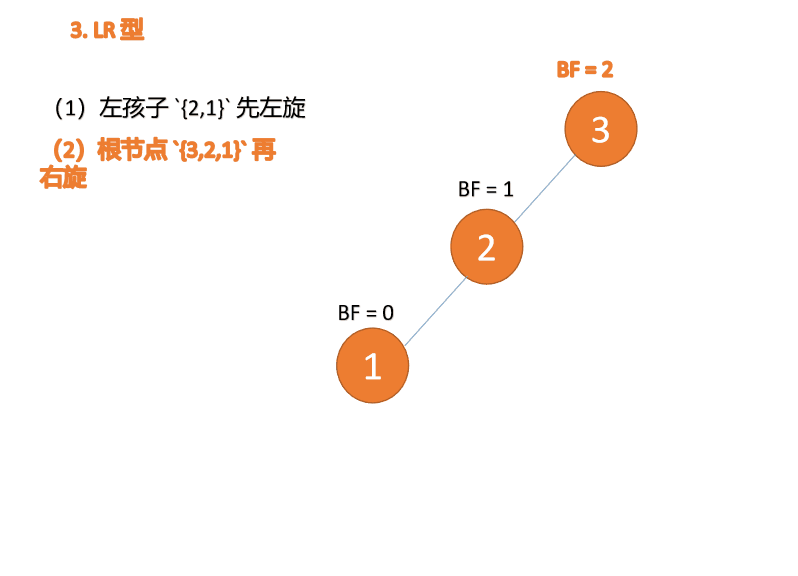
4.3 LR 型
第三个节点「3」插入的 时候,BF(3)=2 BF(1)=-1LR 型失衡,先「左旋」再「右旋」
(1)最小不平衡子树左子树 {2,1} 先左旋
左旋
- 旧根节点(节点 1)为新根节点(节点 2)的左子树
- 新根节点的左子树(如果存在)为旧根节点的右子树

(2)最小不平衡子树 {3,2,1} 再右旋
右旋
- 旧根节点(节点 3)为新根节点(节点 2)的右子树
- 新根节点的 右子树(如果存在)为旧根节点的左子树
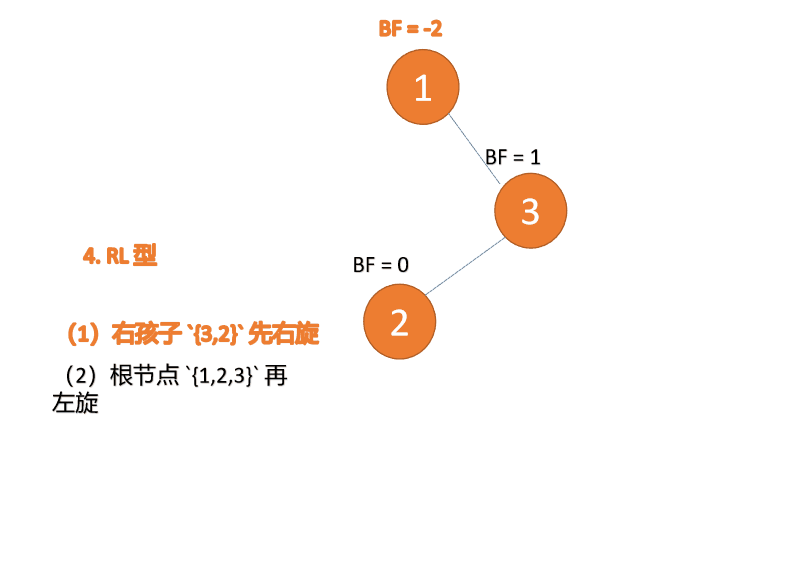
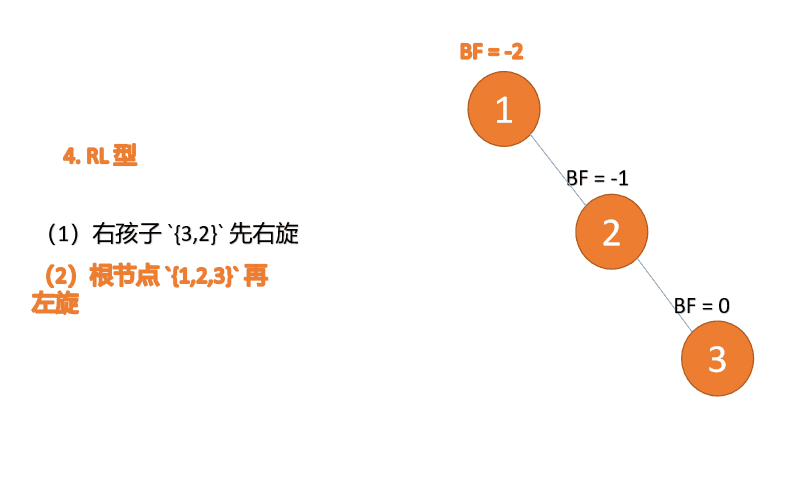
4.4 RL 型
第三个节点「1」插入的 时候,BF(1)=-2 BF(3)=1RL 型失衡,先「右旋」再「左旋」
(1)最小不平衡子树根节点右子树{3,2}先右旋
右旋
- 旧根节点(节点 3)为新根节点(节点 2)的右子树
- 新根节点的 右子树(如果存在)为旧根节点的左子树
(2)最小不平衡子树 {1,2,3} 再左旋(L)
左旋
- 旧根节点(节点 1)为新根节点(节点 2)的左子树
- 新根节点的左子树(如果存在)为旧根节点的右子树
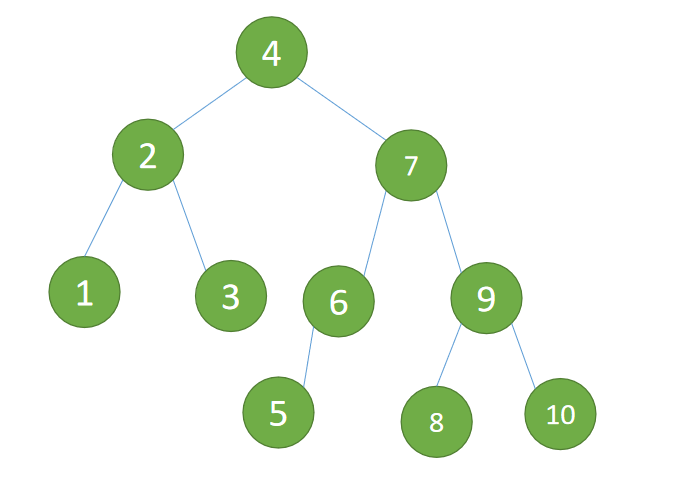
5. 实例
接下来我们以 {3,2,1,4,5,6,7,10,9,8} 为实例练习刚刚的 4 种插入方式
(1)依次插入 3、2、1 插入第三个点 1 的时候 BF(3)=2 BF(2)=1,LL 型失衡。
对最小不平衡树 {3,2,1}进行「右旋」
右旋:
- 旧根节点(节点 3)为新根节点(节点 2)的右子树
- 新根节点(节点 2)的右子树(这里没有右子树)为旧根节点的左子树
(2)依次插入 4 ,5 插入 5 点的时候 BF(3) = -2 BF(4)=-1,RR 型失衡
对最小不平衡树 {3,4,5} 进行「左旋」
左旋:
- 旧根节点(节点 3)为新根节点(节点 4)的左子树
- 新根节点(节点 4)的左子树(这里没有左子树)为旧根节点的右子树
(3)插入 4 ,5 插入 5 点的时候 BF(2)=-2 BF(4)=-1 ,RR 型失衡 对最小不平衡树进行「左旋」
左旋:
- 旧根节点(节点 2)为新根节点(节点 4)的左子树
- 新根节点(节点 4)的 左子树(节点 3)为旧根节点的右子树

新根节点(节点 4)的左子树(节点 3)为旧根节点的右子树

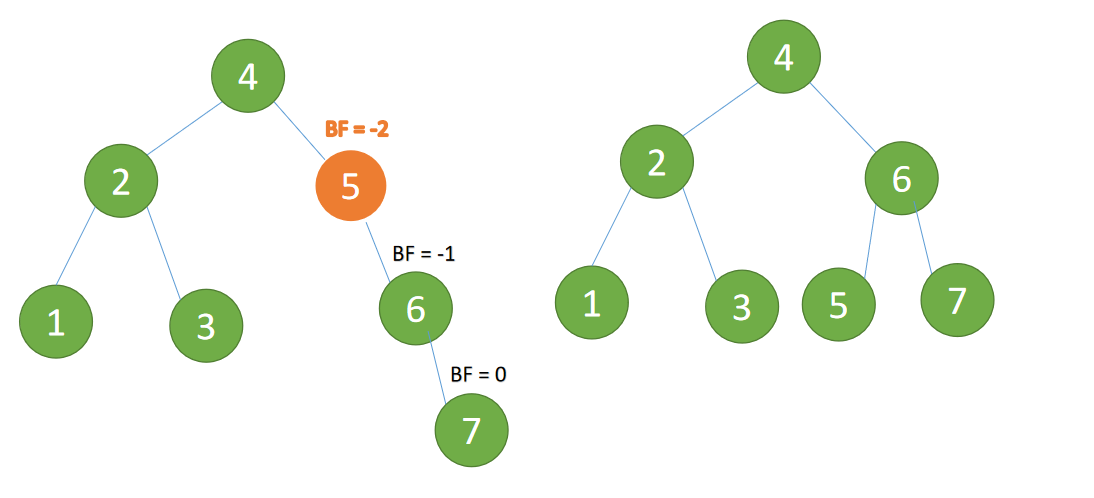
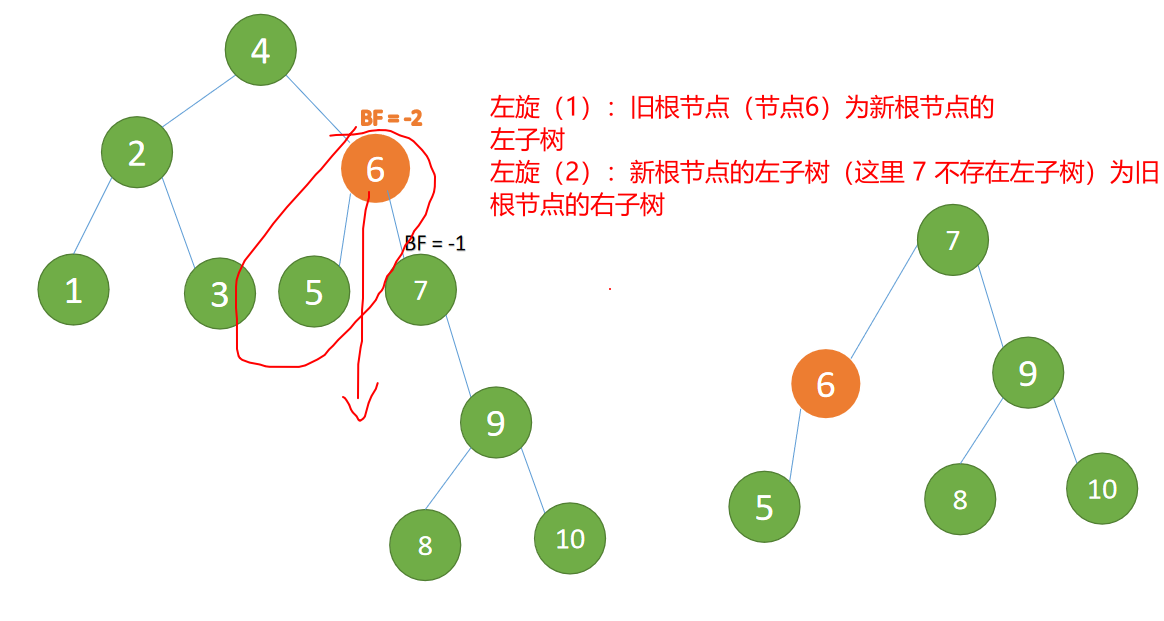
(4)插入 7 节点的时候 BF(5)=-2, BF(6)=-1 ,RR 型失衡,对最小不平衡树 进行「左旋」
左旋:
- 旧根节点(节点 5)为新根节点(节点 6)的左子树
- 新根节点的左子树(这里没有)为旧根节点的右子树
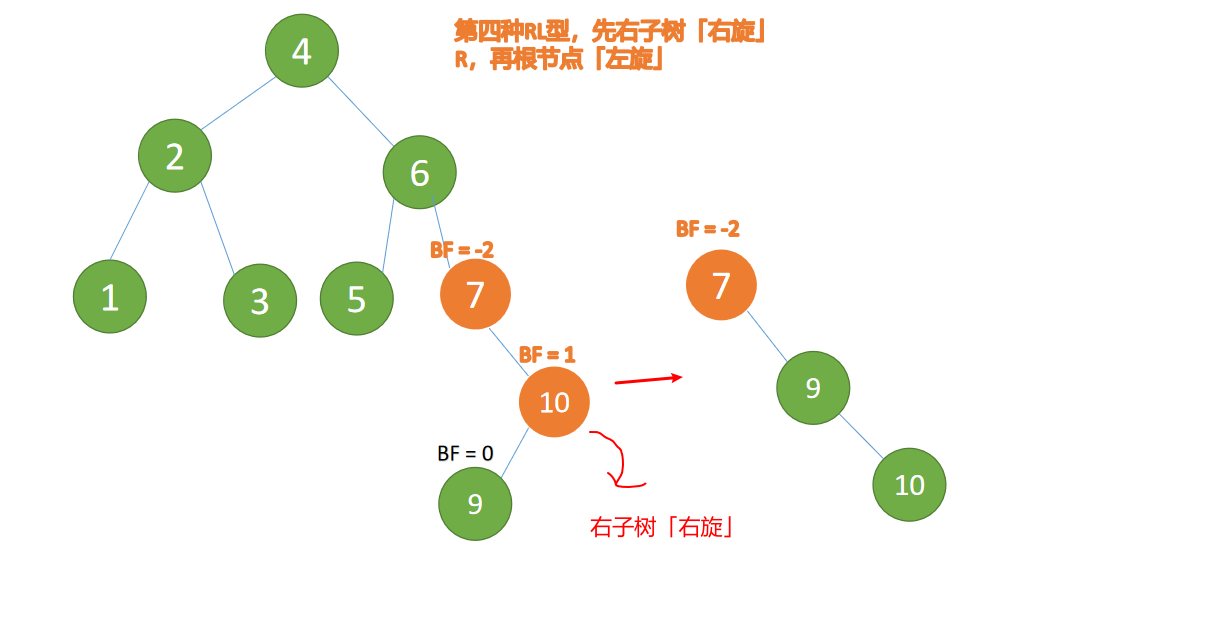
(5)依次插入 10 ,9 。插入 9 点的时候 BF(10) = 1,BF(7) = -2 ,RL 型失衡,对先「右旋」再「左旋」
右子树先「右旋」
最小不平衡子树的右子树
{10,9}先右旋:
- 旧根节点(节点 10)为新根节点(节点 9)的右子树
- 新根节点(节点 9)的右子树(这里没有右子树)为旧根节点的左子树
最小不平衡子树再左旋:
- 旧根节点(节点 7)为新根节点(节点 9)的左子树
- 新根节点(节点 9)的左子树(这里没有左子树)为旧根节点的右子树
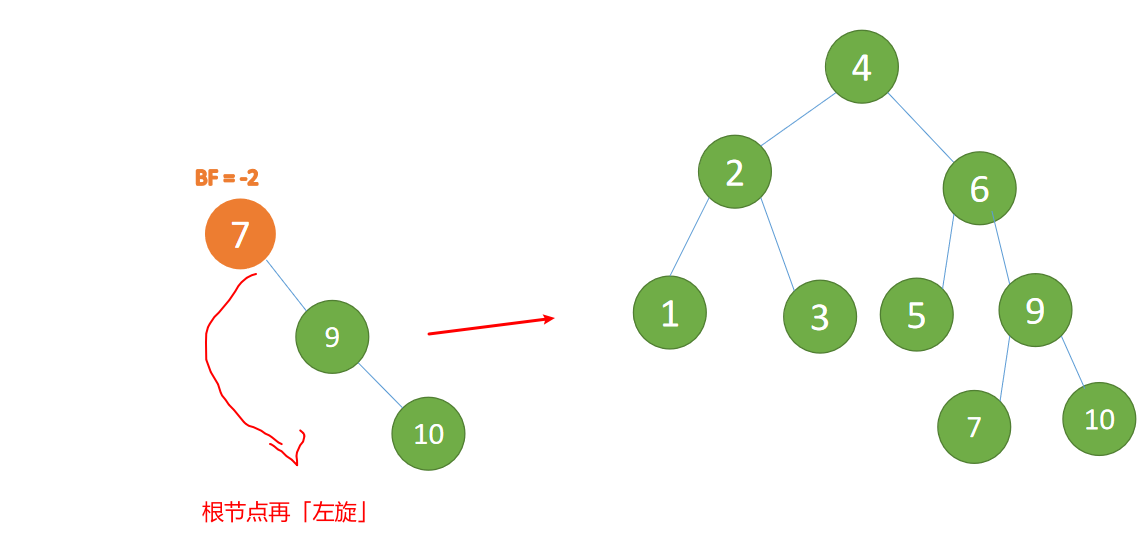
(6)最后插入节点 8 ,BF(6)=-2 BF(9)=1,RL 型失衡,先「右旋」再「左旋」
最小不平衡子树的右子树 {9,7,10,8} 先「右旋」
右旋:
- 旧根节点(节点 9
{9,10})为新根节点(节点 7)的右子树 - 新根节点(节点 7)的右子树(这里是 节点 8)为旧根节点(节点 9)的左子树
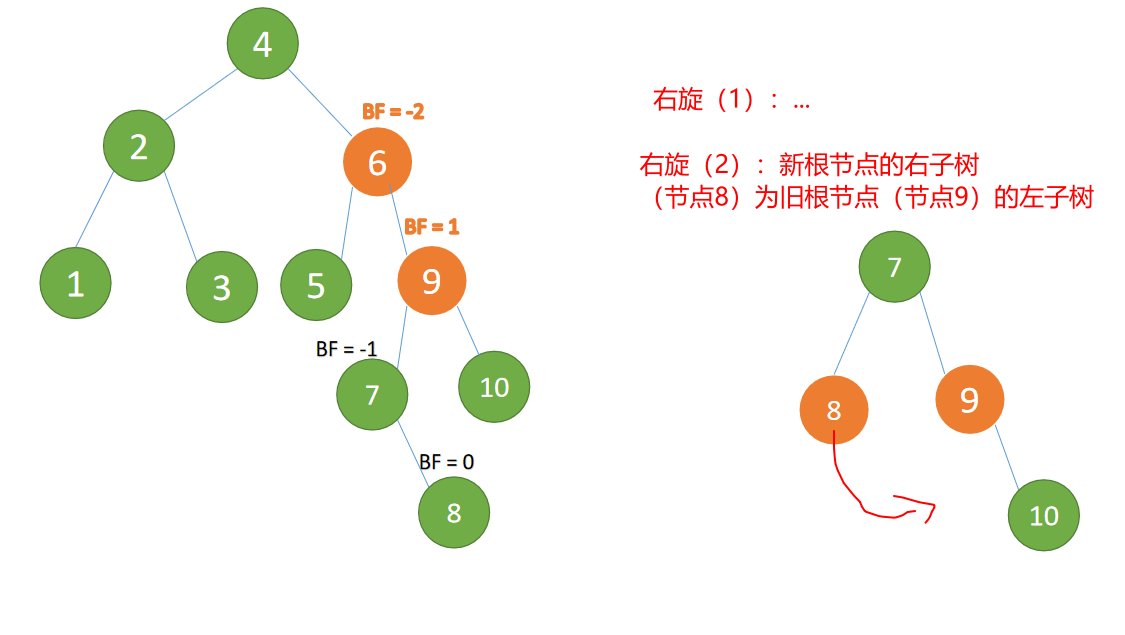
最小不平衡子树 {6,5,7,9,8,10} 再「左旋」
左旋:
- 旧根节点(节点 6
{6,5})为新根节点(节点 7)的左子树 - 新根节点的左子树(这里没有)为旧根节点的右子树
左旋结束
程序结束
6.代码实现
6.1 定义节点
public class AVLNode {

    /** 数据 **/
    public int data;
    /** 相对高度 **/
    public int height;
    /** 父节点 **/
    public AVLNode parent;
    /** 左子树 **/
    public AVLNode left;
    /** 右子树 **/
    public AVLNode right;
    public AVLNode(int data) {

        this.data = data;
        this.height = 1;
    }
}
6.2 计算高度
节点高度等于左子树和右子树最大高度 + 1
/** 通过子树高度 计算高度 **/
private int calcHeight(AVLNode root) {

    if (root.left == null && root.right == null) {

        return 1;
    }
    else if (root.right == null) {

        return root.left.height + 1;
    } else if (root.left == null) {

        return root.right.height + 1;
    }else {

        return root.left.height > root.right.height ? root.left.height + 1 : root.right.height + 1;
    }
}
6.3 计算 BF
BF(平衡因子)的值为:左子树高度 - 右子树高度
private int calcBF(AVLNode root) {

    if (root == null){

        return 0;
    }
    else if (root.left == null && root.right == null) {

        return 0;
    }
    else if (root.right == null) {

        return root.left.height ;
    } else if (root.left == null) {

        return - root.right.height;
    }else {

        return root.left.height - root.right.height;
    }
}
6.4 旋转
2 种「旋转」方式:
- 左旋
- 旧根节点为新根节点的左子树
- 新根节点的左子树(如果存在)为旧根节点的右子树
- 右旋:
- 旧根节点为新根节点的右子树
- 新根节点的右子树(如果存在)为旧根节点的左子树
重点理解:旋转之后通过需要刷新高度
高度变化只有: oldRoot 和 newRoot
但是它们子树的高度是不变的(这很关键)
我们可以通过它们 子树的高度计算他们的高度
使用不变的因数计算变化的因素是一个很好的思维
public AVLNode leftRotate(AVLNode root) {

    AVLNode oldRoot = root;
    AVLNode newRoot = root.right;
    AVLNode parent = root.parent;
    //1.newRoot 替换 oldRoot 位置
    if (null != parent ) {

        if (oldRoot.parent.data > oldRoot.data) {

            parent.left = newRoot;
        }else  {

            parent.right = newRoot;
        }
    }
    newRoot.parent = parent;
    //2.重新组装 oldRoot (将 newRoot 的左子树 给 oldRoot 的右子树)
    oldRoot.right = newRoot.left;
    if (newRoot.left != null) {

        newRoot.left.parent = oldRoot;
    }
    //3. oldRoot 为 newRoot 的左子树
    newRoot.left = oldRoot;
    oldRoot.parent = newRoot;
    //刷新高度
    oldRoot.height = calcHeight(oldRoot);
    newRoot.height = calcHeight(newRoot);
    return newRoot;
}


public AVLNode rightRotate(AVLNode root) {

    AVLNode oldRoot = root;
    AVLNode newRoot = root.left;
    AVLNode parent = root.parent;
    //1.newRoot 替换 oldRoot 位置
    if (null != parent ) {

        if (oldRoot.parent.data > oldRoot.data) {

            parent.left = newRoot;
        }else {

            parent.right = newRoot;
        }
    }
    newRoot.parent = parent;
    //2.重新组装 oldRoot (将 newRoot 的右子树 给 oldRoot 的左子树)
    oldRoot.left = newRoot.right;
    if (newRoot.right != null) {

        newRoot.right.parent = oldRoot;
    }
    //3. oldRoot 为 newRoot 的左子树
    newRoot.right = oldRoot;
    oldRoot.parent = newRoot;
    //刷新高度
    oldRoot.height = calcHeight(oldRoot);
    newRoot.height = calcHeight(newRoot);
    return newRoot;
}
6.5 插入(总代码)
插入操作
- 递归插入新节点
- 刷新高度
- 旋转并再次刷新高度
public class ALVTree {

    AVLNode root;
    public void insert(int data) {

        if (null == this.root) {

            this.root = new AVLNode(data);
            return;
        }
        this.root = insert(this.root, data);
    }
    public AVLNode insert(AVLNode root, int data) {

        //插入左子树
        if (data < root.data) {

            if (null == root.left) {

                root.left = new AVLNode(data);
                root.left.parent = root;
            }else {

                insert(root.left,data);
            }
        }
        //插入右子树
        else if (data > root.data) {

            if (null == root.right) {

                root.right = new AVLNode(data);
                root.right.parent = root;
            } else {

                insert(root.right,data);
            }
        }
        //刷新高度
        root.height = calcHeight(root);
        //旋转
        //1. LL 型 右旋转
        if (calcBF(root) == 2){

            //2. LR 型 先左旋转
            if (calcBF(root.left) == -1) {

                root.left = leftRotate(root.left);
            }
            root = rightRotate(root);
        }
        //3. RR型 左旋转
        if (calcBF(root) == -2){

            //4. RL 型 先右旋转
            if (calcBF(root.right)== 1) {

                root.right = rightRotate(root.right);
            }
            root = leftRotate(root);
        }

        return root;
    }
    public AVLNode leftRotate(AVLNode root) {

        AVLNode oldRoot = root;
        AVLNode newRoot = root.right;
        AVLNode parent = root.parent;
        //1.newRoot 替换 oldRoot 位置
        if (null != parent ) {

            if (oldRoot.parent.data > oldRoot.data) {

                parent.left = newRoot;
            }else  {

                parent.right = newRoot;
            }
        }
        newRoot.parent = parent;
        //2.重新组装 oldRoot (将 newRoot 的左子树 给 oldRoot 的右子树)
        oldRoot.right = newRoot.left;
        if (newRoot.left != null) {

            newRoot.left.parent = oldRoot;
        }
        //3. oldRoot 为 newRoot 的左子树
        newRoot.left = oldRoot;
        oldRoot.parent = newRoot;
        //刷新高度
        oldRoot.height = calcHeight(oldRoot);
        newRoot.height = calcHeight(newRoot);
        return newRoot;
    }


    public AVLNode rightRotate(AVLNode root) {

        AVLNode oldRoot = root;
        AVLNode newRoot = root.left;
        AVLNode parent = root.parent;
        //1.newRoot 替换 oldRoot 位置
        if (null != parent ) {

            if (oldRoot.parent.data > oldRoot.data) {

                parent.left = newRoot;
            }else {

                parent.right = newRoot;
            }
        }
        newRoot.parent = parent;
        //2.重新组装 oldRoot (将 newRoot 的右子树 给 oldRoot 的左子树)
        oldRoot.left = newRoot.right;
        if (newRoot.right != null) {

            newRoot.right.parent = oldRoot;
        }
        //3. oldRoot 为 newRoot 的左子树
        newRoot.right = oldRoot;
        oldRoot.parent = newRoot;
        //刷新高度
        oldRoot.height = calcHeight(oldRoot);
        newRoot.height = calcHeight(newRoot);
        return newRoot;
    }
    /** 通过子树高度 计算高度 **/
    private int calcHeight(AVLNode root) {

        if (root.left == null && root.right == null) {

            return 1;
        }
        else if (root.right == null) {

            return root.left.height + 1;
        } else if (root.left == null) {

            return root.right.height + 1;
        }else {

            return root.left.height > root.right.height ? root.left.height + 1 : root.right.height + 1;
        }
    }
    private int calcBF(AVLNode root) {

        if (root == null){

            return 0;
        }
        else if (root.left == null && root.right == null) {

            return 0;
        }
        else if (root.right == null) {

            return root.left.height ;
        } else if (root.left == null) {

            return - root.right.height;
        }else {

            return root.left.height - root.right.height;
        }
    }
}
测试
public static void main(String[] args) {

    ALVTree tree = new ALVTree();
    tree.insert(3);
    tree.insert(2);
    tree.insert(1);
    tree.insert(4);
    tree.insert(5);
    tree.insert(6);
    tree.insert(7);
    tree.insert(10);
    tree.insert(9);
    tree.insert(8);
    //遍历输出
    innerTraverse(tree.root);
}
private static void innerTraverse(AVLNode root) {

    if (root == null) {

        return;
    }
    innerTraverse(root.left);
    System.out.println(root.data + " height:"+root.height);
    innerTraverse(root.right);
}
输出
1 height:1
2 height:2
3 height:1
4 height:4
5 height:1
6 height:2
7 height:3
8 height:1
9 height:2
10 height:1
边栏推荐
- SSD technical features
- Introduction to the daily practice column of the Blue Bridge Cup
- FairyGUI循环列表
- 微信小程序开发心得
- 【干货】提升RTK模糊度固定率的建议之周跳探测
- (1) Introduction Guide to R language - the first step of data analysis
- (一)R语言入门指南——数据分析的第一步
- (core focus of software engineering review) Chapter V detailed design exercises
- Excel导入,导出功能实现
- 【GNSS数据处理】赫尔默特(helmert)方差分量估计解析及代码实现
猜你喜欢

Halcon knowledge: gray_ Tophat transform and bottom cap transform
FairyGUI人物状态弹窗

The master of double non planning left the real estate company and became a programmer with an annual salary of 25W. There are too many life choices at the age of 25
(4) Data visualization of R language -- matrix chart, histogram, pie chart, scatter chart, linear regression and strip chart
FairyGUI循環列錶
idea中好用的快捷键
Latex learning

RTKLIB: demo5 b34f.1 vs b33
Gravure sans fil Bluetooth sur micro - ordinateur à puce unique
Fairygui character status Popup
随机推荐
Mixed use of fairygui button dynamics
Devops' future: six trends in 2022 and beyond
(core focus of software engineering review) Chapter V detailed design exercises
Prove the time complexity of heap sorting
First use of dosbox
【干货】提升RTK模糊度固定率的建议之周跳探测
Office prompts that your license is not genuine pop-up box solution
idea中好用的快捷键
Combination of fairygui check box and progress bar
(4) Data visualization of R language -- matrix chart, histogram, pie chart, scatter chart, linear regression and strip chart
It has been solved by personal practice: MySQL row size too large (> 8126) Changing some columns to TEXT or BLOB or using ROW_ FORMAT
Solution to the problem of automatic login in Yanshan University Campus Network
Mysql database index
2021.11.10 compilation examination
CUDA C programming authoritative guide Grossman Chapter 4 global memory
Excel导入,导出功能实现
Force buckle 1189 Maximum number of "balloons"
Design and implementation of general interface open platform - (39) simple and crude implementation of API services
Unity3D,阿里云服务器,平台配置
(五)R语言入门生物信息学——ORF和序列分析