当前位置:网站首页>Deploy flask project based on LNMP
Deploy flask project based on LNMP
2022-07-06 17:25:00 【Tang Monk riding white horse】
About LNMP
LNMP A set of free software acronyms commonly used together to run a dynamic web site or server .L finger Linux,N finger Nginx,M Generally refer to MySQL, It can also refer to MariaDB,P Generally refer to PHP, It can also refer to Perl or Python.
One , install python
1、 install python Depend on the environment
[[email protected] ~]# yum -y install openssl-devel bzip2-devel expat-devel gdbm-devel readline-devel sqline-devel
2、 install python
[[email protected] ~]# cd /usr/local/
[[email protected] local]# wget https://www.python.org/ftp/python/3.6.6/Python-3.6.6.tgz
3、 decompression python3.6
[[email protected] local]#tar -zxvf Python-3.6.6.tgz
[[email protected] local]# cd Python-3.6.6
4、 Configure and compile python3.6
[[email protected] Python-3.6.6]# ./configure --prefix=/usr/local/pyhton3
[[email protected] Python-3.6.6]# make
[[email protected] Python-3.6.6]# make install
5、 establish python3 and pip3 The soft links
[[email protected] ~]# ln -s /usr/local/pyhton3/bin/python3.6 /usr/bin/python3
[[email protected] ~]# ln -s /usr/local/pyhton3/bin/pip3 /usr/bin/pip3
6、 start-up python, Check if the installation is successful
[[email protected] ~]# python3
Python 3.6.6 (default, Oct  9 2019, 17:06:57)
[GCC 4.8.5 20150623 (Red Hat 4.8.5-11)] on linux
Type "help", "copyright", "credits" or "license" for more information.
>>> exit()
7、 Check pip3 edition
[[email protected] ~]# pip3 -V
pip 10.0.1 from /usr/local/pyhton3/lib/python3.6/site-packages/pip (python 3.6)
python and pip3 After the installation is successful, as shown in the figure below 
Two 、 install mysql database (MariaDB database )
1、 In the installation mysql Adjust first yum And system python edition
[[email protected] bin]# vim yum
[[email protected] bin]# vim /usr/libexec/urlgrabber-ext-down

[[email protected] bin]# whereis python
python: /usr/bin/python /usr/bin/python2.7 /usr/lib/python2.7 /usr/lib64/python2.7 /etc/python /usr/include/python2.7 /usr/share/man/man1/python.1.gz
2、 install mysql database
[[email protected] bin]# yum -y install mariadb-server
3、 Start database service
[[email protected] bin]# systemctl start mariadb.service
4、 Set boot up
[[email protected] bin]# systemctl enable mariadb.service
Created symlink from /etc/systemd/system/multi-user.target.wants/mariadb.service to /usr/lib/systemd/system/mariadb.service.
5、 Set user name and password
[[email protected] bin]# mysqladmin -uroot password "root"
[[email protected] bin]# mysql -uroot -proot
6、 View the database encoding format
MariaDB [(none)]> \s
7、 Exit database
MariaDB [(none)]> \q
8、 Modify the database encoding format
[[email protected] bin]# vim /etc/my.cnf
add to character-set-server=utf8
9、 Restart the service
[[email protected] bin]# systemctl restart mariadb.service
10、 Check the database code again
MariaDB [(none)]> \s
As long as the corresponding coding format of the database is utf8 It's set up 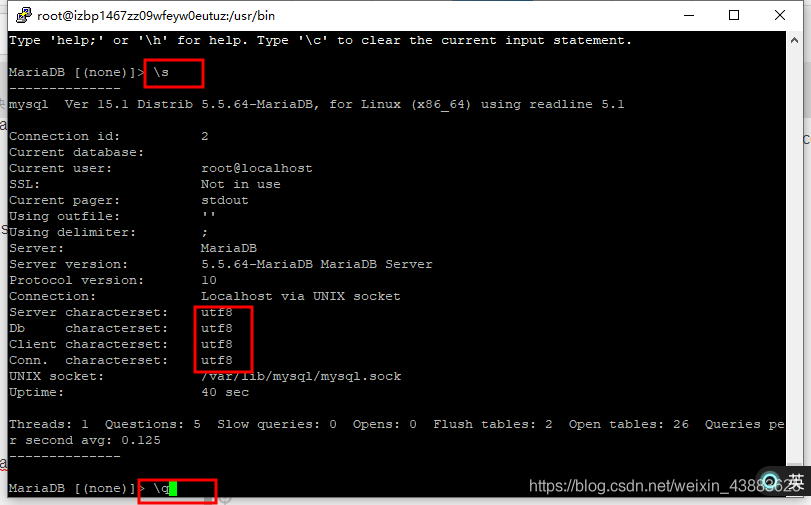
3、 ... and 、 install Nginx
1、 download Nginx
[[email protected] home]# wget http://nginx.org/download/nginx-1.13.7.tar.gz
2、 install Nginx Depend on the environment
[[email protected] ~]# yum -y install gcc gcc-c++ openssl-devel pcre-devel httpd-tools
3、 decompression Nginx
[[email protected] home]# tar -zxvf nginx-1.13.7.tar.gz
4、 add to Nginx
[[email protected] nginx-1.13.7]# useradd nginx
5、 To configure Nginx
[[email protected] nginx-1.13.7]# ./configure --prefix=/usr/local/nginx --user=nginx --group=nginx --with-http_ssl_module --with-http_mp4_module --with-http_flv_module
6、 compile Nginx
[[email protected] nginx-1.13.7]# make && make install
7、 establish Nginx Soft link
[[email protected] nginx-1.13.7]# ln -s /usr/local/nginx/sbin/nginx /usr/sbin/
8、 start-up Nginx
[[email protected] ~]# nginx
9、 see Nginx Service port
[[email protected] ~]# netstat -anptu | grep nginx
tcp        0      0 0.0.0.0:80              0.0.0.0:*               LISTEN      19810/nginx: master
[[email protected] ~]#
Four 、 Deploy flask project
Before uploading the project to the server, you need to flask Of app.debug = False Change the mode to False, Change the connection information of the database to Linux Connection information in the environment app.config["SQLALCHEMY_DATABASE_URI"] = "mysql+pymysql://root:[email protected]:3306/ Database name "
1、 Upload flask project , database sql file , The project's dependent environment ( The dependent environment of the project can be found in Pycharm In the interactive environment of freeze > req.txt Generate ) decompression flask After the project, enter the project directory to view the included files
If you use xshell You can use it directly rz Command can upload files or directories
[[email protected] movies]# ls
app  app.py  managa.py  nginx.conf  req.txt  venv
2、 install flask The project depends on the environment
[[email protected] home]# pip install -i http://pypi.douban.com/simple/ --trusted-host pypi.douban.com -r req.txt
3、 Enter the database and create a database for the project
MariaDB [(none)]> create database move;
Query OK, 1 row affected (0.01 sec)
4、 Using a database
MariaDB [(none)]> use move
Database changed
MariaDB [move]>
5、 Used to import the project sql file
MariaDB [move]> source /home/movie.sql
6、 Look at the data sheet
MariaDB [move]> show tables;
7、 decompression flask project
[[email protected] home]# tar -zxvf movies.tar.gz
8、 Copy items to /usr/local/nginx/html/
[[email protected] home]# cp -r movies /usr/local/nginx/html/
9、 View the contents of the project file
[[email protected] movies]# ls
app  app.py  managa.py  nginx.conf  req.txt  venv
10、 To configure nginx.conf file
[[email protected] movies]# vim nginx.conf
Enter the following
worker_processes 4;
events {

    worker_connections 262140;
}
http {

    include mime.types;
    default_type application/octet-stream;
    sendfile on;
    keepalive_timeout 65;
    limit_conn_zone $binary_remote_addr zone=addr:5m;
    upstream movies {

        server 127.0.0.1:5001;
        server 127.0.0.1:5002;
        server 127.0.0.1:5003;
        server 127.0.0.1:5004;
    }
    server {

        listen 80;
        server_name localhost;
        location / {

            root html;
            index index.html index.htm;
            proxy_pass http://movies;
        }
        location ~ \.flv$ {

            flv;
            limit_conn addr 4;
            limit_rate 1024k;
            rewrite ^/static/uploads/(.+?).flv$ /movies/app/static/uploads/$1.flv permanent;
        }
        location ~ \.mp4$ {

            mp4;
            limit_conn addr 4;
            limit_rate 1024k;
            rewrite ^/static/uploads/(.+?).mp4$ /movies/app/static/uploads/$1.mp4 permanent;
        }
        error_page 500 502 503 504 /50x.html;
        location = /50x.html {

            root html;
        }
    }
}
11、 Get into Nginx directory
[[email protected] movies]# cd ..
[[email protected] home]# ls
movies  movie.sql  movies.tar.gz  nginx  nginx-1.13.7  nginx-1.13.7.tar.gz  req.txt
12、 Copy the nginx.conf To /usr/local/nginx/conf/ Under the table of contents
[[email protected] home]# cp movies/nginx.conf /usr/local/nginx/conf/
cp: overwrite ‘/usr/local/nginx/conf/nginx.conf’? y
[[email protected] home]#
13、 stop it Nginx
[[email protected] home]# nginx -s stop
And then restart Nginx
[[email protected] home]# nginx
[[email protected] home]# netstat -anptu | grep nginx
14、 Get into /usr/local/nginx/html/movies/ Project directory under Directory
[[email protected] home]# cd /usr/local/nginx/html/movies/
[[email protected] movies]# ls
app  app.py  managa.py  req.txt  venv
15、 Start project
[[email protected] movies]# nohup python managa.py runserver -h 127.0.0.1 -p 5001 &
[1] 20238
[[email protected] movies]# nohup: ignoring input and appending output to ‘nohup.out’
16、 View started Nginx port
[[email protected] movies]# netstat -anptu | grep 500*
tcp        0      0 127.0.0.1:5001          0.0.0.0:*               LISTEN      20282/python3
tcp        0      0 127.0.0.1:5002          0.0.0.0:*               LISTEN      20285/python3
tcp        0      0 127.0.0.1:5003          0.0.0.0:*               LISTEN      20289/python3
[[email protected] movies]#
17、 Next, input the local ip You can access the address flask Project 
End of deployment
边栏推荐
- Install docker under windows10 (through Oracle VM VirtualBox)
- Introduction to spring trick of ByteDance: senior students, senior students, senior students, and the author "brocade bag"
- Flink 解析(六):Savepoints
- Interpretation of Flink source code (III): Interpretation of executiongraph source code
- Some feelings of brushing leetcode 300+ questions
- Activiti目录(五)驳回、重新发起、取消流程
- Yum install XXX reports an error
- 唯有学C不负众望 TOP3 Demo练习
- CentOS7上Redis安装
- Garbage first of JVM garbage collector
猜你喜欢

随机推荐
灵活报表v1.0(简单版)
On the clever use of stream and map
SQL tuning notes
Compile homework after class
JVM类加载子系统
Introduction to spring trick of ByteDance: senior students, senior students, senior students, and the author "brocade bag"
Activit零零碎碎要人命的坑
唯有学C不负众望 TOP2 p1变量
Flink 解析(三):内存管理
吴军三部曲见识(七) 商业的本质
SQL调优小记
Data transfer instruction
JVM 垃圾回收器之Serial SerialOld ParNew
[CISCN 2021 华南赛区]rsa Writeup
Flink 解析(四):恢复机制
Flink 解析(六):Savepoints
Idea breakpoint debugging skills, multiple dynamic diagram package teaching package meeting.
JS garbage collection mechanism and memory leakage
Flink源码解读(二):JobGraph源码解读
[reverse primary] Unique