当前位置:网站首页>Go redis initialization connection
Go redis initialization connection
2022-07-06 09:09:00 【~Pompeii】
Catalog
go-redis Initialize the connection
install
If you are using Redis 6, Please install go-redis/ v8:
go get github.com/go-redis/redis/v8
If you are using Redis 7, Please install go-redis/ v9( It's in the testing phase ):
go get github.com/go-redis/redis/v9
Connect to Redis The server
To connect to Redis The server :
import "github.com/go-redis/redis/v8"

rdb := redis.NewClient(&redis.Options{

	Addr:	  "localhost:6379",
	Password: "", // no password set
	DB:		  0,  // use default DB
})
Another popular method is to use connection strings :
opt, err := redis.ParseURL("redis://<user>:<pass>@localhost:6379/<db>")
if err != nil {

	panic(err)
}

rdb := redis.NewClient(opt)
Use TLS
To enable the TLS/SSL, You need to provide an empty tls.Config. If you are using a private certificate , You need to Specify to open in a new window They are tls.Config.
rdb := redis.NewClient(&redis.Options{

	TLSConfig: &tls.Config{

		MinVersion: tls.VersionTLS12,
		//Certificates: []tls.Certificate{cert}
	},
})
If you get x509: cannot validate certificate for xxx.xxx.xxx.xxx because it doesn't contain any IP SANs, Please try setting ServerName Options :
rdb := redis.NewClient(&redis.Options{

	TLSConfig: &tls.Config{

		MinVersion: tls.VersionTLS12,
		ServerName: "your.domain.com",
	},
})
adopt SSH
adopt SSH Channel connection :
sshConfig := &ssh.ClientConfig{

	User:			 "root",
	Auth:			 []ssh.AuthMethod{
    ssh.Password("password")},
	HostKeyCallback: ssh.InsecureIgnoreHostKey(),
	Timeout:		 15 * time.Second,
}

sshClient, err := ssh.Dial("tcp", "remoteIP:22", sshConfig)
if err != nil {

	panic(err)
}

rdb := redis.NewClient(&redis.Options{

	Addr: net.JoinHostPort("127.0.0.1", "6379"),
	Dialer: func(ctx context.Context, network, addr string) (net.Conn, error) {

		return sshClient.Dial(network, addr)
	},
	// Disable timeouts, because SSH does not support deadlines.
	ReadTimeout:  -1,
	WriteTimeout: -1,
})
dial tcp: i/o timeout
When go-redis Can't connect to Redis Server time , You will receive dial tcp: i/o timeout Error message , for example , When the server is down or the port is protected by a firewall . To check Redis Whether the server is listening on port , Please run go-redis Run on the client's host telnet command :
telnet localhost 6379
Trying 127.0.0.1...
telnet: Unable to connect to remote host: Connection refused
If you use Docker、Istio Or any other service grid /sidecar, Make sure the application starts after the container is fully available , for example , By configuring The health check opens in a new window Use Docker and holdApplicationUntilProxyStartsIstio.
Context
Every Redis Commands accept a context , You can use it to set Overtime Or spread some information , for example Tracking context .
ctx := context.Background()
Carry out orders
Carry out orders :
val, err := rdb.Get(ctx, "key").Result()
fmt.Println(val)
perhaps , You can save the command and access the values and errors respectively later :
get := rdb.Get(ctx, "key")
fmt.Println(get.Val(), get.Err())
Execute unsupported commands
To perform any / Custom command :
val, err := rdb.Do(ctx, "get", "key").Result()
if err != nil {

	if err == redis.Nil {

		fmt.Println("key does not exists")
		return
	}
	panic(err)
}
fmt.Println(val.(string))
Do Return to one Cmd Open... In a new window There are a bunch of assistants who can handle interface{} value :
// Text is a shortcut for get.Val().(string) with proper error handling.
val, err := rdb.Do(ctx, "get", "key").Text()
fmt.Println(val, err)
A complete list of assistants :
s, err := cmd.Text()
flag, err := cmd.Bool()

num, err := cmd.Int()
num, err := cmd.Int64()
num, err := cmd.Uint64()
num, err := cmd.Float32()
num, err := cmd.Float64()

ss, err := cmd.StringSlice()
ns, err := cmd.Int64Slice()
ns, err := cmd.Uint64Slice()
fs, err := cmd.Float32Slice()
fs, err := cmd.Float64Slice()
bs, err := cmd.BoolSlice()
redis.Nil
go-redis export redis.Nil Error and in Redis The server returns it when it responds (nil). You can use redis-cli Check Redis Response returned .
In the following example , We use redis.Nil To distinguish between empty string replies and nil reply (key non-existent ):
val, err := rdb.Get(ctx, "key").Result()
switch {

case err == redis.Nil:
	fmt.Println("key does not exist")
case err != nil:
	fmt.Println("Get failed", err)
case val == "":
	fmt.Println("value is empty")
}
GET for example , Not the only return nil Reply to the order ,BLPOP also ZSCORE Can return redis.Nil.
Conn
Conn Represents a single Redis Connect , Instead of connection pooling . Unless there is a special need for continuous single Redis Connect , Otherwise, it is preferred to run the command from the client .
cn := rdb.Conn(ctx)
defer cn.Close()

if err := cn.ClientSetName(ctx, "myclient").Err(); err != nil {

	panic(err)
}

name, err := cn.ClientGetName(ctx).Result()
if err != nil {

	panic(err)
}
fmt.Println("client name", name)
redis colony
go-redis Bring their own Redis Cluster The client opens in a new window . below ,redis.ClusterClient be used for redis.Client Communicate with each node in the cluster . Every one of them redis.Client Maintain a separate connection pool .
To connect to Redis colony :
import "github.com/go-redis/redis/v8"

rdb := redis.NewClusterClient(&redis.ClusterOptions{

    Addrs: []string{
    ":7000", ":7001", ":7002", ":7003", ":7004", ":7005"},

    // To route commands by latency or randomly, enable one of the following.
    //RouteByLatency: true,
    //RouteRandomly: true,
})
Iterative fragmentation :
err := rdb.ForEachShard(ctx, func(ctx context.Context, shard *redis.Client) error {

    return shard.Ping(ctx).Err()
})
if err != nil {

    panic(err)
}
To iterate over the master node , Please use ForEachMaster. To traverse the slave node , Please use ForEachSlave.
To change the options for some tiles :
rdb := redis.NewClusterClient(&redis.ClusterOptions{

    NewClient: func(opt *redis.Options) *redis.NewClient {

        user, pass := userPassForAddr(opt.Addr)
        opt.Username = user
        opt.Password = pass

        return redis.NewClient(opt)
    },
})
redis sentry
Redis Server client
Connect to by Redis Sentinel Managed Redis The server opens in a new window :
import "github.com/go-redis/redis/v8"

rdb := redis.NewFailoverClient(&redis.FailoverOptions{

    MasterName:    "master-name",
    SentinelAddrs: []string{
    ":9126", ":9127", ":9128"},
})
from v8 Start , You can use experiments NewFailoverClusterClient Route read-only commands to slave nodes :
import "github.com/go-redis/redis/v8"

rdb := redis.NewFailoverClusterClient(&redis.FailoverOptions{

    MasterName:    "master-name",
    SentinelAddrs: []string{
    ":9126", ":9127", ":9128"},

    // To route commands by latency or randomly, enable one of the following.
    //RouteByLatency: true,
    //RouteRandomly: true,
})
Redis Sentinel client
To connect to Redis Sentinel In itself :
import "github.com/go-redis/redis/v8"

sentinel := redis.NewSentinelClient(&redis.Options{

    Addr: ":9126",
})

addr, err := sentinel.GetMasterAddrByName(ctx, "master-name").Result()
redis Ring
Introduce
Ring It's a Redis client , It uses consistent hashes in multiple Redis The server ( Fragmentation ) Distribute keys between . Multiple goroutine Concurrent use is safe .
Ring Monitor the status of each fragment and delete the dead fragment from the ring . When a slice goes online , It will be added back to the loop . This achieves maximum availability and partition fault tolerance , But there is no consistency between different partitions or even clients . Each client uses shards available to the client , And do not coordinate with other clients when the partition state changes .
When you need more Redis When the server caches and can tolerate the loss of data when one of the servers crashes , You should use Ring. Otherwise you should use Redis Cluster or Redis Server.
Quick start
Create a containing 3 Piece by piece Ring colony :
import "github.com/go-redis/redis/v8"

rdb := redis.NewRing(&redis.RingOptions{

    Addrs: map[string]string{

        "shard1": ":7000",
        "shard2": ":7001",
        "shard3": ":7002",
    },
})
Then the client can use it as usual :
if err := rdb.Set(ctx, "foo", "bar", 0).Err(); err != nil {

    panic(err)
}
Iterative fragmentation :
err := rdb.ForEachShard(ctx, func(ctx context.Context, shard *redis.Client) error {

    return shard.Ping(ctx).Err()
})
if err != nil {

    panic(err)
}
Each slice option
To change the slice connection options :
rdb := redis.NewRing(&redis.RingOptions{

    NewClient: func(opt *redis.Options) *redis.NewClient {

        user, pass := userPassForAddr(opt.Addr)
        opt.Username = user
        opt.Password = pass

        return redis.NewClient(opt)
    },
})
Key distribution
By default ,Ring Use Rendezvous Open... In a new window Hash to distribute keys on multiple slices . But you can change the default consistent hash implementation :
import "github.com/golang/groupcache/consistenthash"

ring := redis.NewRing(&redis.RingOptions{

    NewConsistentHash: func() {

        return consistenthash.New(100, crc32.ChecksumIEEE)
    },
})
Redis Universal client
UniversalClient Is an abstract client , Based on the options provided , representative a ClusterClient、 aFailoverClient or single-node Client. This is useful for testing cluster specific applications locally or having different clients in different environments .
NewUniversalClient Return a new multi client . The type of client returned depends on the following conditions :
- If this option is specified , Then return to
MasterNameSentinel support .FailoverClient - If the quantity
Addrsby 2 Or more ,ClusterClientThen return to a. - otherwise , Returns a single node
Client.
// rdb is *redis.Client.
rdb := NewUniversalClient(&redis.UniversalOptions{

    Addrs: []string{
    ":6379"},
})

// rdb is *redis.ClusterClient.
rdb := NewUniversalClient(&redis.UniversalOptions{

    Addrs: []string{
    ":6379", ":6380"},
})

// rdb is *redis.FailoverClient.
rdb := NewUniversalClient(&redis.UniversalOptions{

    Addrs: []string{
    ":6379"},
    MasterName: "mymaster",
})
Golang Redis The Conduit 、WATCH And transaction
Use pipes to accelerate Redis
Redis Pipelines allow you to use a single client - The server - The client executes multiple commands back and forth to improve performance . You can route commands in a pipeline , Then use a single write like a single command + Read operations execute queued commands , Instead of executing one by one 100 An order .
To use a single write + Read operation executes multiple commands :
pipe := rdb.Pipeline()

incr := pipe.Incr(ctx, "pipeline_counter")
pipe.Expire(ctx, "pipeline_counter", time.Hour)

cmds, err := pipe.Exec(ctx)
if err != nil {

	panic(err)
}

// The value is available only after Exec is called.
fmt.Println(incr.Val())
perhaps , You can use Pipelinedwhich call :Exec
var incr *redis.IntCmd

cmds, err := rdb.Pipelined(ctx, func(pipe redis.Pipeliner) error {

	incr = pipe.Incr(ctx, "pipelined_counter")
	pipe.Expire(ctx, "pipelined_counter", time.Hour)
	return nil
})
if err != nil {

	panic(err)
}

// The value is available only after the pipeline is executed.
fmt.Println(incr.Val())
The pipeline also returns the executed command , So you can traverse them to retrieve the results :
cmds, err := rdb.Pipelined(ctx, func(pipe redis.Pipeliner) error {

	for i := 0; i < 100; i++ {

		pipe.Get(ctx, fmt.Sprintf("key%d", i))
	}
	return nil
})
if err != nil {

	panic(err)
}

for _, cmd := range cmds {

    fmt.Println(cmd.(*redis.StringCmd).Val())
}
Transactions and Watch
Use Redis The transaction opens in a new window , You can observe key changes and execute the pipeline only if the observed key has not been changed by another client . This method of conflict resolution is also known as Optimistic locking
WATCH mykey

val = GET mykey
val = val + 1

MULTI
SET mykey $val
EXEC
TxPipelined You can use and Package with MULTI and EXEC Command pipeline TxPipeline, But it is not very useful in itself :
cmds, err := rdb.TxPipelined(ctx, func(pipe redis.Pipeliner) error {

	for i := 0; i < 100; i++ {

		pipe.Get(ctx, fmt.Sprintf("key%d", i))
	}
	return nil
})
if err != nil {

	panic(err)
}

// MULTI
// GET key0
// GET key1
// ...
// GET key99
// EXEC
contrary , You should use Watch Transaction processing pipeline Open... In a new window , for example , We can correctly realize INCR Open... In a new window Use GET,SET and WATCH The order of Please note how we use redis.TxFailedErr To check whether the transaction failed .
// Redis transactions use optimistic locking.
const maxRetries = 1000

// Increment transactionally increments the key using GET and SET commands.
func increment(key string) error {

	// Transactional function.
	txf := func(tx *redis.Tx) error {

		// Get the current value or zero.
		n, err := tx.Get(ctx, key).Int()
		if err != nil && err != redis.Nil {

			return err
		}

		// Actual operation (local in optimistic lock).
		n++

		// Operation is commited only if the watched keys remain unchanged.
		_, err = tx.TxPipelined(ctx, func(pipe redis.Pipeliner) error {

			pipe.Set(ctx, key, n, 0)
			return nil
		})
		return err
	}

    // Retry if the key has been changed.
	for i := 0; i < maxRetries; i++ {

		err := rdb.Watch(ctx, txf, key)
		if err == nil {

			// Success.
			return nil
		}
		if err == redis.TxFailedErr {

			// Optimistic lock lost. Retry.
			continue
		}
		// Return any other error.
		return err
	}

	return errors.New("increment reached maximum number of retries")
}
Redis Publish subscribe
go-redis Allow publishing messages and subscribing to channels . When a network error occurs , It will also automatically reconnect to Redis Server.
To publish a message :
err := rdb.Publish(ctx, "mychannel1", "payload").Err()
if err != nil {

	panic(err)
}
Subscribed Channels :
// There is no error because go-redis automatically reconnects on error.
pubsub := rdb.Subscribe(ctx, "mychannel1")

// Close the subscription when we are done.
defer pubsub.Close()
To receive messages :
for {

	msg, err := pubsub.ReceiveMessage(ctx)
	if err != nil {

		panic(err)
	}

	fmt.Println(msg.Channel, msg.Payload)
}
But the easiest way is to use the Go channel :
ch := pubsub.Channel()

for msg := range ch {

	fmt.Println(msg.Channel, msg.Payload)
}
边栏推荐
- [Hacker News Weekly] data visualization artifact; Top 10 Web hacker technologies; Postman supports grpc
- Leetcode: Jianzhi offer 03 Duplicate numbers in array
- Advance Computer Network Review(1)——FatTree
- LeetCode:387. 字符串中的第一个唯一字符
- Selenium+Pytest自动化测试框架实战(下)
- Compétences en mémoire des graphiques UML
- UML diagram memory skills
- The carousel component of ant design calls prev and next methods in TS (typescript) environment
- IJCAI2022论文合集(持续更新中)
- Leetcode: Jianzhi offer 04 Search in two-dimensional array
猜你喜欢
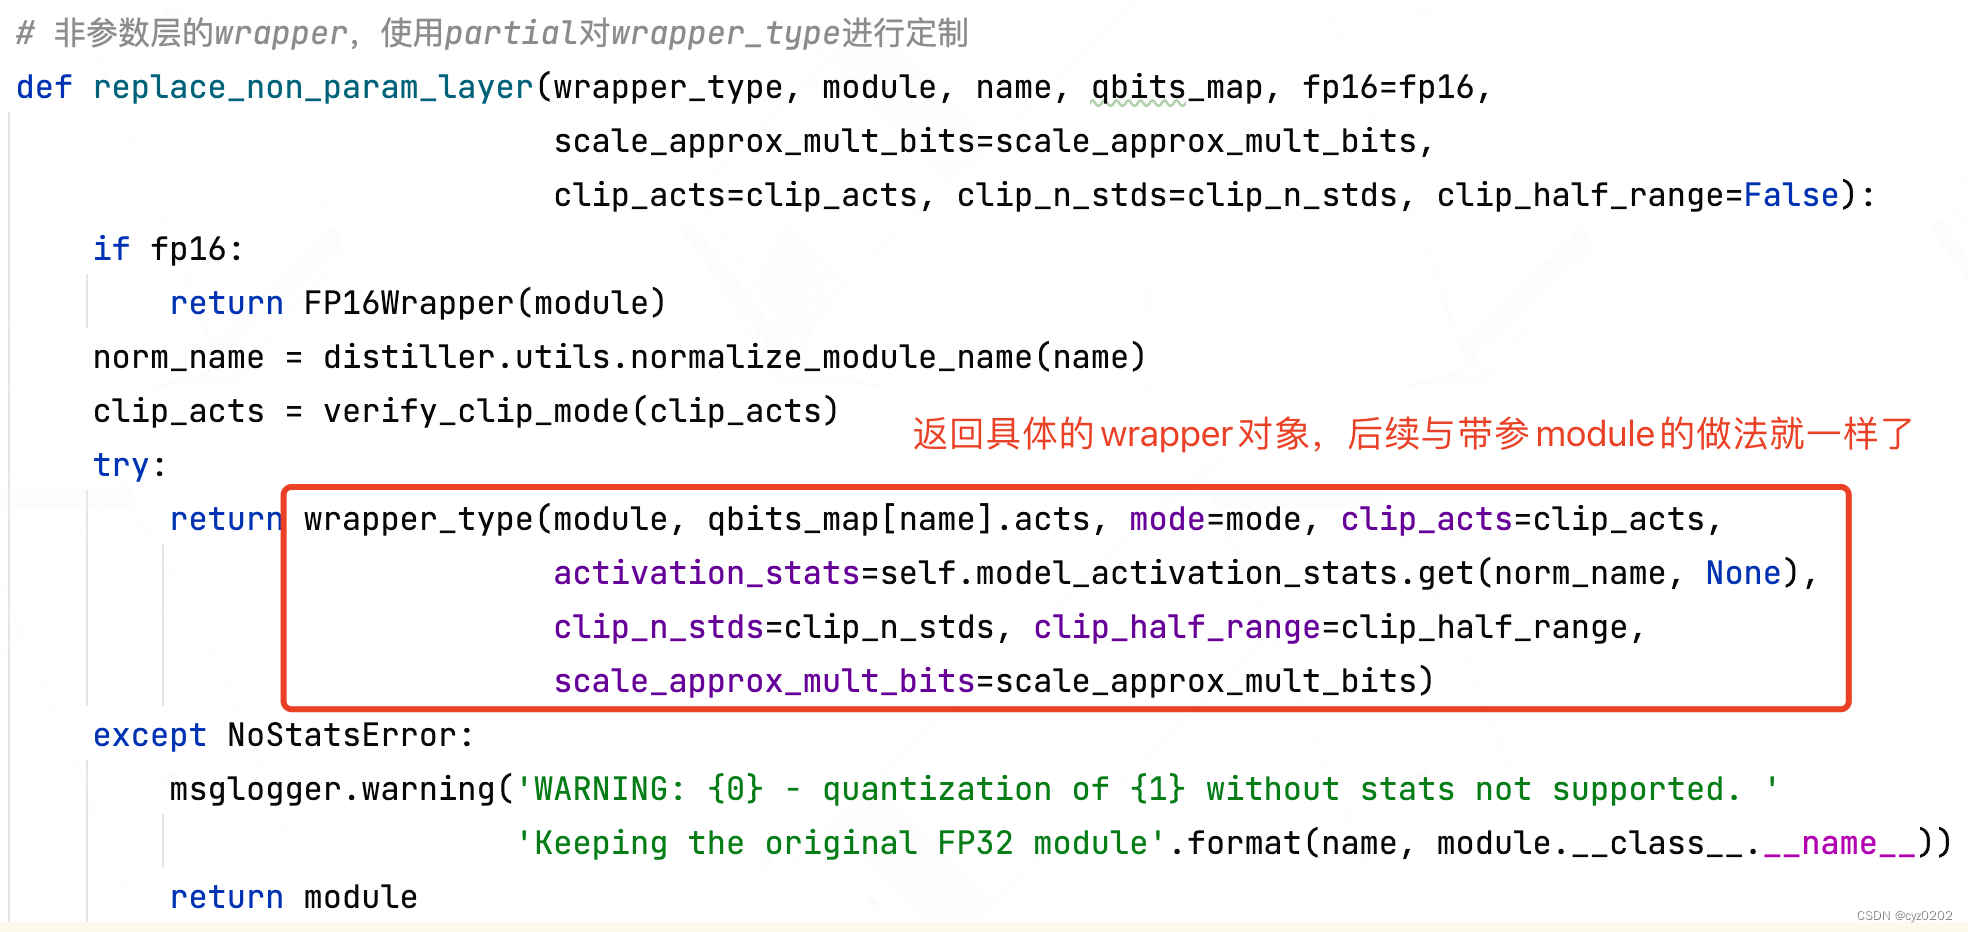
Intel Distiller工具包-量化实现2

UML圖記憶技巧
Intel distiller Toolkit - Quantitative implementation 2
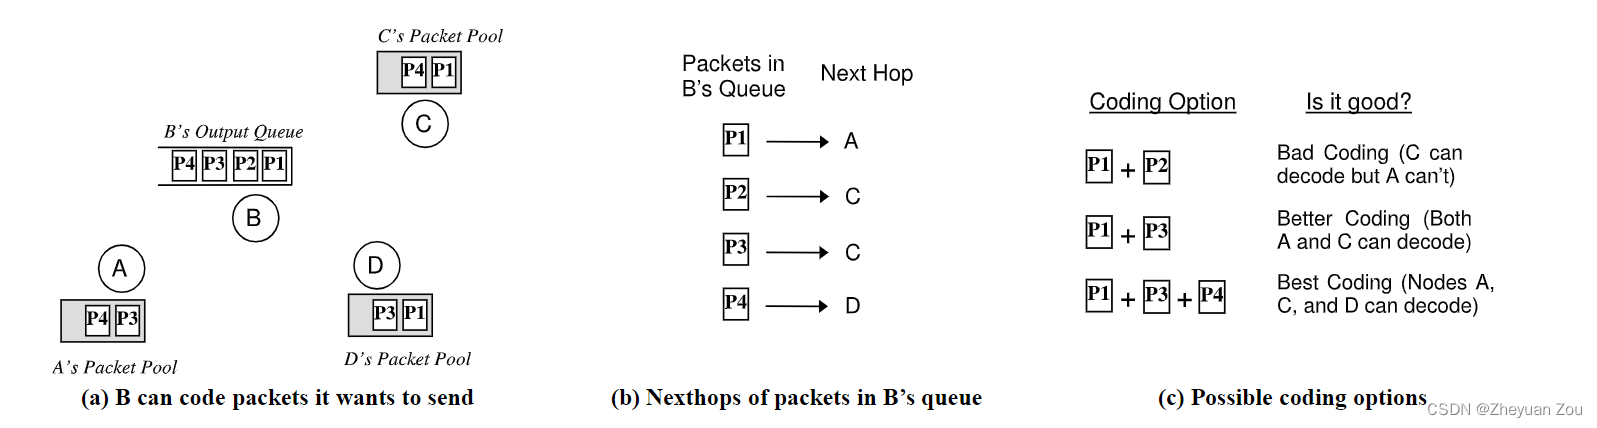
Advanced Computer Network Review(5)——COPE
数学建模2004B题(输电问题)
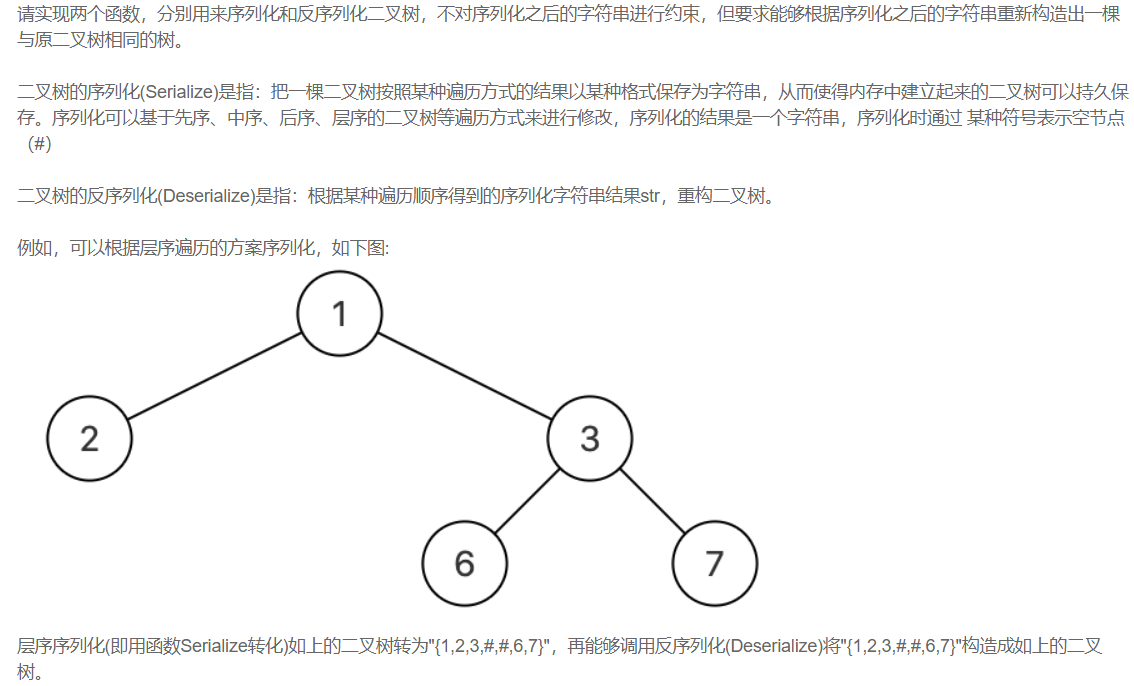
【剑指offer】序列化二叉树
![[MySQL] multi table query](/img/eb/9d54df9a5c6aef44e35c7a63b286a6.jpg)
[MySQL] multi table query

Pytest parameterization some tips you don't know / pytest you don't know
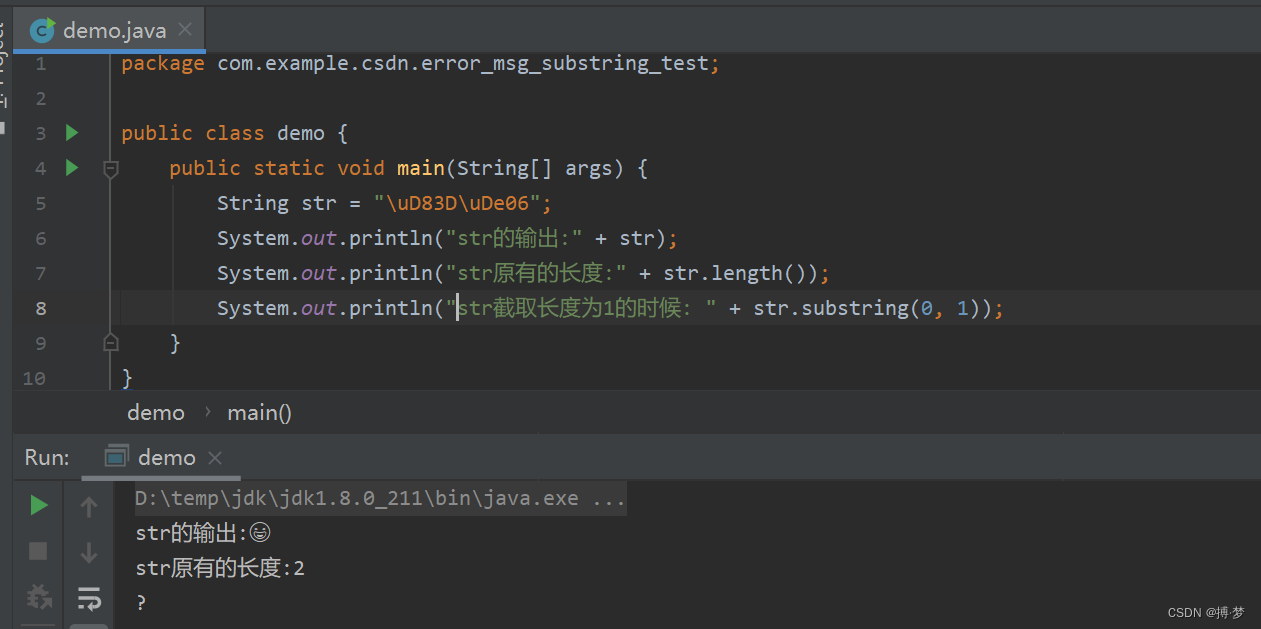
How to intercept the string correctly (for example, intercepting the stock in operation by applying the error information)
![[oc foundation framework] - < copy object copy >](/img/62/c04eb2736c2184d8826271781ac7e3.png)
[oc foundation framework] - < copy object copy >
随机推荐
一改测试步骤代码就全写 为什么不试试用 Yaml实现数据驱动?
Ijcai2022 collection of papers (continuously updated)
LeetCode:673. Number of longest increasing subsequences
自定义卷积注意力算子的CUDA实现
Selenium+pytest automated test framework practice
Pytest参数化你不知道的一些使用技巧 /你不知道的pytest
Advanced Computer Network Review(3)——BBR
Computer graduation design PHP Zhiduo online learning platform
vb. Net changes with the window, scales the size of the control and maintains its relative position
LeetCode:836. 矩形重叠
[OC]-<UI入门>--常用控件的学习
LeetCode:41. 缺失的第一个正数
Mongodb installation and basic operation
LeetCode41——First Missing Positive——hashing in place & swap
LeetCode:836. Rectangle overlap
LeetCode:214. Shortest palindrome string
Intel Distiller工具包-量化实现1
Alibaba cloud server mining virus solution (practiced)
Advanced Computer Network Review(5)——COPE
Pytest之收集用例规则与运行指定用例