当前位置:网站首页>Apache DolphinScheduler源码分析(超详细)
Apache DolphinScheduler源码分析(超详细)
2022-07-06 06:33:00 【杨林伟】
文章目录
01 引言
Apache DolphinScheduler官方文档地址:https://dolphinscheduler.apache.org/zh-cn/index.html
Apache DolphinScheduler是一个分布式去中心化,易扩展的可视化DAG工作流任务调度平台。致力于解决数据处理流程中错综复杂的依赖关系,使调度系统在数据处理流程中开箱即用。
其原理图如下: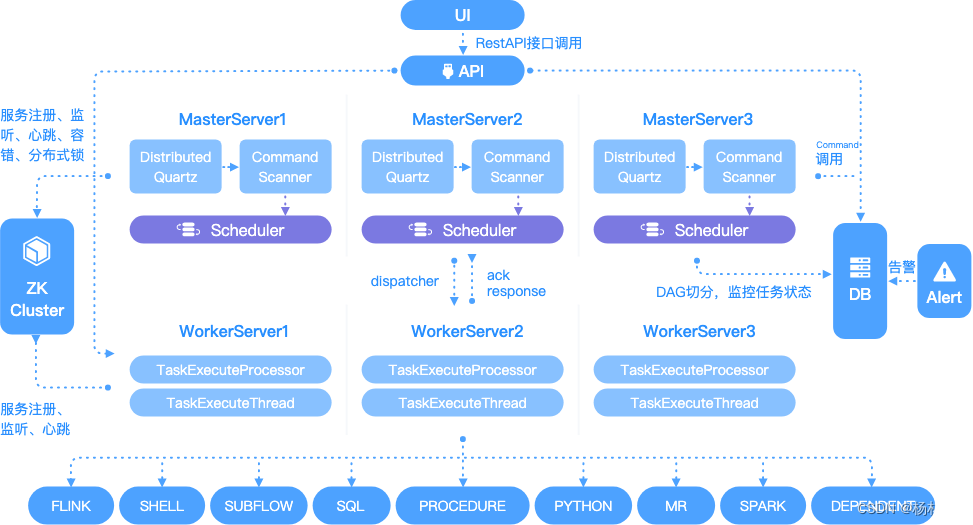
接下来,本文一步一步详细地讲解其源码。
02 DolphinScheduler 项目结构
2.1 结构分析
首先使用IDEA从Github clone项目到本地,项目地址:https://github.com/apache/dolphinscheduler
导入项目后,可以看到其主要核心模块如下:
| 模块 | 描述 |
|---|---|
| dolphinscheduler-alert | 告警模块,提供 AlertServer 服务。 |
| dolphinscheduler-api | web应用模块,提供 ApiServer 服务。 |
| dolphinscheduler-common | 通用的常量枚举、工具类、数据结构或者基类 |
| dolphinscheduler-dao | 提供数据库访问等操作。 |
| dolphinscheduler-remote | 基于 netty 的客户端、服务端 |
| dolphinscheduler-server | MasterServer 和 WorkerServer 服务 |
| dolphinscheduler-service | service模块,包含Quartz、Zookeeper、日志客户端访问服务,便于server模块和api模块调用 |
| dolphinscheduler-ui | 前端模块 |
2.2 表分析
在项目/dolphinscheduler-dao/src/main/resources/sql/create/release-1.0.0_schema/mysql目录下,有数据库初始化脚本dolphinscheduler_ddl.sql及dolphinscheduler_dml.sql脚本以及一些升级脚本:
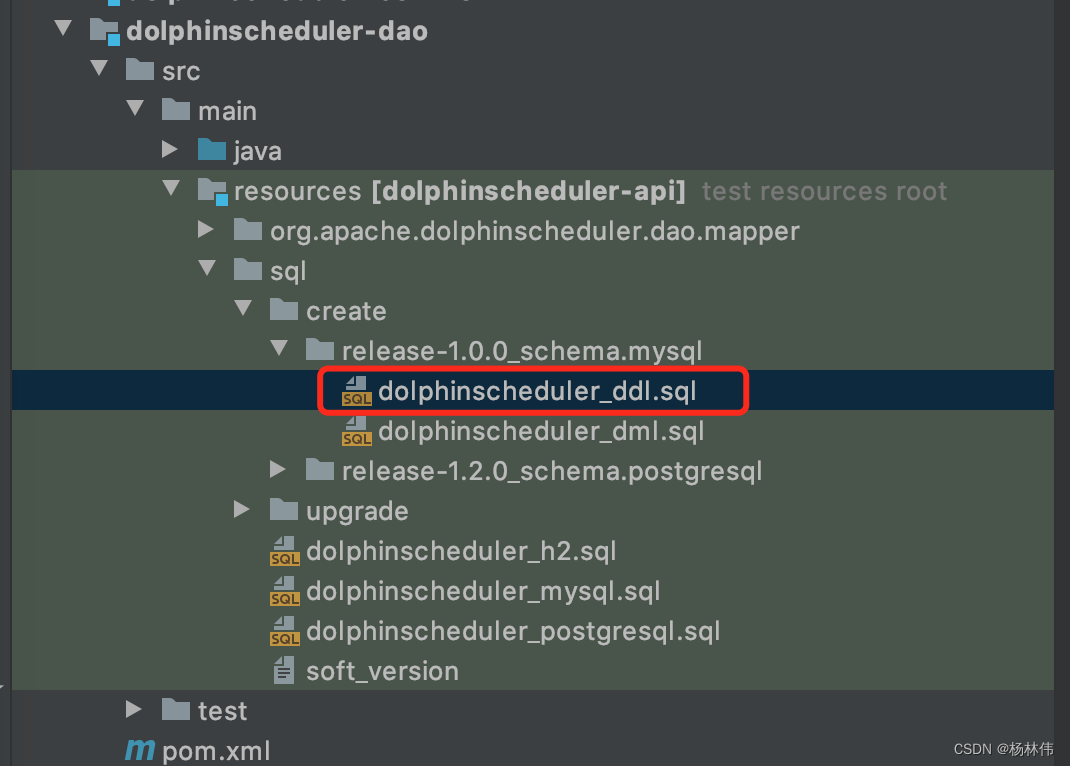
执行完后,可以在数据库里看到有如下表:
| 表名 | 表信息 |
|---|---|
| t_ds_access_token | 访问ds后端的token |
| t_ds_alert | 告警信息 |
| t_ds_alertgroup | 告警组 |
| t_ds_command | 执行命令 |
| t_ds_datasource | 数据源 |
| t_ds_error_command(核心表) | 错误命令 |
| t_ds_process_definition(核心表) | 流程定义 |
| t_ds_process_instance(核心表) | 流程实例 |
| t_ds_project | 项目 |
| t_ds_queue | 队列 |
| t_ds_relation_datasource_user | 用户关联数据源 |
| t_ds_relation_process_instance | 子流程 |
| t_ds_relation_project_user | 用户关联项目 |
| t_ds_relation_resources_user | 用户关联资源 |
| t_ds_relation_udfs_user | 用户关联UDF函数 |
| t_ds_relation_user_alertgroup | 用户关联告警组 |
| t_ds_resources | 资源文件 |
| t_ds_schedules(核心表) | 流程定时调度 |
| t_ds_session | 用户登录的session |
| t_ds_task_instance(核心表) | 任务实例 |
| t_ds_tenant | 租户 |
| t_ds_udfs | UDF资源 |
| t_ds_user | 用户 |
| t_ds_version | ds版本信息 |
核心表可以直接看文末附录。
2.2.1 类关系图 (用户/队列/数据源)
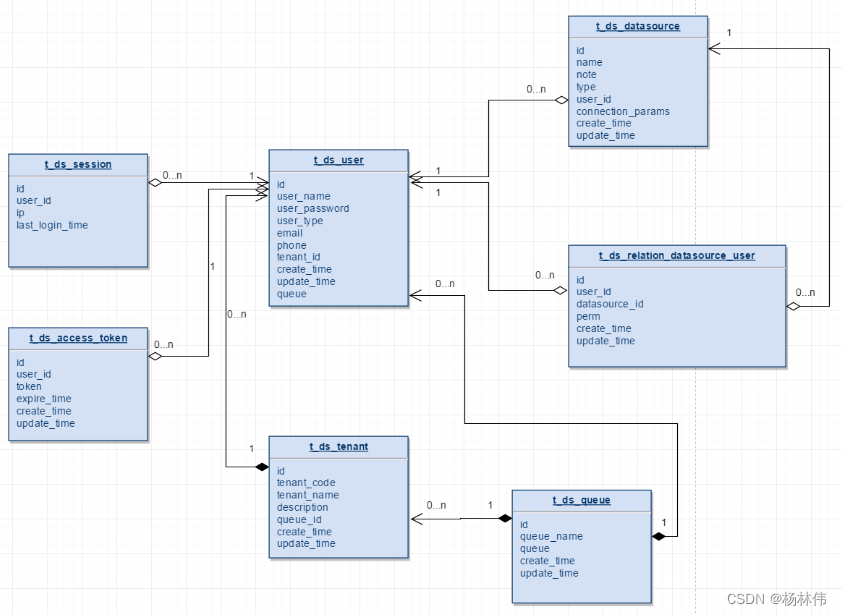
描述如下:
- 一个租户下可以有多个用户;
t_ds_user中的queue字段存储的是队列表中的queue_name信息;t_ds_tenant下存的是queue_id,在流程定义执行过程中,用户队列优先级最高,用户队列为空则采用租户队列;t_ds_datasource表中的user_id字段表示创建该数据源的用户;t_ds_relation_datasource_user中的user_id表示,对数据源有权限的用户。
2.2.2 类关系图 (项目/资源/告警)
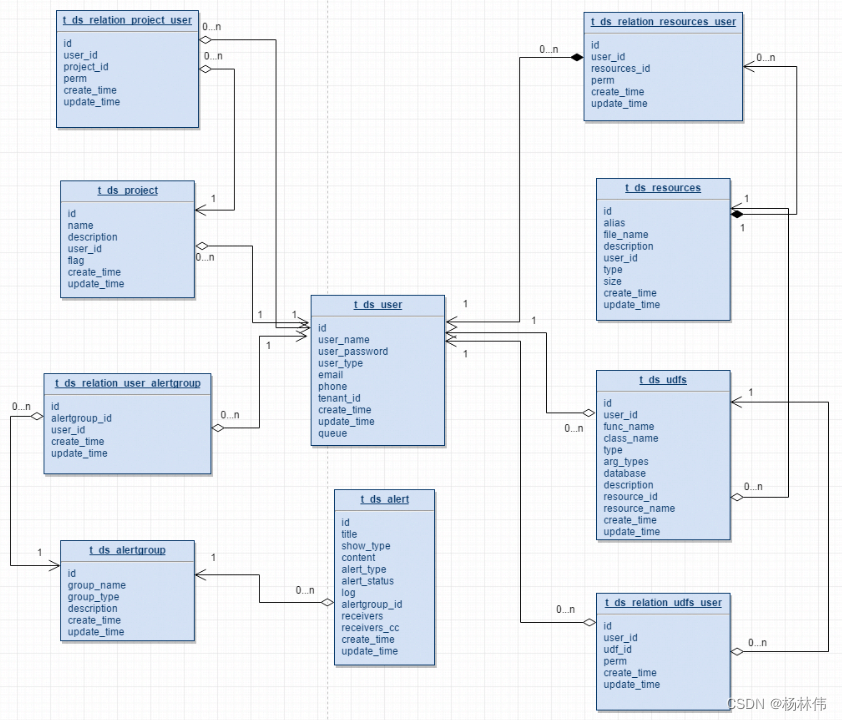
描述如下:
- 一个用户可以有多个项目,用户项目授权通过t_ds_relation_project_user表完成project_id和user_id的关系绑定;
- t_ds_projcet表中的user_id表示创建该项目的用户;
- t_ds_relation_project_user表中的user_id表示对项目有权限的用户;
- t_ds_resources表中的user_id表示创建该资源的用户;
- t_ds_relation_resources_user中的user_id表示对资源有权限的用户;
- t_ds_udfs表中的user_id表示创建该UDF的用户;
- t_ds_relation_udfs_user表中的user_id表示对UDF有权限的用户。
2.2.3 类关系图 ( 命令/流程/任务)
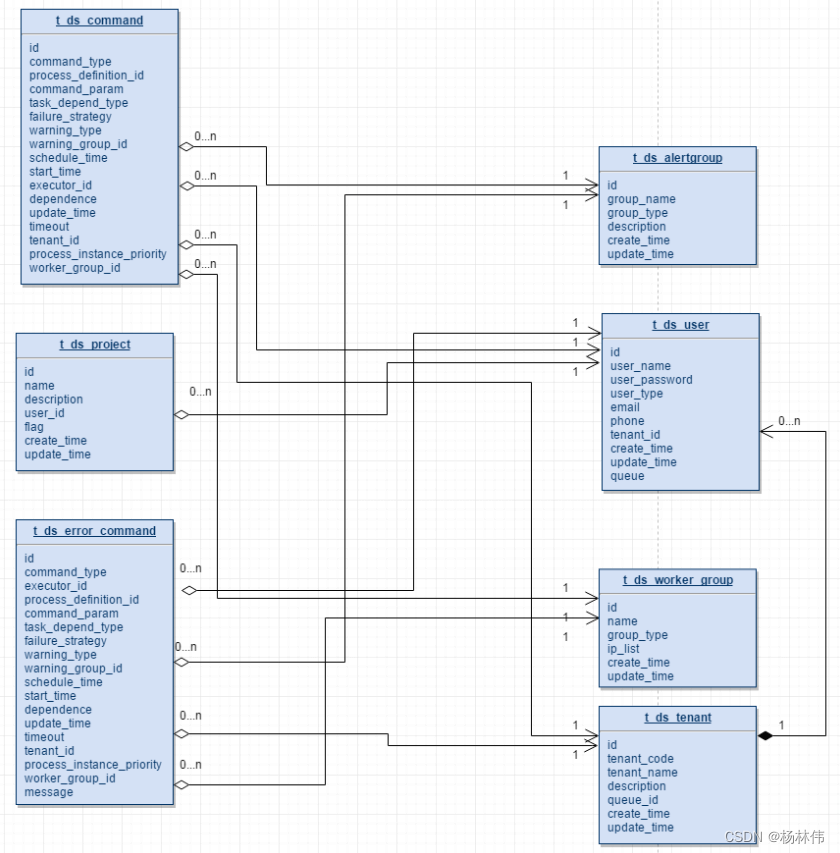
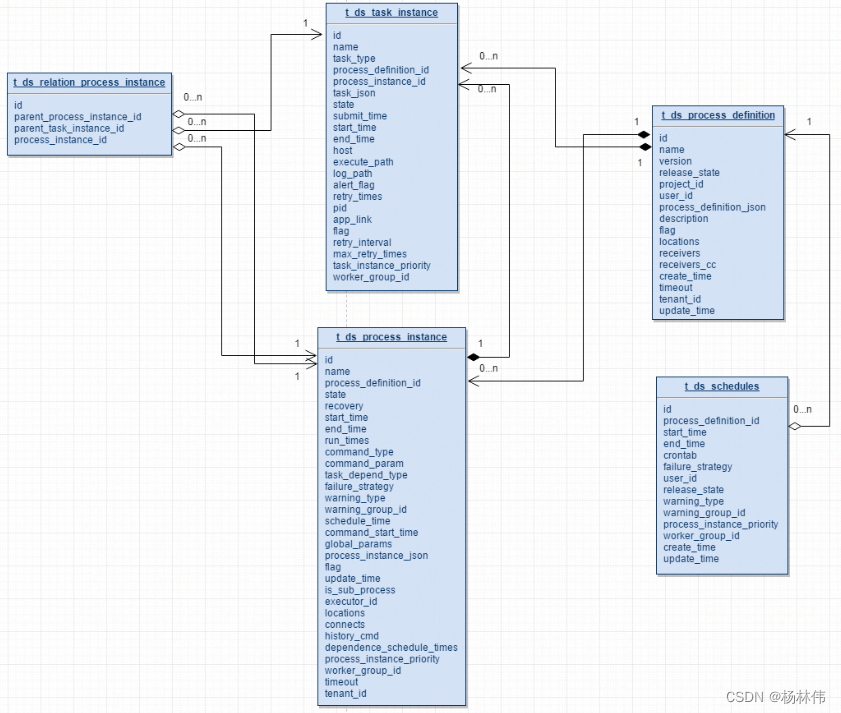
描述如下:
- 一个项目有多个流程定义,一个流程定义可以生成多个流程实例,一个流程实例可以生成多个任务实例;
- t_ds_schedulers表存放流程定义的定时调度信息;
- t_ds_relation_process_instance表存放的数据用于处理流程定义中含有子流程的情况,parent_process_instance_id表示含有子流程的主流程实例id,process_instance_id表示子流程实例的id,parent_task_instance_id表示子流程节点的任务实例id,流程实例表和任务实例表分别对应t_ds_process_instance表和t_ds_task_instance表
03 DolphinScheduler 源码分析
讲解源码前,先贴一份官网的启动流程图: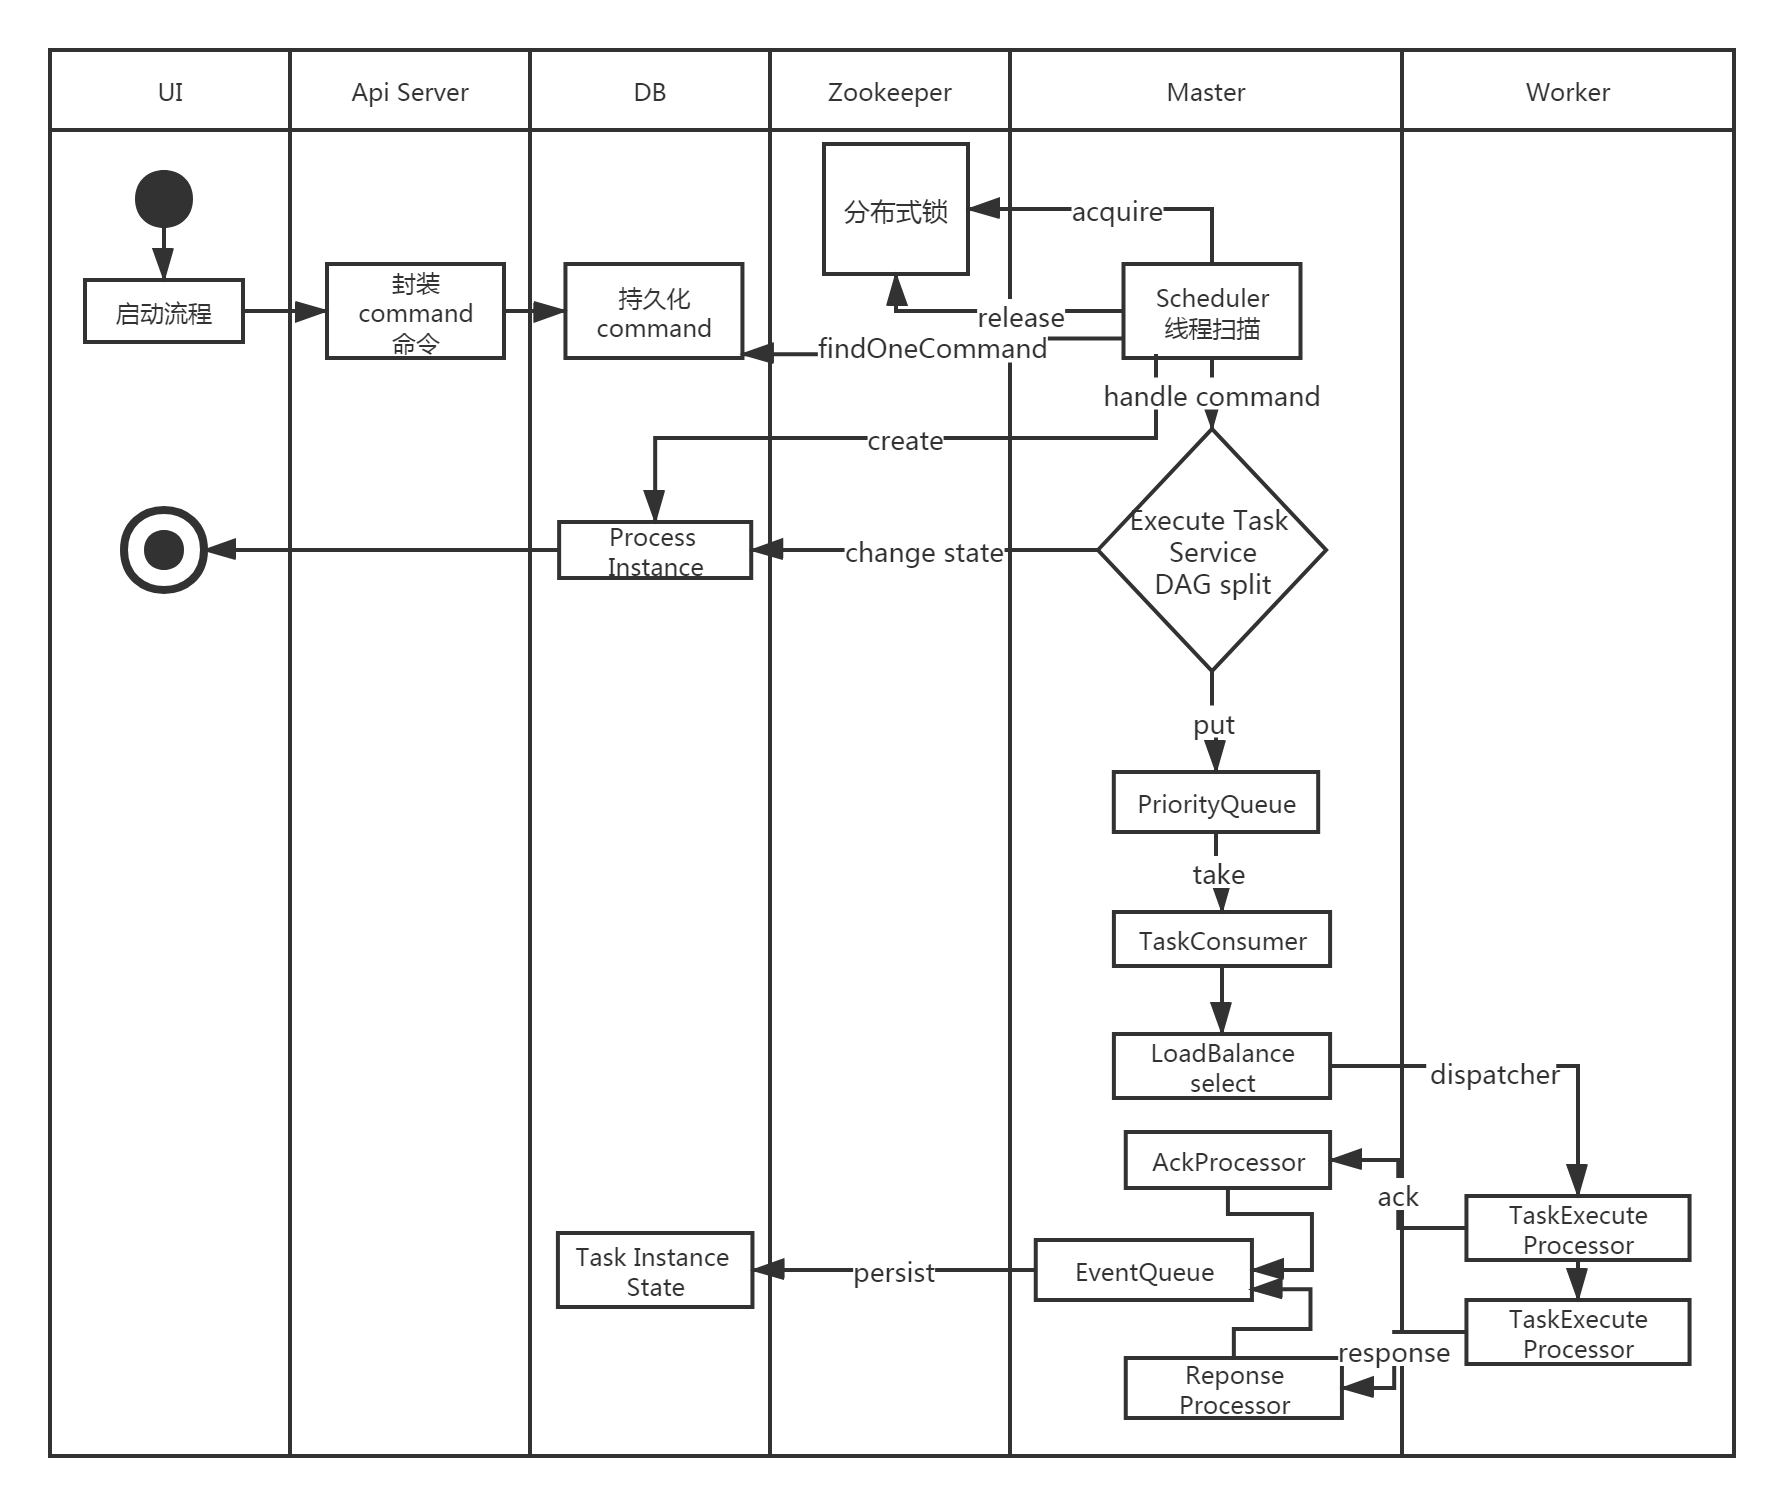
3.1 ExecutorController
根据上述的流程图,可以看到,我们在UI层点击“启动按钮”后,会访问dophinscheduler-api目录的Api Server服务,会进入到ExecutorController(完整类路径:org.apache.dolphinscheduler.api.controller.ExecutorController),下面看看ExecutorController提供了哪些接口方法?

以下是对各接口的描述:
| 接口 | 描述 |
|---|---|
| /start-process-instance | 执行流程实例 |
| /batch-start-process-instance | 批量执行流程实例 |
| /execute | 操作流程实例,如:暂停, 停止, 重跑, 从暂停恢复,从停止恢复 |
| /batch-execute | 批量操作流程实例 |
| /start-check | 检查流程定义或检查所有的子流程定义是否在线 |
接下我们看看最核心的execute方法:
 /** * do action to process instance: pause, stop, repeat, recover from pause, recover from stop * * @param loginUser login user * @param projectCode project code * @param processInstanceId process instance id * @param executeType execute type * @return execute result code */
    @ApiOperation(value = "execute", notes = "EXECUTE_ACTION_TO_PROCESS_INSTANCE_NOTES")
    @ApiImplicitParams({

            @ApiImplicitParam(name = "processInstanceId", value = "PROCESS_INSTANCE_ID", required = true, dataType = "Int", example = "100"),
            @ApiImplicitParam(name = "executeType", value = "EXECUTE_TYPE", required = true, dataType = "ExecuteType")
    })
    @PostMapping(value = "/execute")
    @ResponseStatus(HttpStatus.OK)
    @ApiException(EXECUTE_PROCESS_INSTANCE_ERROR)
    @AccessLogAnnotation(ignoreRequestArgs = "loginUser")
    public Result execute(@ApiIgnore @RequestAttribute(value = Constants.SESSION_USER) User loginUser,
                          @ApiParam(name = "projectCode", value = "PROJECT_CODE", required = true) @PathVariable long projectCode,
                          @RequestParam("processInstanceId") Integer processInstanceId,
                          @RequestParam("executeType") ExecuteType executeType
    ) {

        Map<String, Object> result = execService.execute(loginUser, projectCode, processInstanceId, executeType);
        return returnDataList(result);
    }
可以看到execute接口,是直接使用ExecService去执行了,下面分析下。
3.2 ExecService
下面看看里面的execute方法,已经加好了注释:
/** * 操作工作流实例 * * @param loginUser 登录用户 * @param projectCode 项目编码 * @param processInstanceId 流程实例ID * @param executeType 执行类型(repeat running、resume pause、resume failure、stop、pause) * @return 执行结果 */
@Override
public Map<String, Object> execute(User loginUser, long projectCode, Integer processInstanceId, ExecuteType executeType) {


    /*** 查询项目信息 **/
    Project project = projectMapper.queryByCode(projectCode);
    //check user access for project

    /*** 判断当前用户是否有操作权限 **/
    Map<String, Object> result = projectService.checkProjectAndAuth(loginUser, project, projectCode, ApiFuncIdentificationConstant.map.get(executeType));
    if (result.get(Constants.STATUS) != Status.SUCCESS) {

        return result;
    }

    /*** 检查Master节点是否存在 **/
    if (!checkMasterExists(result)) {

        return result;
    }

    /*** 查询工作流实例详情 **/
    ProcessInstance processInstance = processService.findProcessInstanceDetailById(processInstanceId);
    if (processInstance == null) {

        putMsg(result, Status.PROCESS_INSTANCE_NOT_EXIST, processInstanceId);
        return result;
    }

    /*** 根据工作流实例绑定的流程定义ID查询流程定义 **/
    ProcessDefinition processDefinition = processService.findProcessDefinition(processInstance.getProcessDefinitionCode(),
            processInstance.getProcessDefinitionVersion());
    if (executeType != ExecuteType.STOP && executeType != ExecuteType.PAUSE) {

        /*** 校验工作流定义能否执行(工作流是否存在?是否上线状态?存在子工作流定义不是上线状态?) **/
        result = checkProcessDefinitionValid(projectCode, processDefinition, processInstance.getProcessDefinitionCode(), processInstance.getProcessDefinitionVersion());
        if (result.get(Constants.STATUS) != Status.SUCCESS) {

            return result;
        }
    }

    /*** 根据当前工作流实例的状态判断能否执行对应executeType类型的操作 **/
    result = checkExecuteType(processInstance, executeType);
    if (result.get(Constants.STATUS) != Status.SUCCESS) {

        return result;
    }

    /*** 判断是否已经选择了合适的租户 **/
    if (!checkTenantSuitable(processDefinition)) {

        logger.error("there is not any valid tenant for the process definition: id:{},name:{}, ",
                processDefinition.getId(), processDefinition.getName());
        putMsg(result, Status.TENANT_NOT_SUITABLE);
    }

    /*** 在executeType为重跑的状态下,获取用户指定的启动参数 **/
    Map<String, Object> commandMap = JSONUtils.parseObject(processInstance.getCommandParam(), new TypeReference<Map<String, Object>>() {

    });
    String startParams = null;
    if (MapUtils.isNotEmpty(commandMap) && executeType == ExecuteType.REPEAT_RUNNING) {

        Object startParamsJson = commandMap.get(Constants.CMD_PARAM_START_PARAMS);
        if (startParamsJson != null) {

            startParams = startParamsJson.toString();
        }
    }

    /*** 根据不同的ExecuteType去执行相应的操作 **/
    switch (executeType) {

        case REPEAT_RUNNING: // 重跑
            result = insertCommand(loginUser, processInstanceId, processDefinition.getCode(), processDefinition.getVersion(), CommandType.REPEAT_RUNNING, startParams);
            break;
        case RECOVER_SUSPENDED_PROCESS: // 恢复挂载的工作流
            result = insertCommand(loginUser, processInstanceId, processDefinition.getCode(), processDefinition.getVersion(), CommandType.RECOVER_SUSPENDED_PROCESS, startParams);
            break;
        case START_FAILURE_TASK_PROCESS: // 启动失败的工作流
            result = insertCommand(loginUser, processInstanceId, processDefinition.getCode(), processDefinition.getVersion(), CommandType.START_FAILURE_TASK_PROCESS, startParams);
            break;
        case STOP: // 停止
            if (processInstance.getState() == ExecutionStatus.READY_STOP) {

                putMsg(result, Status.PROCESS_INSTANCE_ALREADY_CHANGED, processInstance.getName(), processInstance.getState());
            } else {

                result = updateProcessInstancePrepare(processInstance, CommandType.STOP, ExecutionStatus.READY_STOP);
            }
            break;
        case PAUSE: // 暂停
            if (processInstance.getState() == ExecutionStatus.READY_PAUSE) {

                putMsg(result, Status.PROCESS_INSTANCE_ALREADY_CHANGED, processInstance.getName(), processInstance.getState());
            } else {

                result = updateProcessInstancePrepare(processInstance, CommandType.PAUSE, ExecutionStatus.READY_PAUSE);
            }
            break;
        default:
            logger.error("unknown execute type : {}", executeType);
            putMsg(result, Status.REQUEST_PARAMS_NOT_VALID_ERROR, "unknown execute type");

            break;
    }
    return result;
}
可以看到,以上代码前半部分主要是做了校验的操作,后半部分是根据执行类型来做不同的操作,操作主要分为两部分:insertCommand以及updateProcessInstancePrepare。
3.2.1 insertCommand
方法代码如下,其实主要就是把生成命令并插入t_ds_command(执行命令表),插入已经添加好注释:
/** * 插入命令(re run, recovery (pause / failure) execution) * * @param loginUser 登录用户 * @param instanceId 工作流实例id * @param processDefinitionCode 工作流定义id * @param processVersion 工作流版本 * @param commandType 命令类型 * @return 操作结果 */
private Map<String, Object> insertCommand(User loginUser, Integer instanceId, long processDefinitionCode, int processVersion, CommandType commandType, String startParams) {

    Map<String, Object> result = new HashMap<>();

    /*** 封装启动参数 **/
    Map<String, Object> cmdParam = new HashMap<>();
    cmdParam.put(CMD_PARAM_RECOVER_PROCESS_ID_STRING, instanceId);
    if (!StringUtils.isEmpty(startParams)) {

        cmdParam.put(CMD_PARAM_START_PARAMS, startParams);
    }

    Command command = new Command();
    command.setCommandType(commandType);
    command.setProcessDefinitionCode(processDefinitionCode);
    command.setCommandParam(JSONUtils.toJsonString(cmdParam));
    command.setExecutorId(loginUser.getId());
    command.setProcessDefinitionVersion(processVersion);
    command.setProcessInstanceId(instanceId);

    /*** 判断工作流实例是否正在执行 **/
    if (!processService.verifyIsNeedCreateCommand(command)) {

        putMsg(result, Status.PROCESS_INSTANCE_EXECUTING_COMMAND, String.valueOf(processDefinitionCode));
        return result;
    }

    /*** 保存命令 **/
    int create = processService.createCommand(command);

    if (create > 0) {

        putMsg(result, Status.SUCCESS);
    } else {

        putMsg(result, Status.EXECUTE_PROCESS_INSTANCE_ERROR);
    }

    return result;
}
3.2.2 updateProcessInstancePrepare
方法代码如下,已经添加注释
/** * 准备更新工作流实例的命令类型和状态 * * @param processInstance 工作流实例 * @param commandType 命令类型 * @param executionStatus 执行状态 * @return 更新结果 */
private Map<String, Object> updateProcessInstancePrepare(ProcessInstance processInstance, CommandType commandType, ExecutionStatus executionStatus) {

    Map<String, Object> result = new HashMap<>();

    processInstance.setCommandType(commandType);
    processInstance.addHistoryCmd(commandType);
    processInstance.setState(executionStatus);
    int update = processService.updateProcessInstance(processInstance);

    // 判断流程是否正常
    if (update > 0) {

        StateEventChangeCommand stateEventChangeCommand = new StateEventChangeCommand(
                processInstance.getId(), 0, processInstance.getState(), processInstance.getId(), 0
        );
        Host host = new Host(processInstance.getHost());
        stateEventCallbackService.sendResult(host, stateEventChangeCommand.convert2Command());
        putMsg(result, Status.SUCCESS);
    } else {

        putMsg(result, Status.EXECUTE_PROCESS_INSTANCE_ERROR);
    }
    return result;
}
根据流程图,我们可以看到了已经执行了如下红框的代码,也就是把我们的command已经缓存到了DB。接下来需要看看Master的代码。
3.3 MasterServer
MasterSerer在项目/dolphinscheduler-dev/dolphinscheduler-master/src/main/java/org/apache/dolphinscheduler/server/master/MasterServer.java目录。它对应的是架构图的这一块: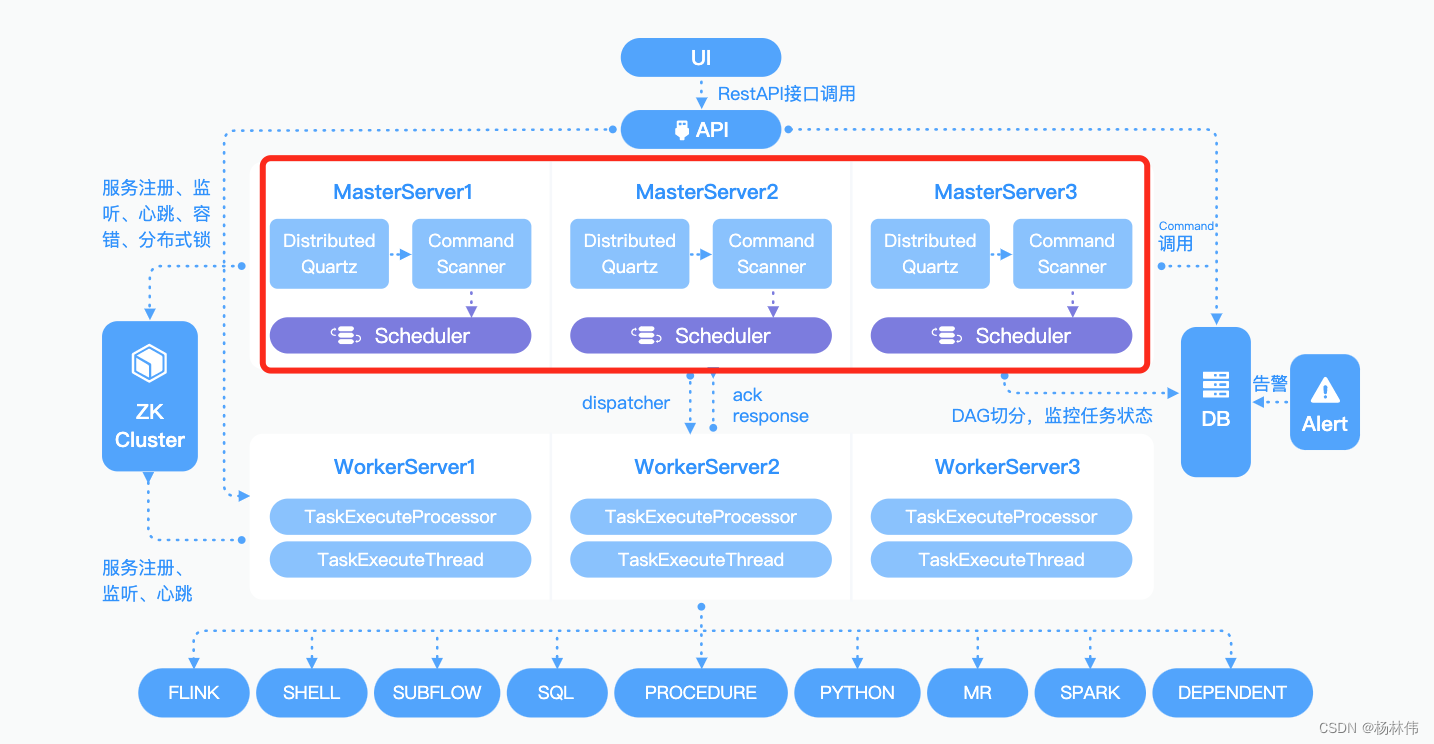
代码及注释如下:
@SpringBootApplication
@ComponentScan("org.apache.dolphinscheduler")
@EnableTransactionManagement
@EnableCaching
public class MasterServer implements IStoppable {

    private static final Logger logger = LoggerFactory.getLogger(MasterServer.class);

    @Autowired
    private SpringApplicationContext springApplicationContext;

    @Autowired
    private MasterRegistryClient masterRegistryClient;

    @Autowired
    private TaskPluginManager taskPluginManager;

    @Autowired
    private MasterSchedulerService masterSchedulerService;

    @Autowired
    private SchedulerApi schedulerApi;

    @Autowired
    private EventExecuteService eventExecuteService;

    @Autowired
    private FailoverExecuteThread failoverExecuteThread;

    @Autowired
    private MasterRPCServer masterRPCServer;

    public static void main(String[] args) {

        Thread.currentThread().setName(Constants.THREAD_NAME_MASTER_SERVER);
        SpringApplication.run(MasterServer.class);
    }

    /** * 启动 master server */
    @PostConstruct
    public void run() throws SchedulerException {


        // 初始化 RPC服务
        this.masterRPCServer.start();

        //安装任务插件
        this.taskPluginManager.installPlugin();

        /*** MasterServer 注册客户端,用于连接到注册表并传递注册表事件。 * 当主节点启动时,它将在注册中心注册,并调度一个{@link HeartBeatTask}来更新注册表中的元数据**/
        this.masterRegistryClient.init();
        this.masterRegistryClient.start();
        this.masterRegistryClient.setRegistryStoppable(this);

        // 主调度程序线程,该线程将使用来自数据库的命令并触发执行的processInstance。
        this.masterSchedulerService.init();
        this.masterSchedulerService.start();

        this.eventExecuteService.start();
        this.failoverExecuteThread.start();

        //这是调度器的接口,包含操作调度任务的方法。
        this.schedulerApi.start();

        Runtime.getRuntime().addShutdownHook(new Thread(() -> {

            if (Stopper.isRunning()) {

                close("MasterServer shutdownHook");
            }
        }));
    }

    /** * 优雅的关闭方法 * * @param cause 关闭的原因 */
    public void close(String cause) {


        try {

            // set stop signal is true
            // execute only once
            if (!Stopper.stop()) {

                logger.warn("MasterServer is already stopped, current cause: {}", cause);
                return;
            }

            logger.info("Master server is stopping, current cause : {}", cause);

            // thread sleep 3 seconds for thread quietly stop
            ThreadUtils.sleep(Constants.SERVER_CLOSE_WAIT_TIME.toMillis());
            // close
            this.schedulerApi.close();
            this.masterSchedulerService.close();
            this.masterRPCServer.close();
            this.masterRegistryClient.closeRegistry();
            // close spring Context and will invoke method with @PreDestroy annotation to destroy beans.
            // like ServerNodeManager,HostManager,TaskResponseService,CuratorZookeeperClient,etc
            springApplicationContext.close();

            logger.info("MasterServer stopped, current cause: {}", cause);
        } catch (Exception e) {

            logger.error("MasterServer stop failed, current cause: {}", cause, e);
        }
    }

    @Override
    public void stop(String cause) {

        close(cause);
    }
}
在run方法里面,可以看到,主要依次执行了:
- ① MasterRPCServer.start():启动master的rpc服务;
- ② TaskPluginManager.installPlugin():安装任务插件;
- ③ MasterRegistryClient.start():向Zookeeper注册MasterServer;
- ④ MasterSchedulerService.start():主调度程序线程,该线程将使用来自数据库的命令并触发执行的processInstance。
- ⑤ EventExecuteService.start():工作流实例执行情况
- ⑥ FailoverExecuteThread():故障转移检测
- ⑦ SchedulerApi.start():scheduler接口去操作任务实例
3.3.1 MasterRPCServer
Master RPC Server主要用来发送或接收请求给其它系统。
初始化方法如下:
@PostConstruct
private void init() {

    // 初始化远程服务
    NettyServerConfig serverConfig = new NettyServerConfig();
    serverConfig.setListenPort(masterConfig.getListenPort());
    this.nettyRemotingServer = new NettyRemotingServer(serverConfig);
    this.nettyRemotingServer.registerProcessor(CommandType.TASK_EXECUTE_RESPONSE, taskExecuteResponseProcessor);
    this.nettyRemotingServer.registerProcessor(CommandType.TASK_EXECUTE_RUNNING, taskExecuteRunningProcessor);
    this.nettyRemotingServer.registerProcessor(CommandType.TASK_KILL_RESPONSE, taskKillResponseProcessor);
    this.nettyRemotingServer.registerProcessor(CommandType.STATE_EVENT_REQUEST, stateEventProcessor);
    this.nettyRemotingServer.registerProcessor(CommandType.TASK_FORCE_STATE_EVENT_REQUEST, taskEventProcessor);
    this.nettyRemotingServer.registerProcessor(CommandType.TASK_WAKEUP_EVENT_REQUEST, taskEventProcessor);
    this.nettyRemotingServer.registerProcessor(CommandType.CACHE_EXPIRE, cacheProcessor);
    this.nettyRemotingServer.registerProcessor(CommandType.TASK_RECALL, taskRecallProcessor);

    // 日志服务
    this.nettyRemotingServer.registerProcessor(CommandType.GET_LOG_BYTES_REQUEST, loggerRequestProcessor);
    this.nettyRemotingServer.registerProcessor(CommandType.ROLL_VIEW_LOG_REQUEST, loggerRequestProcessor);
    this.nettyRemotingServer.registerProcessor(CommandType.VIEW_WHOLE_LOG_REQUEST, loggerRequestProcessor);
    this.nettyRemotingServer.registerProcessor(CommandType.REMOVE_TAK_LOG_REQUEST, loggerRequestProcessor);

    this.nettyRemotingServer.start();
}
3.3.2 TaskPluginManager
插件安装管理器,通过SPI机制加载数据源插件的,其中插件在如下目录: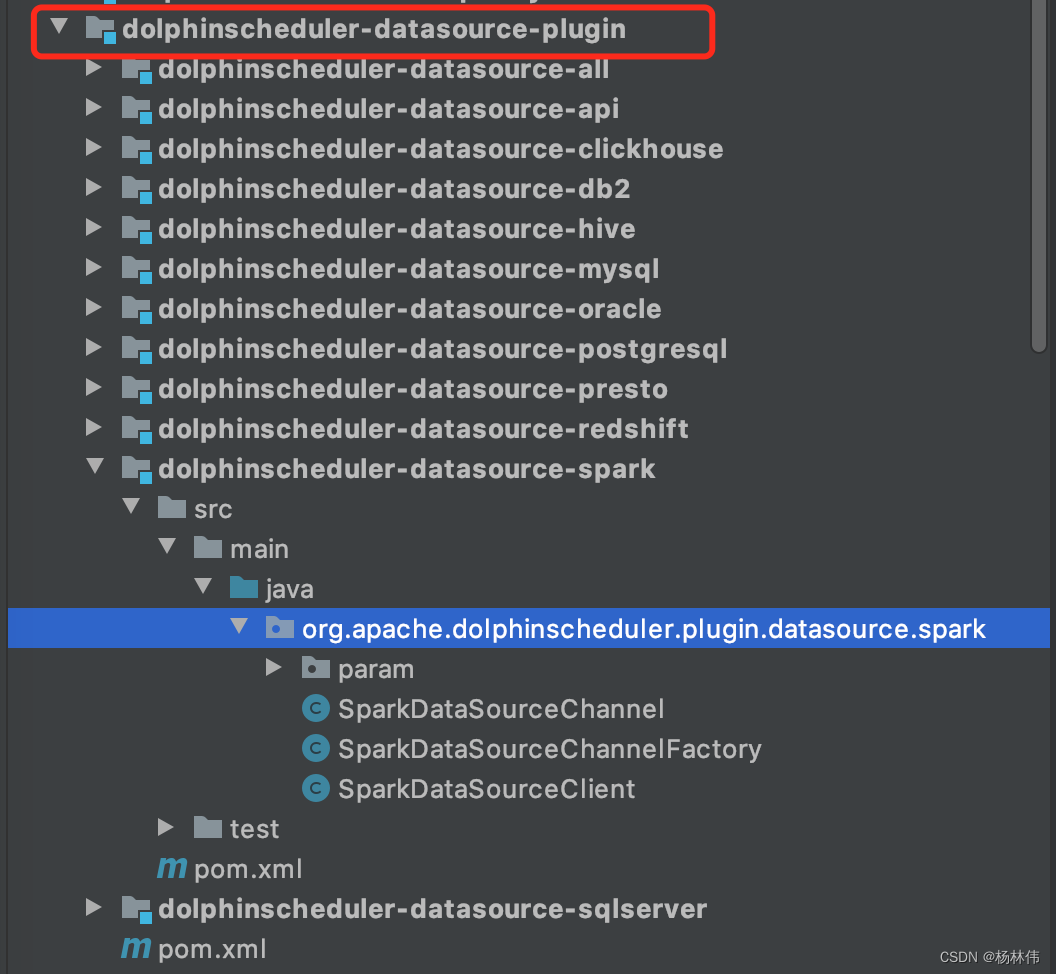
只要每个数据源插件实现指定的工厂即可,如Spark:
核心代码如下,并通过loadTaskChannel ()方法,把factory缓存进Map<String, TaskChannel>集合: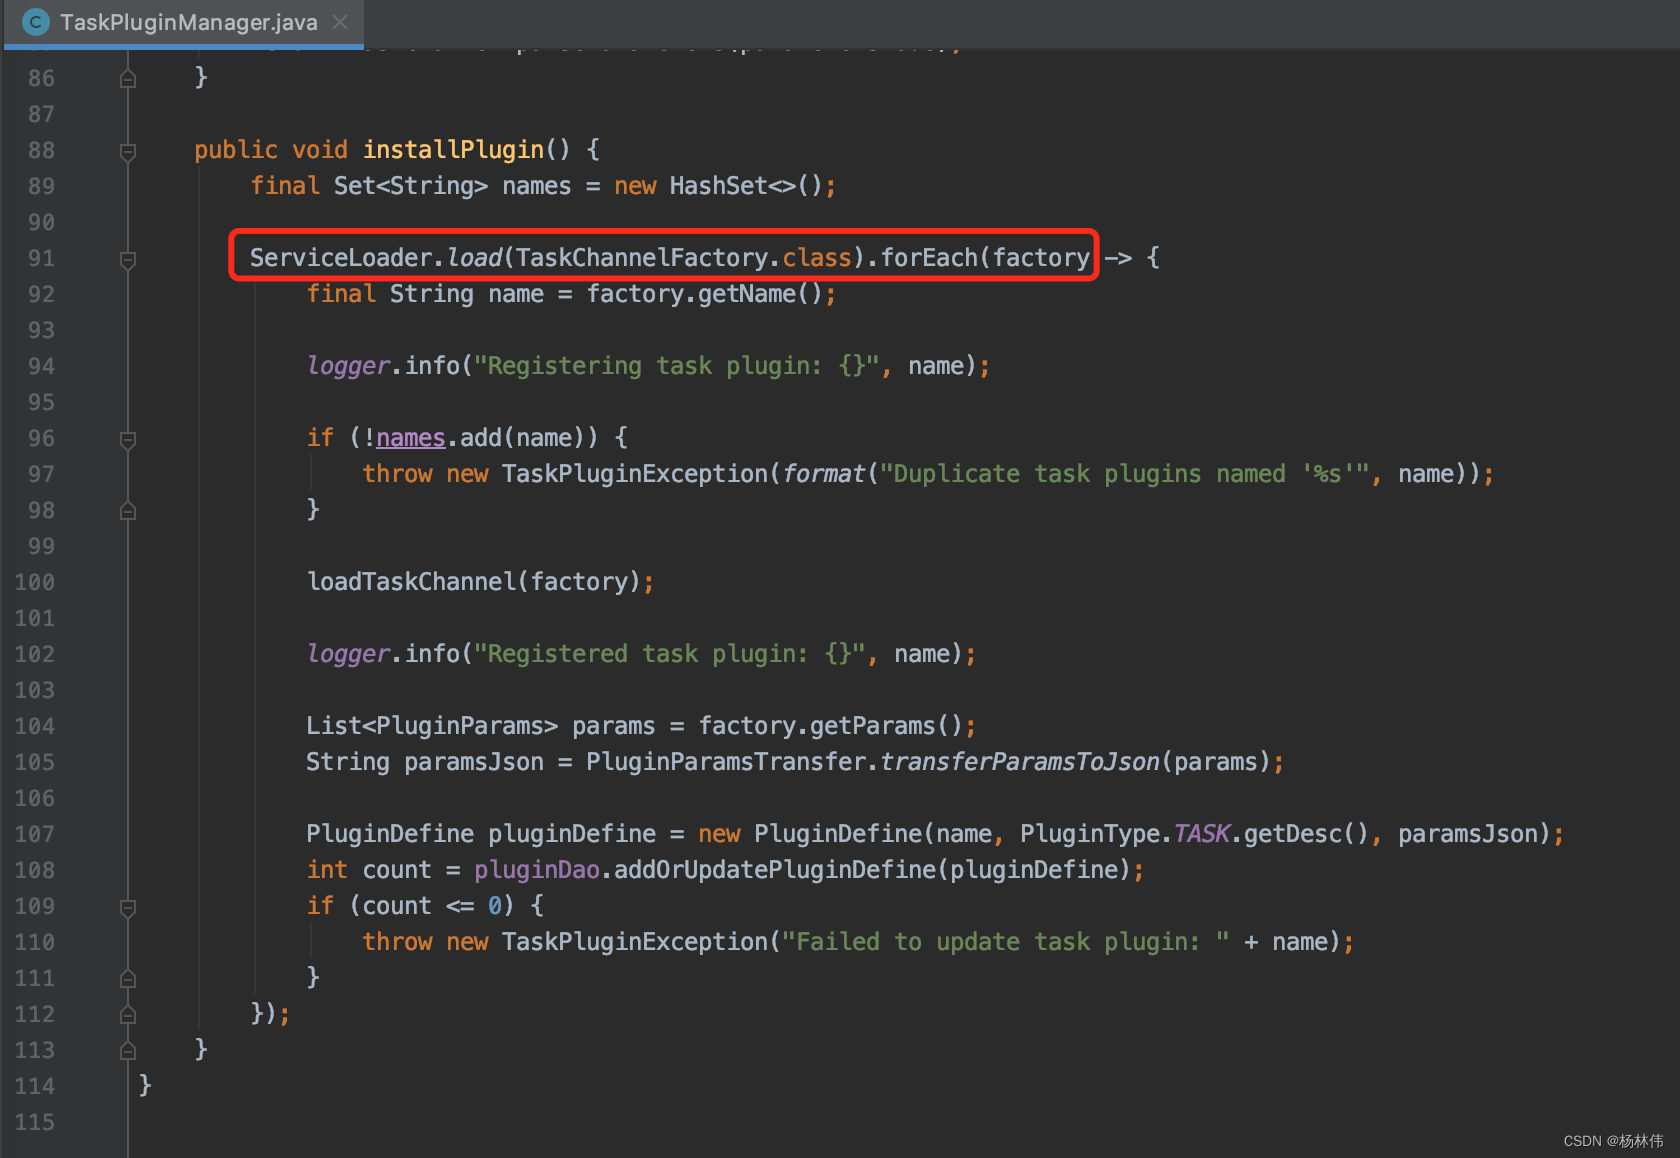
3.3.3 MasterRegistryClient
我们知道DolphinScheduler使用的是去中心化思想,所以MasterRegistryClient主要的作用是注册MasterServer客户端,用于连接到注册表并传递注册表事件。当Master节点启动时,它将在注册中心注册,并调度一个HeartBeatTask来更新注册表中的元数据。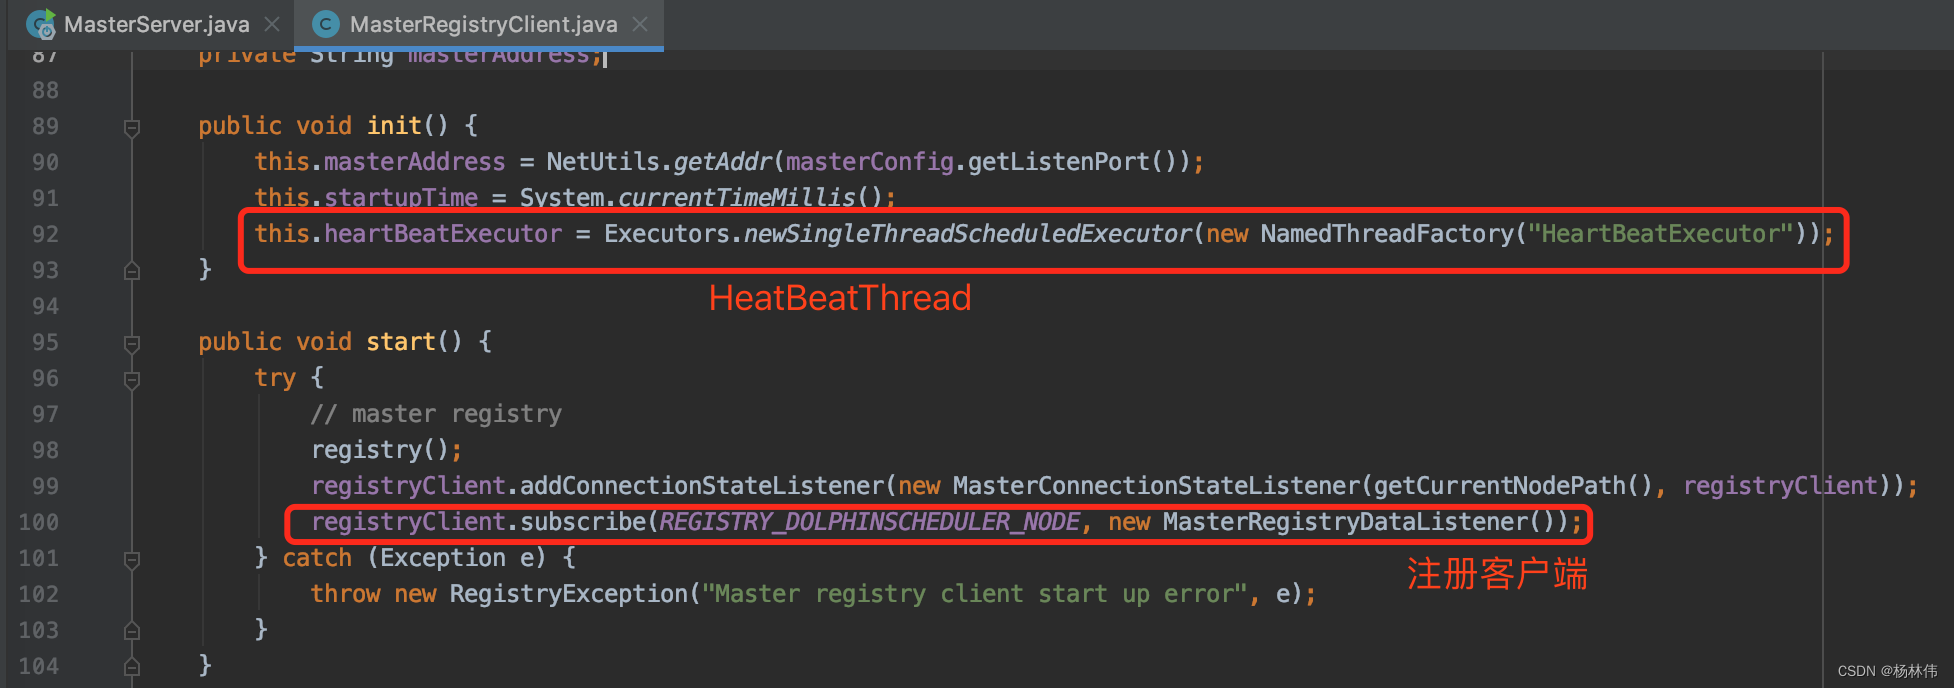
进入RegistryClient里面的subscribe方法,可以看到有两种注册中心,一种是MySQL的,另一种是Zookeeper的,这里应该默认使用了ZookeeperRegistry。
3.3.4 MasterSchedulerService
其init和run方法如下,init主要就是初始化一个工作流实例的队列:

看看里面实际运行的run方法,可以看到里面是一个死循环,不断地去执行scheduleWorkflow() 方法: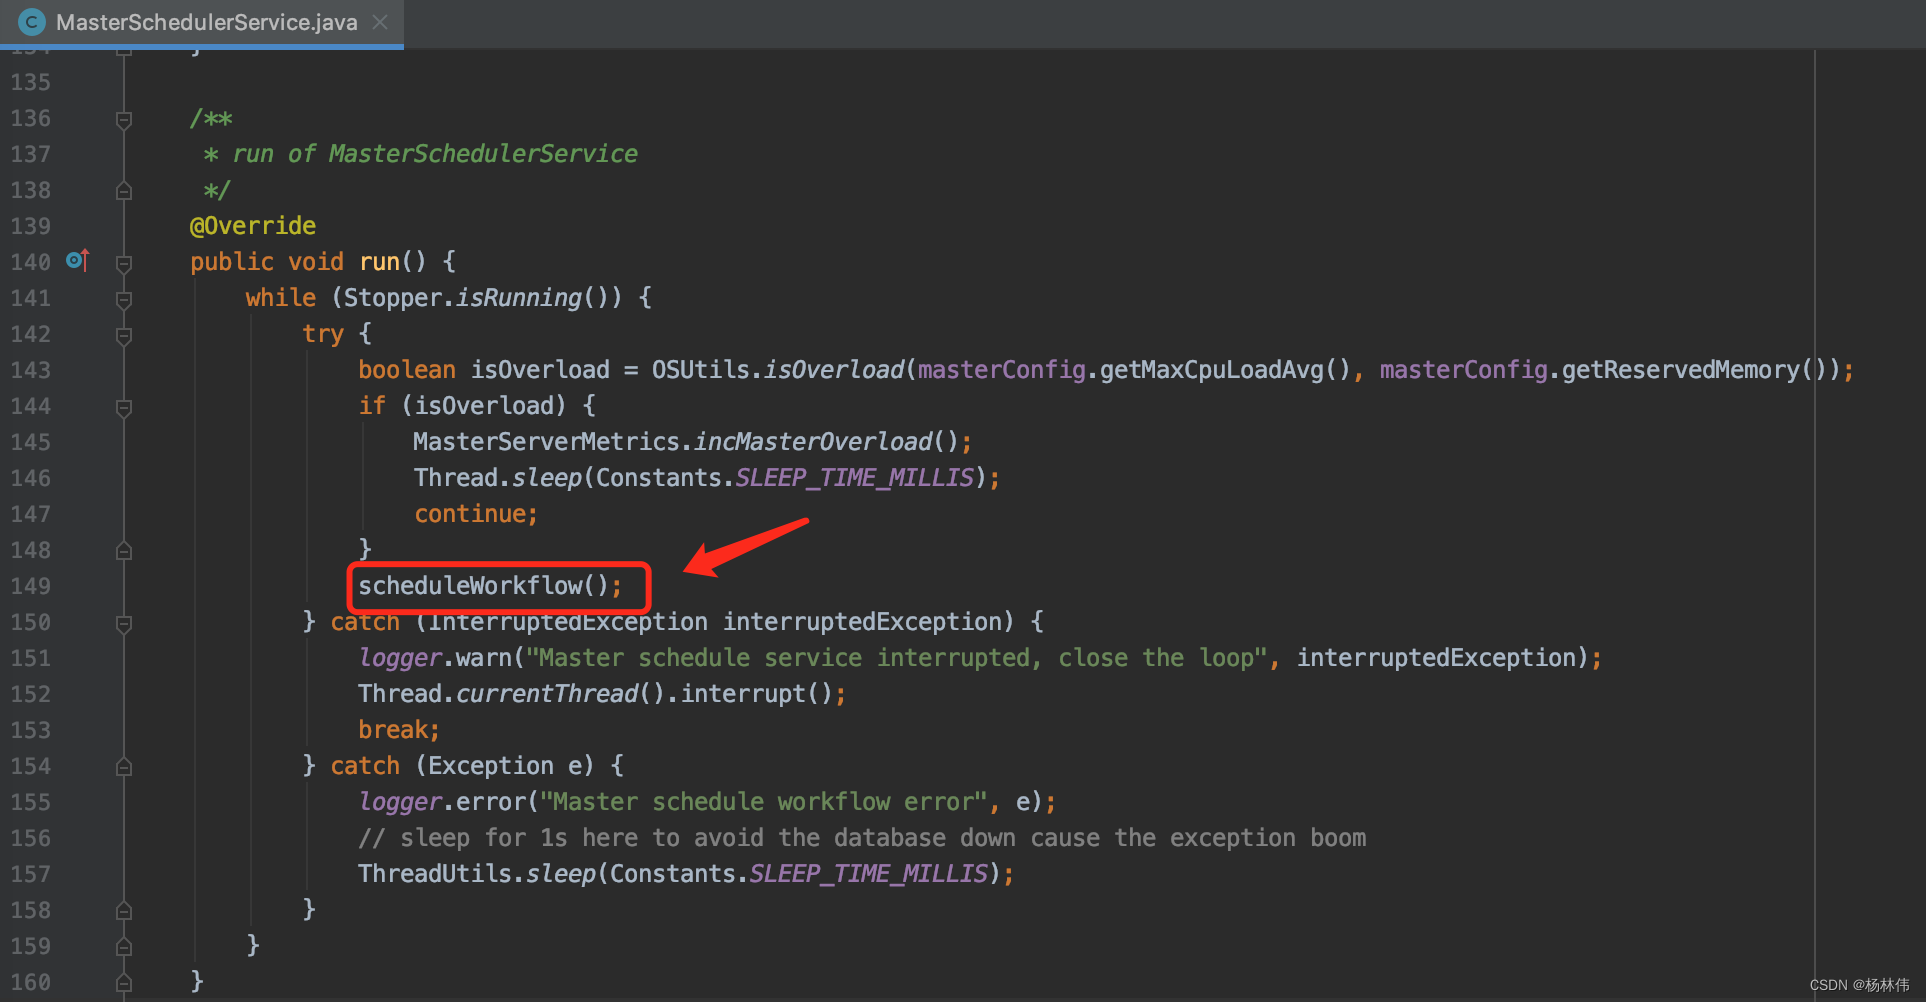
看看里面的scheduleWorkflow()方法,已写好注释:
/** * 从数据库中按槽位查询命令,转换为工作流实例,然后提交给workflowExecuteThreadPool。 */
private void scheduleWorkflow() throws InterruptedException, MasterException {

    // 从数据库中按槽位查询命令
    List<Command> commands = findCommands();
    if (CollectionUtils.isEmpty(commands)) {

        // indicate that no command ,sleep for 1s
        Thread.sleep(Constants.SLEEP_TIME_MILLIS);
        return;
    }

    // 转换为工作流实例
    List<ProcessInstance> processInstances = command2ProcessInstance(commands);
    if (CollectionUtils.isEmpty(processInstances)) {

        // indicate that the command transform to processInstance error, sleep for 1s
        Thread.sleep(Constants.SLEEP_TIME_MILLIS);
        return;
    }
    MasterServerMetrics.incMasterConsumeCommand(commands.size());

    for (ProcessInstance processInstance : processInstances) {

        //提交给workflowExecuteThreadPool
        submitProcessInstance(processInstance);
    }
}
提交工作流实例方法如下,注意提交到了workflowExecuteThreadPool:
/** * 提交工作流实例给 workflowExecuteThreadPool * * @param processInstance 工作流实例 */
private void submitProcessInstance(@NonNull ProcessInstance processInstance) {

    try {

        LoggerUtils.setWorkflowInstanceIdMDC(processInstance.getId());
        logger.info("Master schedule service starting workflow instance");

        // 封装工作流实例Runnable
        final WorkflowExecuteRunnable workflowExecuteRunnable = new WorkflowExecuteRunnable(
                processInstance
                , processService
                , nettyExecutorManager
                , processAlertManager
                , masterConfig
                , stateWheelExecuteThread
                , curingGlobalParamsService);

        this.processInstanceExecCacheManager.cache(processInstance.getId(), workflowExecuteRunnable);
        if (processInstance.getTimeout() > 0) {

            stateWheelExecuteThread.addProcess4TimeoutCheck(processInstance);
        }
        ProcessInstanceMetrics.incProcessInstanceSubmit();

        // 提交封装好的工作流实例Runnable给workflowExecuteThreadPool
        CompletableFuture<WorkflowSubmitStatue> workflowSubmitFuture = CompletableFuture.supplyAsync(
                workflowExecuteRunnable::call, workflowExecuteThreadPool);
        workflowSubmitFuture.thenAccept(workflowSubmitStatue -> {

            if (WorkflowSubmitStatue.FAILED == workflowSubmitStatue) {

                // submit failed
                processInstanceExecCacheManager.removeByProcessInstanceId(processInstance.getId());
                stateWheelExecuteThread.removeProcess4TimeoutCheck(processInstance.getId());
                submitFailedProcessInstances.add(processInstance);
            }
        });
        logger.info("Master schedule service started workflow instance");

    } catch (Exception ex) {

        processInstanceExecCacheManager.removeByProcessInstanceId(processInstance.getId());
        stateWheelExecuteThread.removeProcess4TimeoutCheck(processInstance.getId());
        logger.info("Master submit workflow to thread pool failed, will remove workflow runnable from cache manager", ex);
    } finally {

        LoggerUtils.removeWorkflowInstanceIdMDC();
    }
}
3.3.5 EventExecuteService
EventExecuteService没有类注释,猜测应该是用来传递每个工作流实例执行情况事件的。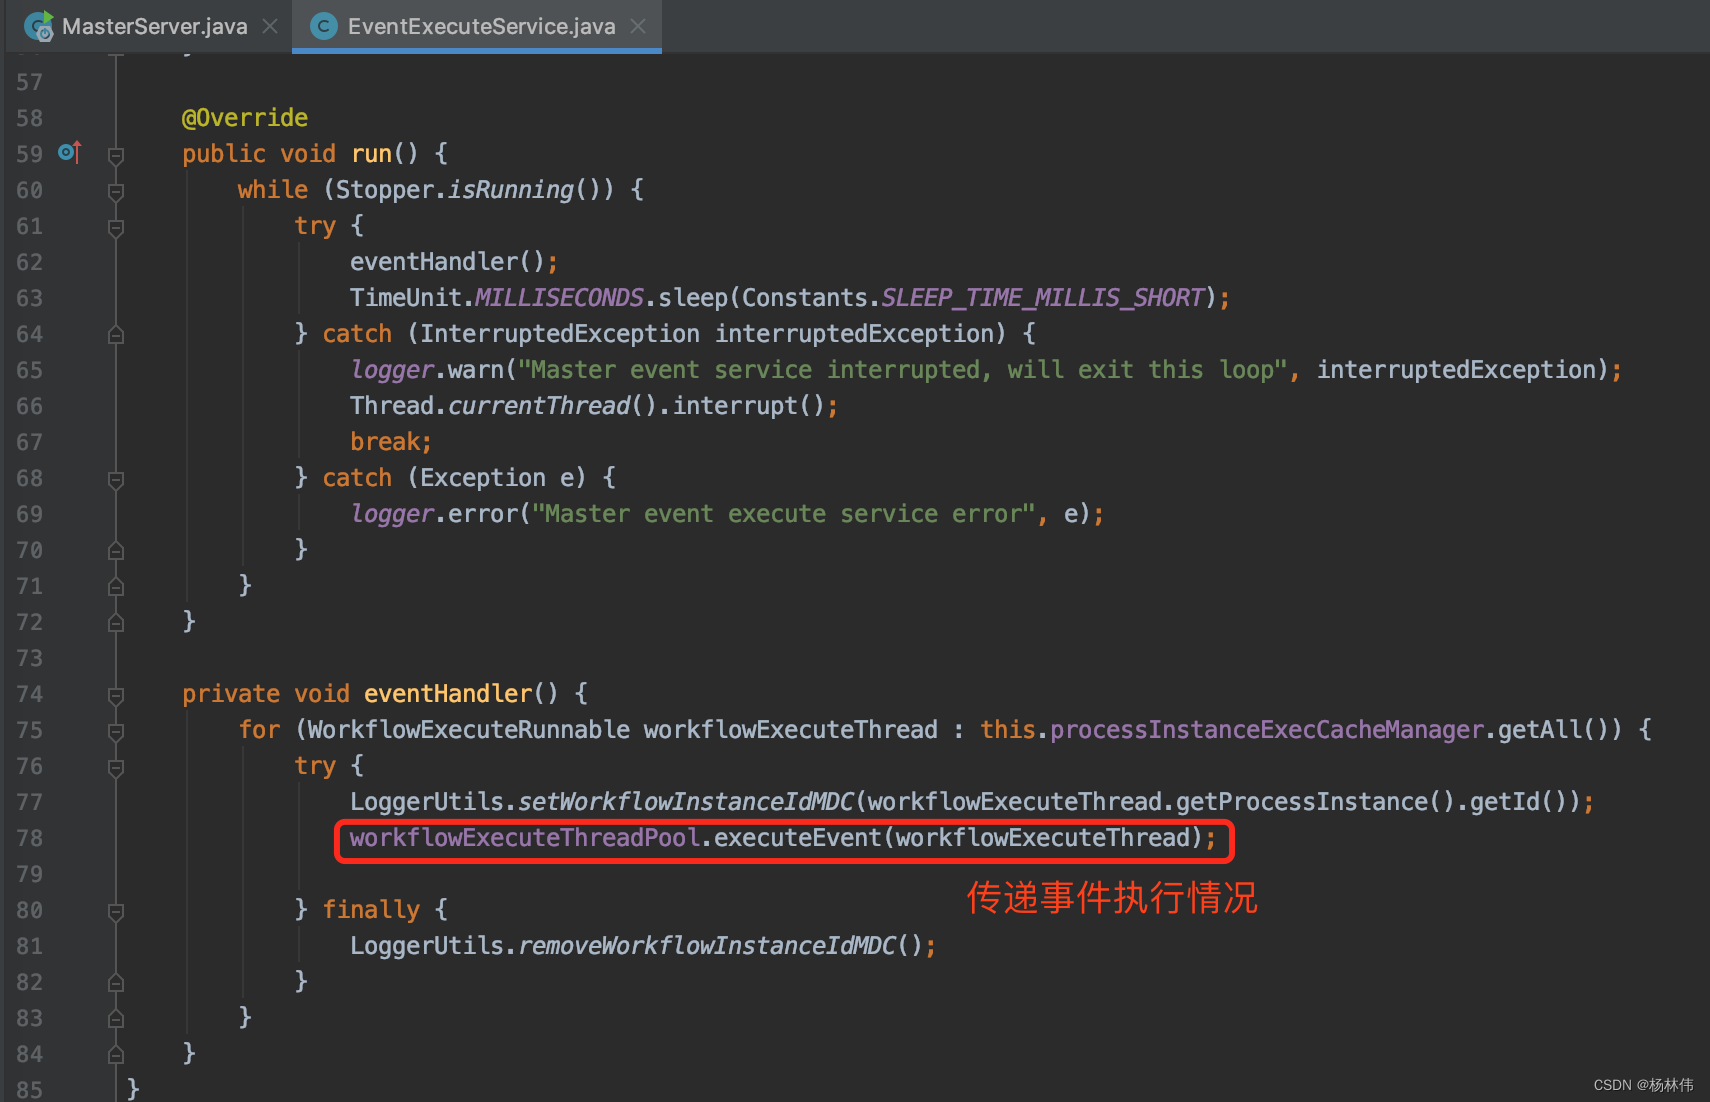
3.3.6 FailoverExecuteThread
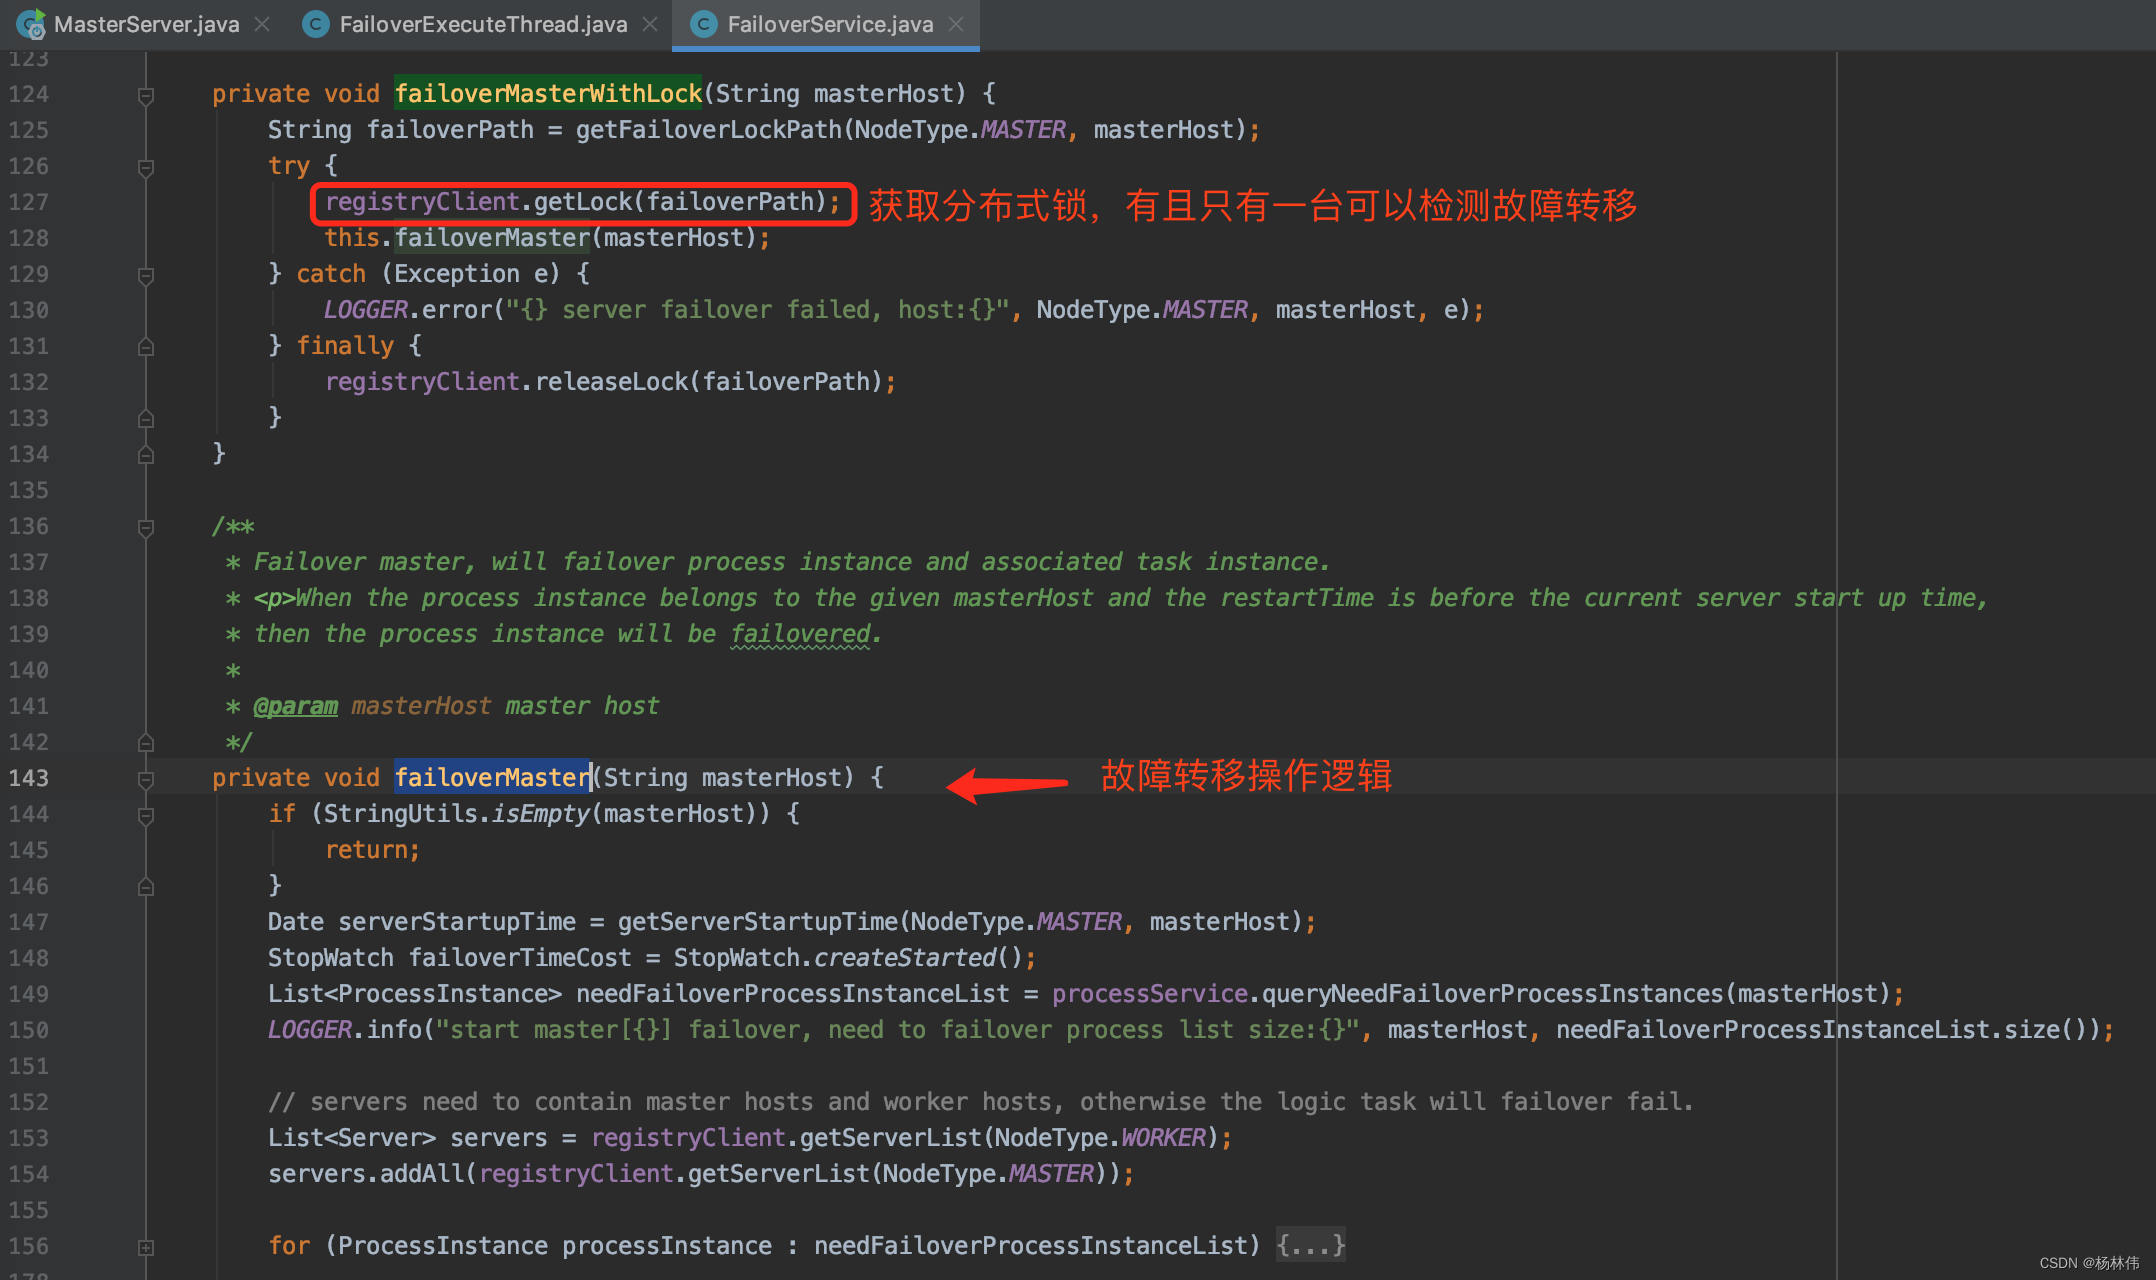
FailoverExecuteThread为故障转移检测线程。每隔10秒检测一次,核心方法在FailoverService里的failoverMasterWithLock()及failoverMaster()方法:
3.3.7 SchedulerApi
SchedulerApi是操作调度任务实例的接口,其主要功能是启动调度程序、插入或更新调度任务、删除调度任务、关闭调度任务和释放资源。
3.3.8 TaskPriorityQueueConsumer
根据流程图,我们可以知道TaskConsumer从队列里获取分割的任务,然后转发到Worker执行。
我们看看TaskPriorityQueueConsumer里的核心代码,可以看到里面的批量分发任务方法: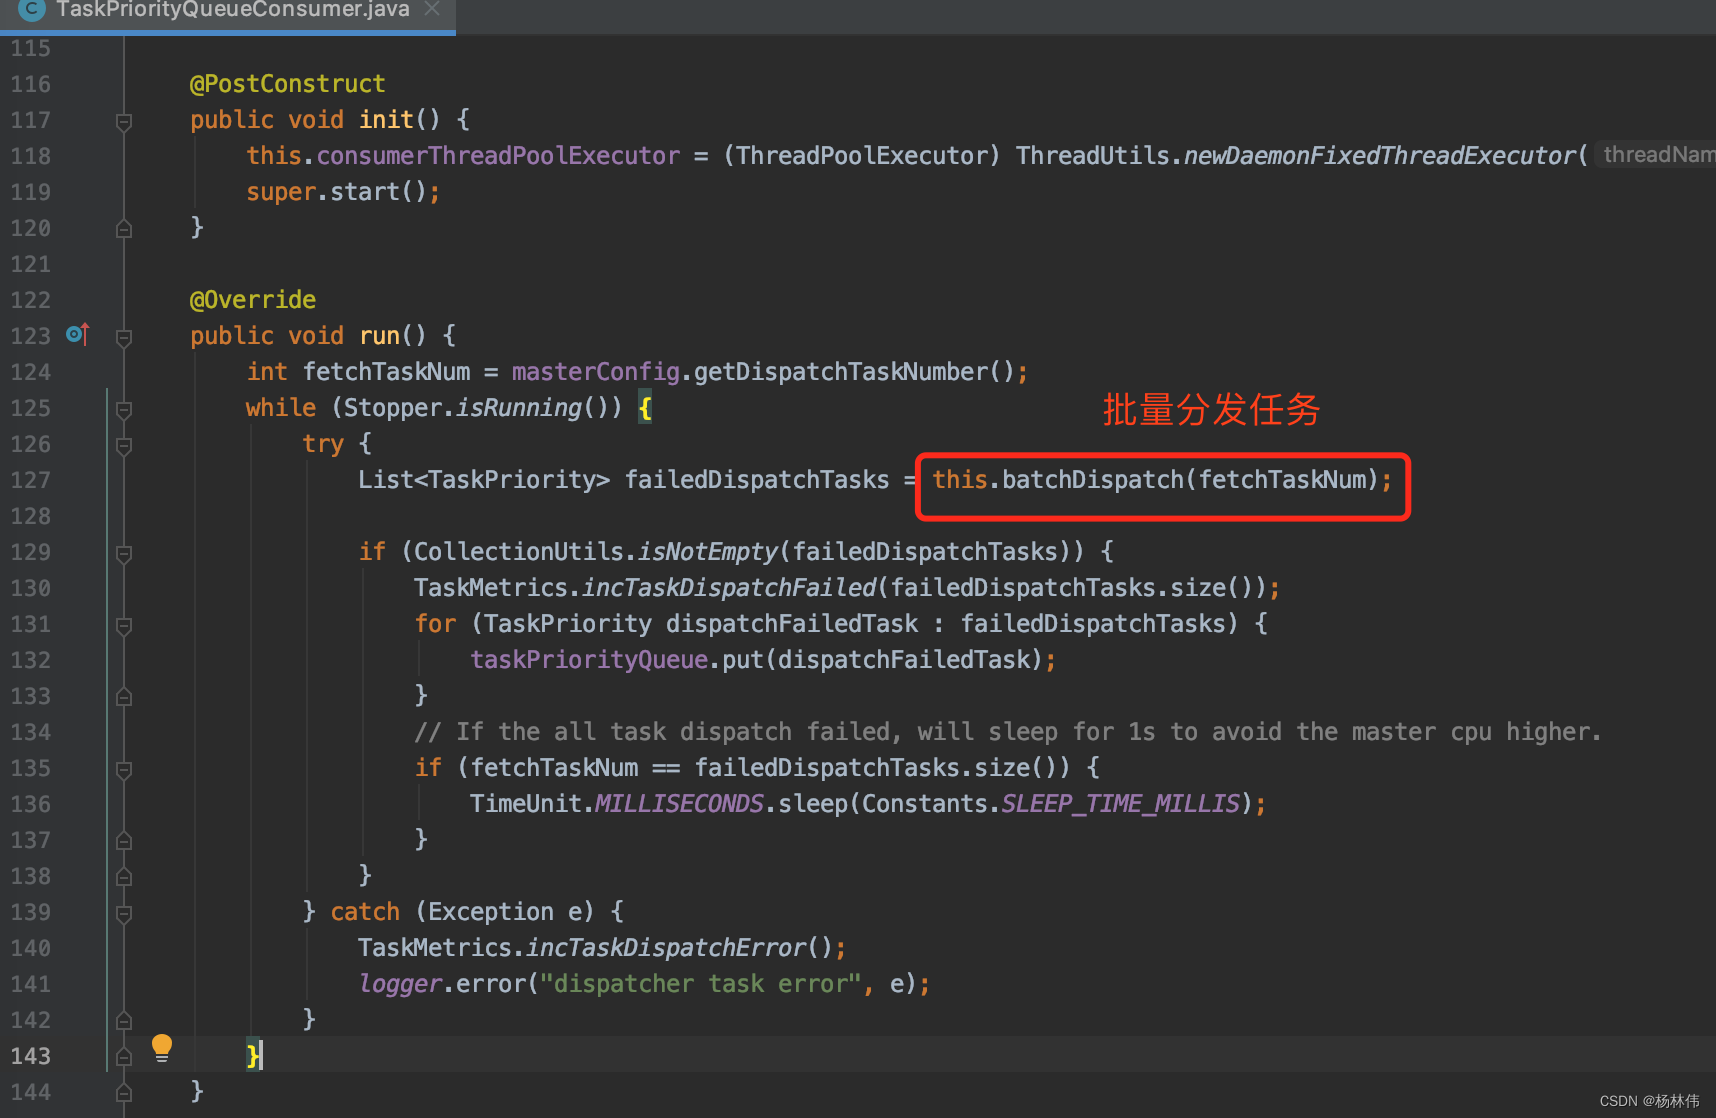
进入batchDispatch方法,可以看到从队列里获取任务分发任务: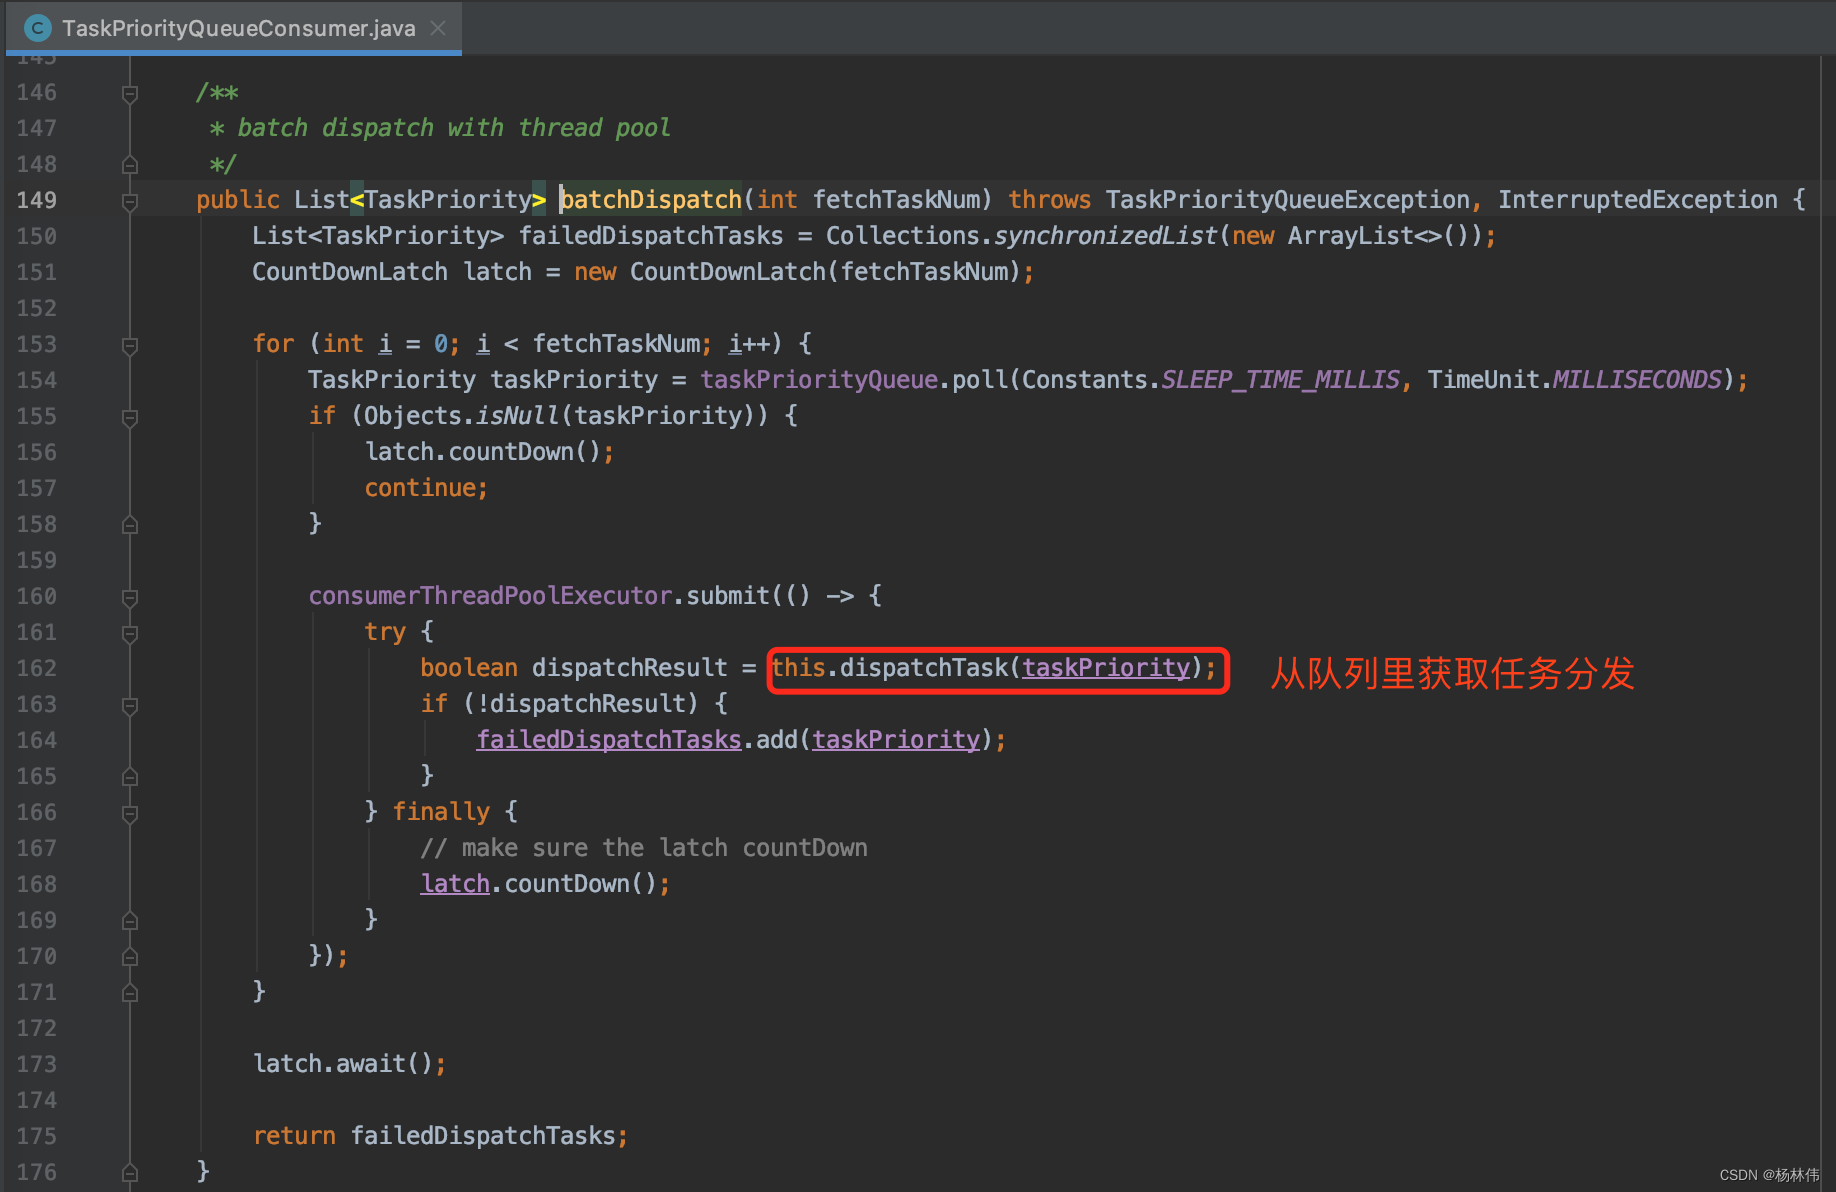
最后分发任务给worker: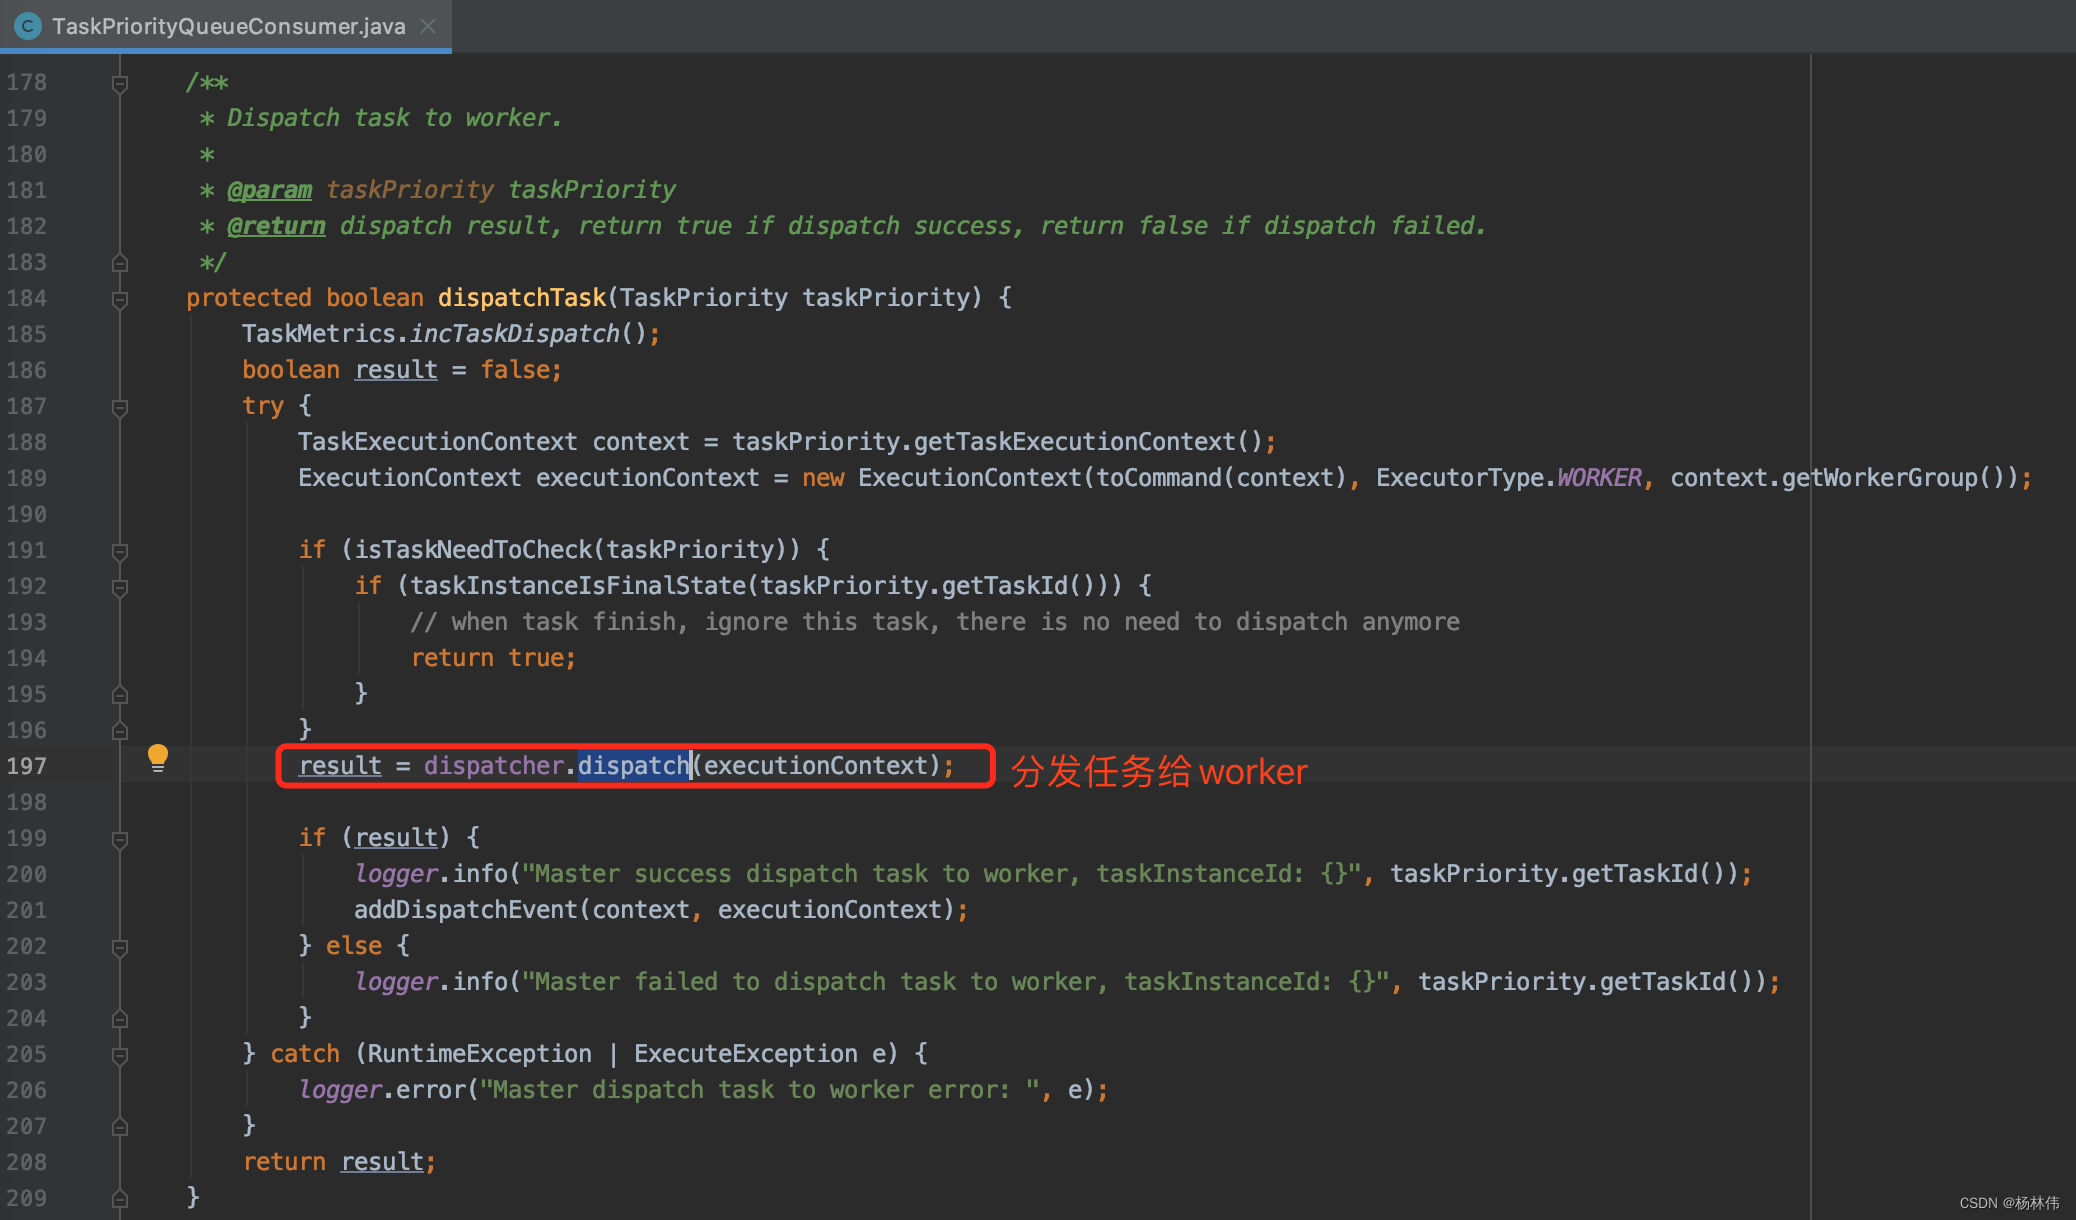
ok,到这里,我们可以看worker部分的代码了。
3.4 WorkerServer
MasterSerer在项目/dolphinscheduler-worker/src/main/java/org/apache/dolphinscheduler/server/worker/WorkerServer.java目录。它的主程序代码与MasterServer基本一致,代码及注释如下:
@PostConstruct
public void run() {

	// worker rpc服务
    this.workerRpcServer.start();

	// 任务插件安装
    this.taskPluginManager.installPlugin();

    // 向Zookeeper注册客户端
    this.workerRegistryClient.registry();
    this.workerRegistryClient.setRegistryStoppable(this);
    Set<String> workerZkPaths = this.workerRegistryClient.getWorkerZkPaths();
    this.workerRegistryClient.handleDeadServer(workerZkPaths, NodeType.WORKER, Constants.DELETE_OP);

   // 管理Worker线程
    this.workerManagerThread.start();

    // 报告状态线程
    this.retryReportTaskStatusThread.start();

    /* * registry hooks, which are called before the process exits */
    Runtime.getRuntime().addShutdownHook(new Thread(() -> {

        if (Stopper.isRunning()) {

            close("WorkerServer shutdown hook");
        }
    }));
}
根据官网提供的流程图,我们需要重点留意的是TaskExecutePorcessor: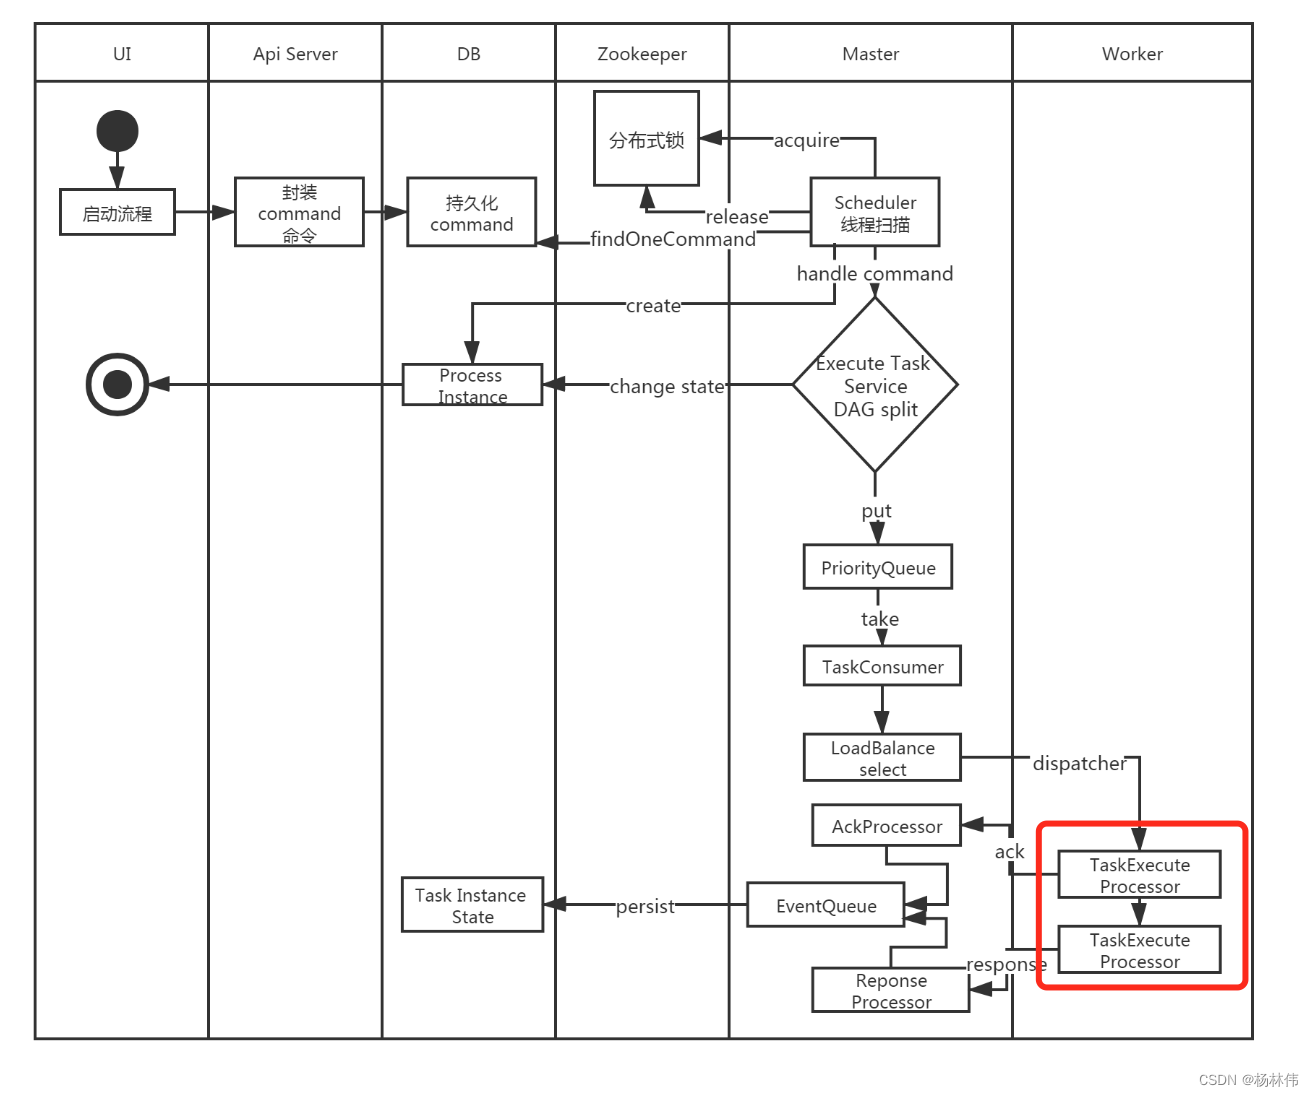
3.4.1 TaskExecutePorcessor
TaskExecuteProcessor在 /dolphinscheduler-worker/src/main/java/org/apache/dolphinscheduler/server/worker/processor/TaskExecuteProcessor.java目录,毋庸置疑,其核心方法为:
@Counted(value = "ds.task.execution.count", description = "task execute total count")
@Timed(value = "ds.task.execution.duration", percentiles = {
    0.5, 0.75, 0.95, 0.99}, histogram = true)
@Override
public void process(Channel channel, Command command) {

 // code ...
}
其中里面有一段较为核心的代码,提交任务TaskExecuteThread给管理者:
接下来看看TaskExecuteThread的代码。
3.4.2 TaskExecuteThread
TaskExecuteThread就是最终执行任务的代码了,里面的run方法如下,已加好注释:
@Override
public void run() {

    // dry run 预演模式
    if (Constants.DRY_RUN_FLAG_YES == taskExecutionContext.getDryRun()) {

        taskExecutionContext.setCurrentExecutionStatus(ExecutionStatus.SUCCESS);
        taskExecutionContext.setStartTime(new Date());
        taskExecutionContext.setEndTime(new Date());
        TaskExecutionContextCacheManager.removeByTaskInstanceId(taskExecutionContext.getTaskInstanceId());
        taskCallbackService.sendTaskExecuteResponseCommand(taskExecutionContext);
        logger.info("[WorkflowInstance-{}][TaskInstance-{}] Task dry run success",
            taskExecutionContext.getProcessInstanceId(), taskExecutionContext.getTaskInstanceId());
        return;
    }
    try {

        LoggerUtils.setWorkflowAndTaskInstanceIDMDC(taskExecutionContext.getProcessInstanceId(), taskExecutionContext.getTaskInstanceId());
        logger.info("script path : {}", taskExecutionContext.getExecutePath());
        if (taskExecutionContext.getStartTime() == null) {

            taskExecutionContext.setStartTime(new Date());
        }
        logger.info("the task begins to execute. task instance id: {}", taskExecutionContext.getTaskInstanceId());

        //回调任务执行状态
        taskExecutionContext.setCurrentExecutionStatus(ExecutionStatus.RUNNING_EXECUTION);
        taskCallbackService.sendTaskExecuteRunningCommand(taskExecutionContext);

        // 拷贝 hdfs/minio 文件到本地
        List<Pair<String, String>> fileDownloads = downloadCheck(taskExecutionContext.getExecutePath(), taskExecutionContext.getResources());
        if (!fileDownloads.isEmpty()) {

            downloadResource(taskExecutionContext.getExecutePath(), logger, fileDownloads);
        }

        taskExecutionContext.setEnvFile(CommonUtils.getSystemEnvPath());

        taskExecutionContext.setTaskAppId(String.format("%s_%s",
                taskExecutionContext.getProcessInstanceId(),
                taskExecutionContext.getTaskInstanceId()));

        TaskChannel taskChannel = taskPluginManager.getTaskChannelMap().get(taskExecutionContext.getTaskType());
        if (null == taskChannel) {

            throw new ServiceException(String.format("%s Task Plugin Not Found,Please Check Config File.", taskExecutionContext.getTaskType()));
        }
        String taskLogName = LoggerUtils.buildTaskId(taskExecutionContext.getFirstSubmitTime(),
                taskExecutionContext.getProcessDefineCode(),
                taskExecutionContext.getProcessDefineVersion(),
                taskExecutionContext.getProcessInstanceId(),
                taskExecutionContext.getTaskInstanceId());
        taskExecutionContext.setTaskLogName(taskLogName);

        // 给当前线程设置名称
        Thread.currentThread().setName(taskLogName);

        task = taskChannel.createTask(taskExecutionContext);

        // 执行任务插件方法 - init
        this.task.init();

        //init varPool
        this.task.getParameters().setVarPool(taskExecutionContext.getVarPool());

        // 执行任务插件方法 - handle
        this.task.handle();

        // 判断是否需要发送告警
        if (this.task.getNeedAlert()) {

            sendAlert(this.task.getTaskAlertInfo(), this.task.getExitStatus().getCode());
        }

        taskExecutionContext.setCurrentExecutionStatus(ExecutionStatus.of(this.task.getExitStatus().getCode()));
        taskExecutionContext.setEndTime(DateUtils.getCurrentDate());
        taskExecutionContext.setProcessId(this.task.getProcessId());
        taskExecutionContext.setAppIds(this.task.getAppIds());
        taskExecutionContext.setVarPool(JSONUtils.toJsonString(this.task.getParameters().getVarPool()));
        logger.info("task instance id : {},task final status : {}", taskExecutionContext.getTaskInstanceId(), this.task.getExitStatus());
    } catch (Throwable e) {

        logger.error("task scheduler failure", e);
        kill();
        taskExecutionContext.setCurrentExecutionStatus(ExecutionStatus.FAILURE);
        taskExecutionContext.setEndTime(DateUtils.getCurrentDate());
        taskExecutionContext.setProcessId(this.task.getProcessId());
        taskExecutionContext.setAppIds(this.task.getAppIds());
    } finally {

        TaskExecutionContextCacheManager.removeByTaskInstanceId(taskExecutionContext.getTaskInstanceId());
        taskCallbackService.sendTaskExecuteResponseCommand(taskExecutionContext);
        clearTaskExecPath();
        LoggerUtils.removeWorkflowAndTaskInstanceIdMDC();
    }
}
04 附录
4.1 核心表
① t_ds_process_definition(流程定义表):
| 字段 | 类型 | 注释 |
|---|---|---|
| id | int | 主键 |
| name | varchar | 流程定义名称 |
| version | int | 流程定义版本 |
| release_state | tinyint | 流程定义的发布状态:0 未上线 1已上线 |
| project_id | int | 项目id |
| user_id | int | 流程定义所属用户id |
| process_definition_json | longtext | 流程定义json串 |
| description | text | 流程定义描述 |
| global_params | text | 全局参数 |
| flag | tinyint | 流程是否可用:0 不可用,1 可用 |
| locations | text | 节点坐标信息 |
| connects | text | 节点连线信息 |
| receivers | text | 收件人 |
| receivers_cc | text | 抄送人 |
| create_time | datetime | 创建时间 |
| timeout | int | 超时时间 |
| tenant_id | int | 租户id |
| update_time | datetime | 更新时间 |
| modify_by | varchar | 修改用户 |
| resource_ids | varchar | 资源id集 |
② t_ds_process_instance(流程实例表):
| 字段 | 类型 | 注释 |
|---|---|---|
| id | int | 主键 |
| name | varchar | 流程实例名称 |
| process_definition_id | int | 流程定义id |
| state | tinyint | 流程实例状态:0 提交成功,1 正在运行,2 准备暂停,3 暂停,4 准备停止,5 停止,6 失败,7 成功,8 需要容错,9 kill,10 等待线程,11 等待依赖完成 |
| recovery | tinyint | 流程实例容错标识:0 正常,1 需要被容错重启 |
| start_time | datetime | 流程实例开始时间 |
| end_time | datetime | 流程实例结束时间 |
| run_times | int | 流程实例运行次数 |
| host | varchar | 流程实例所在的机器 |
| command_type | tinyint | 命令类型:0 启动工作流,1 从当前节点开始执行,2 恢复被容错的工作流,3 恢复暂停流程,4 从失败节点开始执行,5 补数,6 调度,7 重跑,8 暂停,9 停止,10 恢复等待线程 |
| command_param | text | 命令的参数(json格式) |
| task_depend_type | tinyint | 节点依赖类型:0 当前节点,1 向前执行,2 向后执行 |
| max_try_times | tinyint | 最大重试次数 |
| failure_strategy | tinyint | 失败策略 0 失败后结束,1 失败后继续 |
| warning_type | tinyint | 告警类型:0 不发,1 流程成功发,2 流程失败发,3 成功失败都发 |
| warning_group_id | int | 告警组id |
| schedule_time | datetime | 预期运行时间 |
| command_start_time | datetime | 开始命令时间 |
| global_params | text | 全局参数(固化流程定义的参数) |
| process_instance_json | longtext | 流程实例json(copy的流程定义的json) |
| flag | tinyint | 是否可用,1 可用,0不可用 |
| update_time | timestamp | 更新时间 |
| is_sub_process | int | 是否是子工作流 1 是,0 不是 |
| executor_id | int | 命令执行用户 |
| locations | text | 节点坐标信息 |
| connects | text | 节点连线信息 |
| history_cmd | text | 历史命令,记录所有对流程实例的操作 |
| dependence_schedule_times | text | 依赖节点的预估时间 |
| process_instance_priority | int | 流程实例优先级:0 Highest,1 High,2 Medium,3 Low,4 Lowest |
| worker_group | varchar | 任务指定运行的worker分组 |
| timeout | int | 超时时间 |
| tenant_id | int | 租户id |
③ t_ds_task_instance(任务实例表):
| 字段 | 类型 | 注释 |
|---|---|---|
| id | int | 主键 |
| name | varchar | 任务名称 |
| task_type | varchar | 任务类型 |
| process_definition_id | int | 流程定义id |
| process_instance_id | int | 流程实例id |
| task_json | longtext | 任务节点json |
| state | tinyint | 任务实例状态:0 提交成功,1 正在运行,2 准备暂停,3 暂停,4 准备停止,5 停止,6 失败,7 成功,8 需要容错,9 kill,10 等待线程,11 等待依赖完成 |
| submit_time | datetime | 任务提交时间 |
| start_time | datetime | 任务开始时间 |
| end_time | datetime | 任务结束时间 |
| host | varchar | 执行任务的机器 |
| execute_path | varchar | 任务执行路径 |
| log_path | varchar | 任务日志路径 |
| alert_flag | tinyint | 是否告警 |
| retry_times | int | 重试次数 |
| pid | int | 进程pid |
| app_link | varchar | yarn app id |
| flag | tinyint | 是否可用:0 不可用,1 可用 |
| retry_interval | int | 重试间隔 |
| max_retry_times | int | 最大重试次数 |
| task_instance_priority | int | 任务实例优先级:0 Highest,1 High,2 Medium,3 Low,4 Lowest |
| worker_group | varchar | 任务指定运行的worker分组 |
④ t_ds_schedules(流程定时调度表):
| 字段 | 类型 | 注释 |
|---|---|---|
| id | int | 主键 |
| process_definition_id | int | 流程定义id |
| start_time | datetime | 调度开始时间 |
| end_time | datetime | 调度结束时间 |
| crontab | varchar | crontab 表达式 |
| failure_strategy | tinyint | 失败策略: 0 结束,1 继续 |
| user_id | int | 用户id |
| release_state | tinyint | 状态:0 未上线,1 上线 |
| warning_type | tinyint | 告警类型:0 不发,1 流程成功发,2 流程失败发,3 成功失败都发 |
| warning_group_id | int | 告警组id |
| process_instance_priority | int | 流程实例优先级:0 Highest,1 High,2 Medium,3 Low,4 Lowest |
| worker_group | varchar | 任务指定运行的worker分组 |
| create_time | datetime | 创建时间 |
| update_time | datetime | 更新时间 |
⑤ t_ds_command(执行命令表):
| 字段 | 类型 | 注释 |
|---|---|---|
| id | int | 主键 |
| command_type | tinyint | 命令类型:0 启动工作流,1 从当前节点开始执行,2 恢复被容错的工作流,3 恢复暂停流程,4 从失败节点开始执行,5 补数,6 调度,7 重跑,8 暂停,9 停止,10 恢复等待线程 |
| process_definition_id | int | 流程定义id |
| command_param | text | 命令的参数(json格式) |
| task_depend_type | tinyint | 节点依赖类型:0 当前节点,1 向前执行,2 向后执行 |
| failure_strategy | tinyint | 失败策略:0结束,1继续 |
| warning_type | tinyint | 告警类型:0 不发,1 流程成功发,2 流程失败发,3 成功失败都发 |
| warning_group_id | int | 告警组 |
| schedule_time | datetime | 预期运行时间 |
| start_time | datetime | 开始时间 |
| executor_id | int | 执行用户id |
| dependence | varchar | 依赖字段 |
| update_time | datetime | 更新时间 |
| process_instance_priority | int | 流程实例优先级:0 Highest,1 High,2 Medium,3 Low,4 Lowest |
| worker_group | varchar | 任务指定运行的worker分组 |
05 文末
本文是个人阅读DolphinScheduler一些见解,后续或许会再更新,DolphinScheduler给我的感觉就是联通性不强,需要结合流程图才能去理解。最后在补上它的流程图,以做回顾吧
接下来的文章讲讲它的配置。
边栏推荐
- Summary of leetcode's dynamic programming 4
- [web security] nodejs prototype chain pollution analysis
- 自动化测试环境配置
- Financial German translation, a professional translation company in Beijing
- 记一个基于JEECG-BOOT的比较复杂的增删改功能的实现
- Day 245/300 JS forEach 多层嵌套后数据无法更新到对象中
- 【MQTT从入门到提高系列 | 01】从0到1快速搭建MQTT测试环境
- 机器学习植物叶片识别
- How do programmers remember code and programming language?
- How to translate professional papers and write English abstracts better
猜你喜欢
My daily learning records / learning methods

Financial German translation, a professional translation company in Beijing
![[English] Verb Classification of grammatical reconstruction -- English rabbit learning notes (2)](/img/3c/c25e7cbef9be1860842e8981f72352.png)
[English] Verb Classification of grammatical reconstruction -- English rabbit learning notes (2)
钓鱼&文件名反转&office远程模板
Play video with Tencent video plug-in in uni app
![[Tera term] black cat takes you to learn TTL script -- serial port automation skill in embedded development](/img/63/dc729d3f483fd6088cfa7b6fb45ccb.png)
[Tera term] black cat takes you to learn TTL script -- serial port automation skill in embedded development
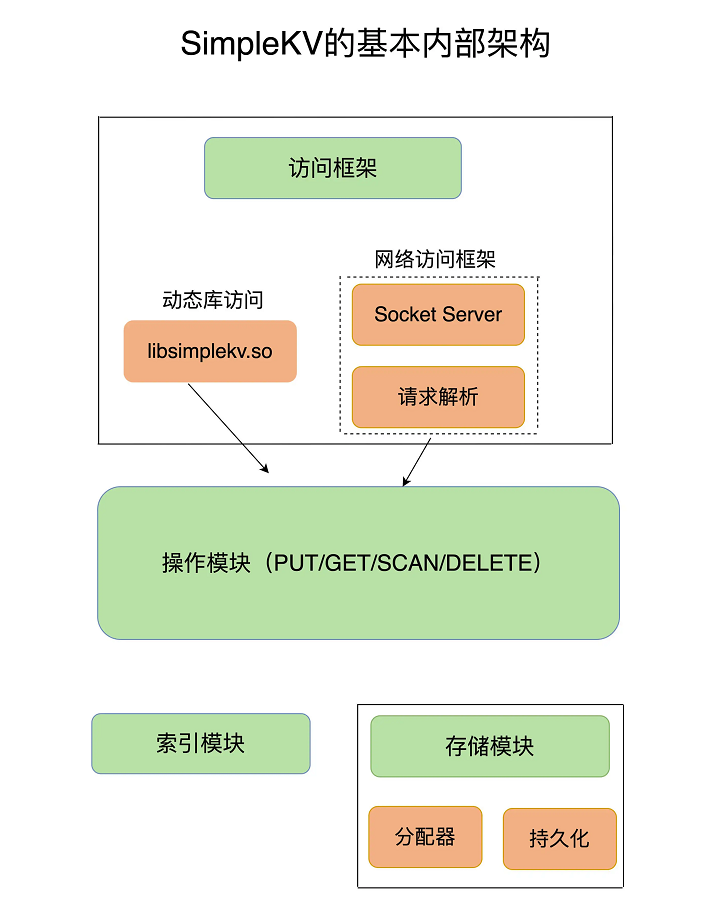
Redis core technology and basic architecture of actual combat: what does a key value database contain?
基於JEECG-BOOT的list頁面的地址欄參數傳遞

如何做好互联网金融的英语翻译

Lesson 7 tensorflow realizes convolutional neural network
随机推荐
[Yu Yue education] flower cultivation reference materials of Weifang Vocational College
删除外部表源数据
CS-证书指纹修改
CS certificate fingerprint modification
MySQL is sorted alphabetically
Mise en œuvre d’une fonction complexe d’ajout, de suppression et de modification basée sur jeecg - boot
女生学软件测试难不难 入门门槛低,学起来还是比较简单的
Classification des verbes reconstruits grammaticalement - - English Rabbit Learning notes (2)
如何做好互联网金融的英语翻译
Thesis abstract translation, multilingual pure human translation
Use shortcut LNK online CS
[ 英語 ] 語法重塑 之 動詞分類 —— 英語兔學習筆記(2)
[English] Grammar remodeling: the core framework of English Learning -- English rabbit learning notes (1)
Introduction and underlying analysis of regular expressions
字幕翻译中翻英一分钟多少钱?
LeetCode - 152 乘积最大子数组
LeetCode每日一题(1870. Minimum Speed to Arrive on Time)
[web security] nodejs prototype chain pollution analysis
The ECU of 21 Audi q5l 45tfsi brushes is upgraded to master special adjustment, and the horsepower is safely and stably increased to 305 horsepower
記一個基於JEECG-BOOT的比較複雜的增删改功能的實現