当前位置:网站首页>Configure an encrypted web server
Configure an encrypted web server
2022-07-07 12:25:00 【Miracle_ ze】
Configure an encrypted web The server
- requirement
- 1. Add disks , Create a new partition , Create logical volumes
- 1. Add disks
- 2. start-up
- 3. View partition
- 4. Disk operating : Operation on new disk
- 1. Disk allocation
- 2. take sda1 Convert to physical volume
- 3. Add physical volumes to volume groups , Volume group name web
- 4. From the volume group web Split above 1G Create a new logical volume webvl
- 5. Use mkfs.xfs Command to logical volume web Create file system ( Formatted as xfs file system )
- 6. Permanently mount to file /tengbaiwan Catalog
- 2. stay vim /etc/httpd/conf.d/host.conf Input configuration
- 2. Creating files /tengbaiwan Create a file and enter the content
- 3. stay vim /etc/hosts Input content
- 4. In path /etc/pki/tls/certs Write a certificate in
- 5. Check out the website ( Premise : Create and add files to add website content : use echo)
requirement
1、 The site address is www.tengbaiwan.com
2、 The website content of this site should be stored in /tengbaiwan Catalog
3、/tengbaiwan The directory is saved in the newly added logical volume weblv On
4、 The logical volume is formatted as xfs The file system is permanently mounted
5、 This site must and can only be used https Protocol access
1. Add disks , Create a new partition , Create logical volumes
Because from the title web The server is not opened at the original default file address , Create a new file address for this
1. Add disks
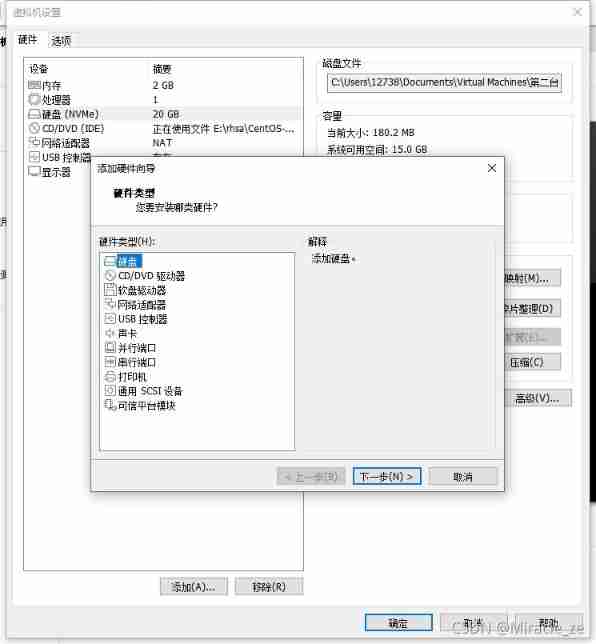
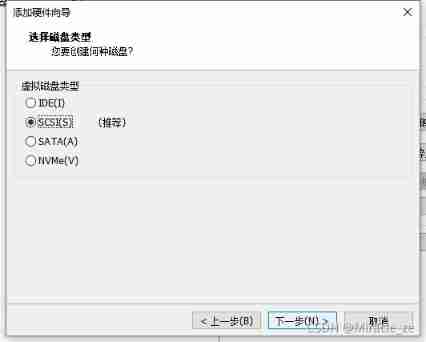
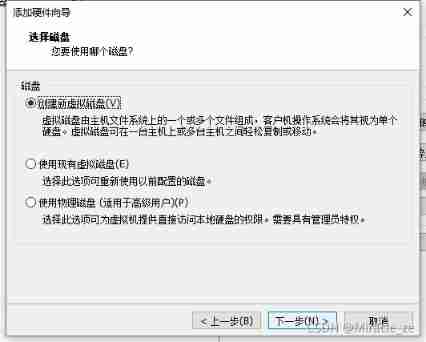
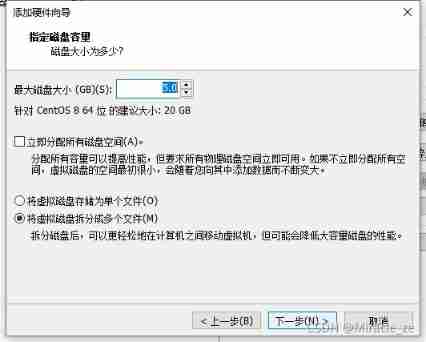

2. start-up
Our system is nvme in , But what he reads by default is not it . It becomes the first installation 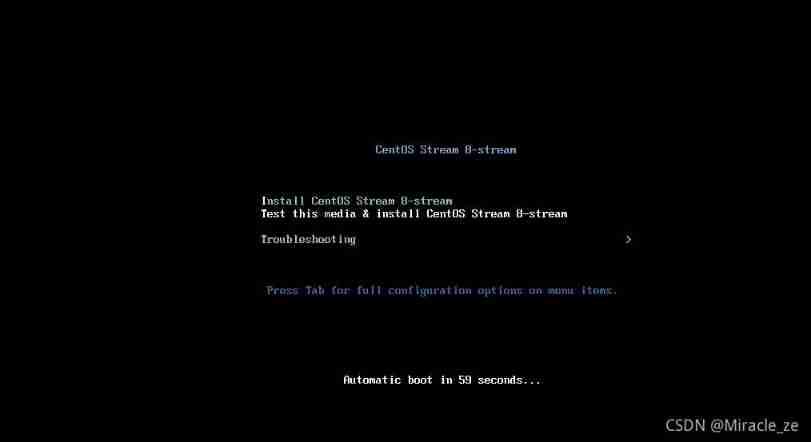
solve :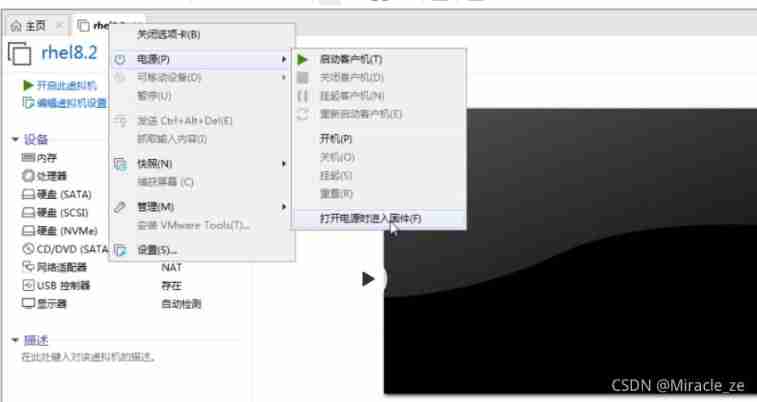
Adjust the system boot in the firmware
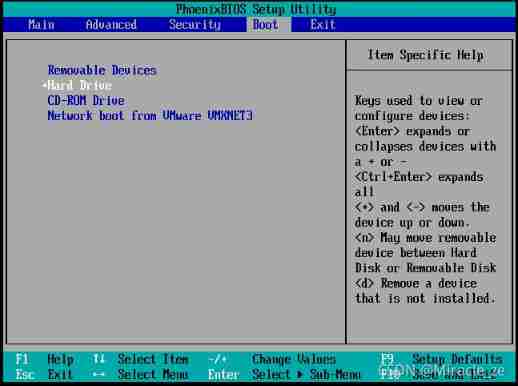
This indicates the order , Read the hard disk first and then the CD , Finally, the network starts
Modification priority :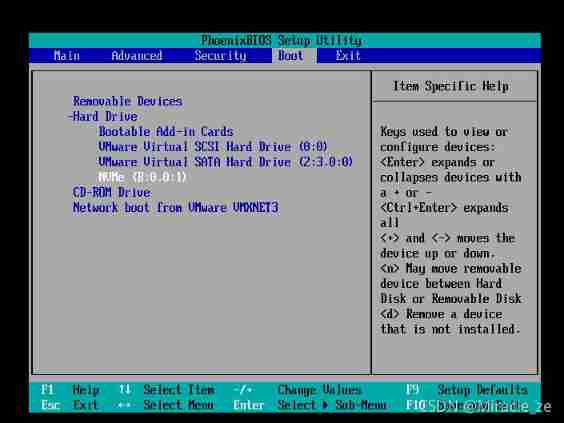
choice mvme:shift + advance (+: Move to ;-: Move down the )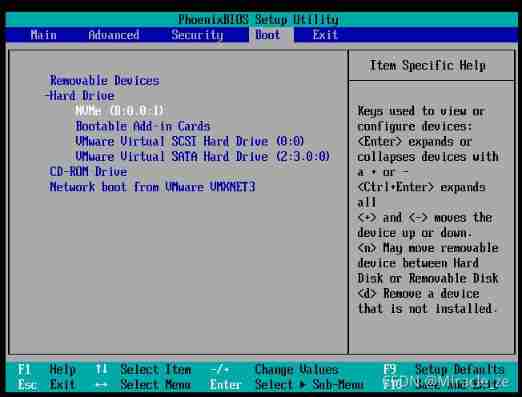
F10 preservation
3. View partition
command :
fdisk -l
result :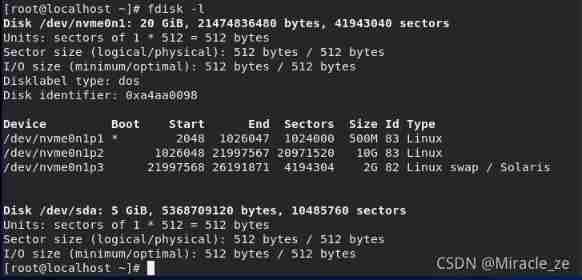
4. Disk operating : Operation on new disk
1. Disk allocation
command :
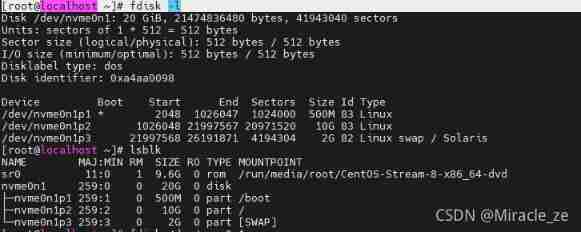
see
[[email protected] ~]# fdisk -l
Distribute :
fdisk /dev/nvme0n1

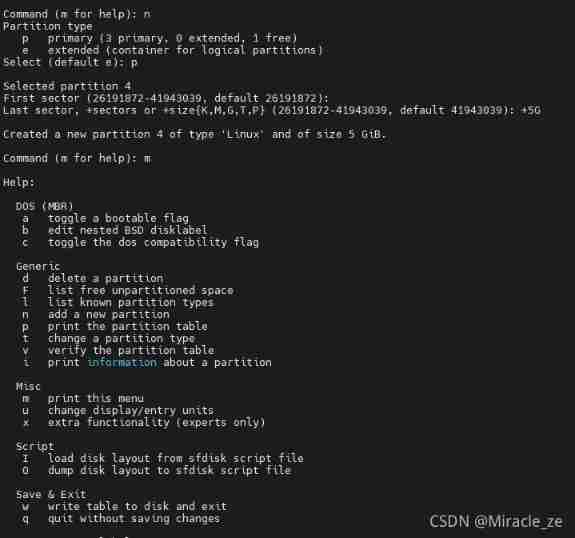
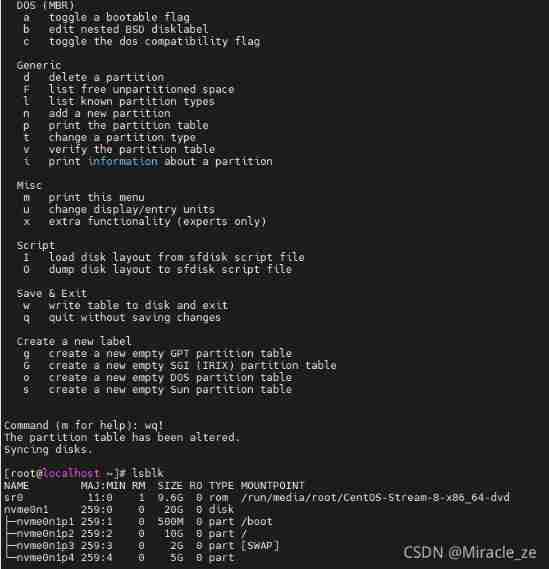
command ( Input m get help ):n
Select (default p): p
Zone number (1-4, Default 1):
start A sector (2048-10485759, The default is 2048):
The default value... Will be used 2048
Last A sector , + A sector or +size{K,M,G} (2048-10485759, The default is 10485759):+5G
Partition 1 Set to Linux type , The size is set to 5 GiB
View allocation 
2. take sda1 Convert to physical volume
command :
pvcreate /dev/sda1
effect :
[[email protected] ~]# pvcreate /dev/sda1
  Physical volume "/dev/sda1" successfully created.
3. Add physical volumes to volume groups , Volume group name web
command :
vgcreate web /dev/sda1
effect :
[[email protected] ~]# vgcreate web /dev/sda1
  Volume group "web" successfully created
4. From the volume group web Split above 1G Create a new logical volume webvl
command :
lvcreate -L 1G -n weblv web
effect :
[[email protected] ~]#  lvcreate -L 1G -n weblv web
  Logical volume "weblv" created.
5. Use mkfs.xfs Command to logical volume web Create file system ( Formatted as xfs file system )
command :
mkfs.xfs /dev/web/weblv
effect :
[[email protected] ~]#  mkfs.xfs /dev/web/weblv
meta-data=/dev/web/weblv         isize=512    agcount=4, agsize=65536 blks
         =                       sectsz=512   attr=2, projid32bit=1
         =                       crc=1        finobt=1, sparse=1, rmapbt=0
         =                       reflink=1
data     =                       bsize=4096   blocks=262144, imaxpct=25
         =                       sunit=0      swidth=0 blks
naming   =version 2              bsize=4096   ascii-ci=0, ftype=1
log      =internal log           bsize=4096   blocks=2560, version=2
         =                       sectsz=512   sunit=0 blks, lazy-count=1
realtime =none                   extsz=4096   blocks=0, rtextents=0
6. Permanently mount to file /tengbaiwan Catalog
Create directory file /tengbaiwan:
mkdir /tengbaiwan
effect :
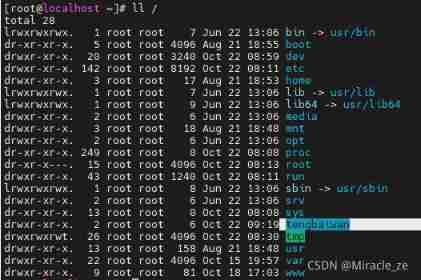
Permanently mount to /tengbaiwan Catalog
First of all to see /dev/sda1 Of UUID
command :sudo blkid /dev/sda1
open vim /etc/fstab
Permanently mount
add to :
UUID=McTtJH-aX4X-dvQA-xIxN-UCR6-krGW-5LUwZh /tengbaiwan xfs defaults 0 0
uuid Mount point Directory File system format defaults Backup (0 Indicates no backup ) Check (0 Means not to check )

UUID Can also write :
/dev/mapper/web-weblv
This document will not take effect immediately after writing , Because when the system is powered on , It has been read .
mount -a Reread /etc/fstab The document can take effect
2. stay vim /etc/httpd/conf.d/host.conf Input configuration
Add content 

2. Creating files /tengbaiwan Create a file and enter the content
echo tengbaiwan > /tengbaiwan/index.html
3. stay vim /etc/hosts Input content

Only in this way can we Linux Display inside , If you want to Windows The display inside should
stay
C:\Windows\System32\drivers\etc
Under the hosts Add one thing to the file
4. In path /etc/pki/tls/certs Write a certificate in
Documents related to the certificate should be uploaded :
xshow: use rz
MobaXterm: Use the upload file on the left
route :/etc/pki/tls/certs
Configure the certificate after installation
command :make tengbaiwan.crt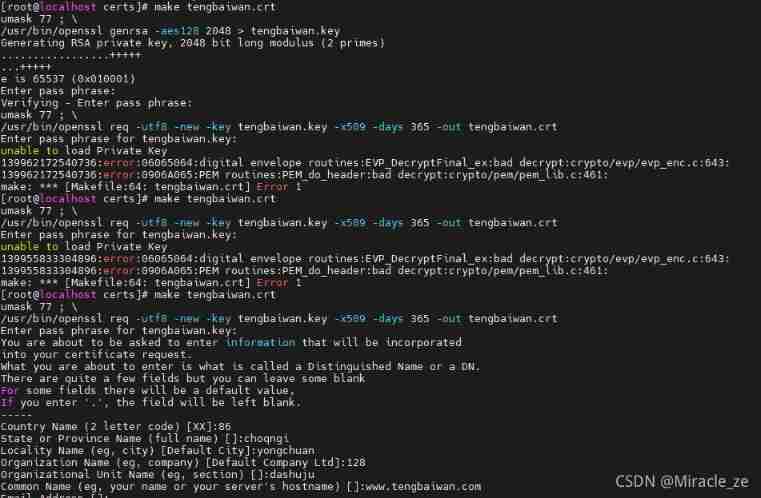
There is an error in the middle because of the wrong input 
5. Check out the website ( Premise : Create and add files to add website content : use echo)
mount —— Restart the service —— Delete permission ( in order to Windows Show )
linux see :curl -k http://www.tengbaiwan.com
Windows:https://www.tengbaiwan.com
边栏推荐
- SQL lab 1~10 summary (subsequent continuous update)
- SQL Lab (36~40) includes stack injection, MySQL_ real_ escape_ The difference between string and addslashes (continuous update after)
- 数据库系统原理与应用教程(008)—— 数据库相关概念练习题
- 《看完就懂系列》天哪!搞懂节流与防抖竟简单如斯~
- SQL Lab (46~53) (continuous update later) order by injection
- 盘点JS判断空对象的几大方法
- 浅谈估值模型 (二): PE指标II——PE Band
- sql-lab (54-65)
- 源代码防泄密中的技术区别再哪里
- [data clustering] realize data clustering analysis based on multiverse optimization DBSCAN with matlab code
猜你喜欢

全球首堆“玲龙一号”反应堆厂房钢制安全壳上部筒体吊装成功

Detailed explanation of debezium architecture of debezium synchronization

(待会删)yyds,付费搞来的学术资源,请低调使用!
Summed up 200 Classic machine learning interview questions (with reference answers)

小红书微服务框架及治理等云原生业务架构演进案例
![[full stack plan - programming language C] basic introductory knowledge](/img/6d/555ac6b80b015e0cdfb7ef0a234f9d.png)
[full stack plan - programming language C] basic introductory knowledge

浅谈估值模型 (二): PE指标II——PE Band

The left-hand side of an assignment expression may not be an optional property access.ts(2779)

Review and arrangement of HCIA
Superscalar processor design yaoyongbin Chapter 10 instruction submission excerpt
随机推荐
30. Few-shot Named Entity Recognition with Self-describing Networks 阅读笔记
Simple network configuration for equipment management
The function of adding @ before the path in C #
wallys/Qualcomm IPQ8072A networking SBC supports dual 10GbE, WiFi 6
数据库系统原理与应用教程(009)—— 概念模型与数据模型
Sort out the garbage collection of JVM, and don't involve high-quality things such as performance tuning for the time being
ENSP MPLS layer 3 dedicated line
盘点JS判断空对象的几大方法
Upgrade from a tool to a solution, and the new site with praise points to new value
小红书微服务框架及治理等云原生业务架构演进案例
Unity 贴图自动匹配材质工具 贴图自动添加到材质球工具 材质球匹配贴图工具 Substance Painter制作的贴图自动匹配材质球工具
Tutorial on the principle and application of database system (008) -- exercises on database related concepts
112. Network security penetration test - [privilege promotion article 10] - [Windows 2003 lpk.ddl hijacking rights lifting & MSF local rights lifting]
EPP+DIS学习之路(2)——Blink!闪烁!
开发一个小程序商城需要多少钱?
SQL blind injection (WEB penetration)
SQL Lab (46~53) (continuous update later) order by injection
SQL Lab (36~40) includes stack injection, MySQL_ real_ escape_ The difference between string and addslashes (continuous update after)
Is it safe to open an account in Ping An Securities mobile bank?
"Series after reading" my God! It's so simple to understand throttling and anti shake~