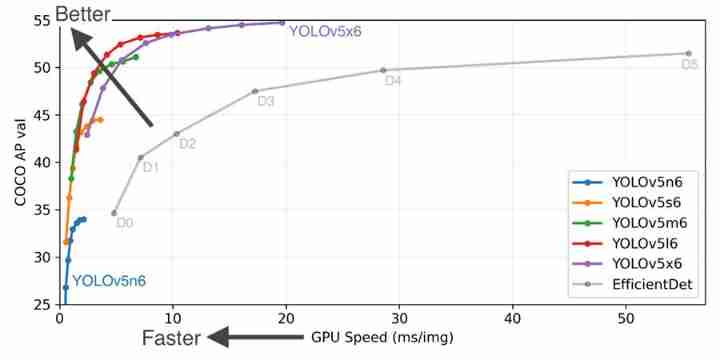
One 、 Why use YOLOv5
Two 、 Software tools
2.1 Anaconda
https://www.anaconda.com/products/individual
2.2 PyCharm
https://www.jetbrains.com/zh-cn/pycharm/download/
2.3 LabelImg
https://github.com/tzutalin/labelImg
3、 ... and 、 Image Overlays
To train your data set , You need to mark your picture and the object to be recognized , Be commonly called “ tagging ”, This article USES the LabelImg The tool annotates the image .
3.1 Left toolbar
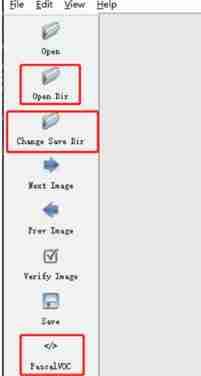
Open Dir: The path folder of the picture data to be marked
Change Save Dir: The path folder where the category label is saved
PascalVOC: The marked label is saved as VOC Format
3.2 Top menu bar
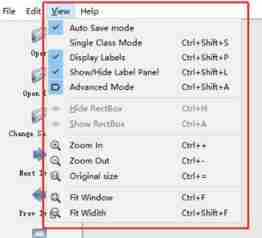
Auto Save mode: When you switch to the next picture , It will automatically save the label of the last marked picture , In this way, you don't have to press... For every picture marked Ctrl+S Save it
Display Labels: After marking the picture , The box and label will be displayed
Advanced Mode: In this way, the marked cross will remain suspended in the window , You don't have to mark one goal at a time , Press again W Shortcut key , Call up the marked cross .
3.3 Other shortcuts :
W: Call up the marked cross , Start tagging
A: Switch to the previous picture
D: Switch to the next picture
Ctrl+S: Save the labeled labels
del: Delete the rectangle of the dimension
Ctrl+ Mouse wheel : Hold down Ctrl, Then scroll the mouse wheel , You can adjust the display size of the annotation picture
Ctrl+U: Select the folder where you want to label pictures
Ctrl+R: Select the marked label Folder where labels are stored
↑→↓←: Move the position of the rectangular box of the dimension
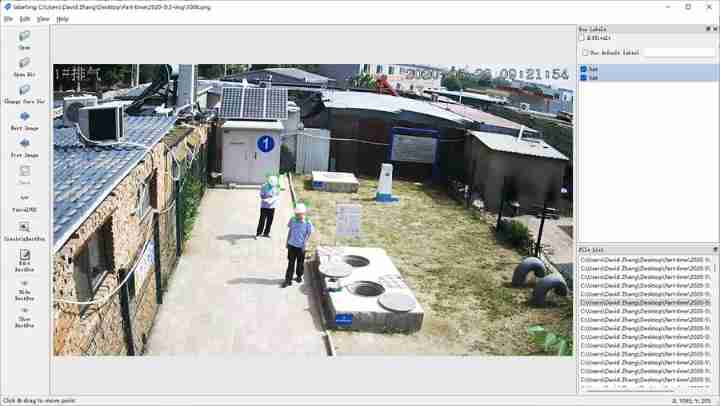
3.4 Annotation example
Four 、 Environment configuration
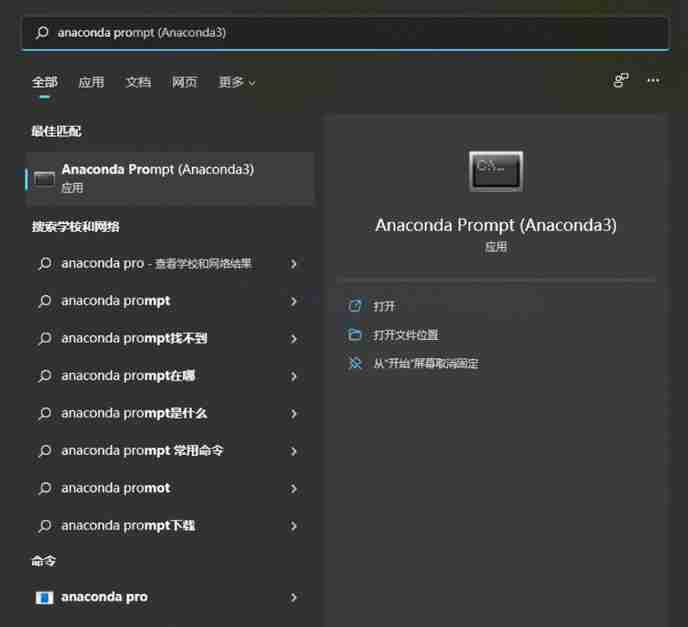
4.1 open Anaconda Prompt
After installation Anaconda after ,Win+S Enter the search box , Search for Anaconda Prompt, open

4.2 establish PyTorch Environmental Science
Input instruction :
conda create -n pytorch python=3.9
If prompted, ask “ whether ”, Type... All the time y, enter , that will do .
among “pytorch” Is the name of the environment , Can be changed to any name , For convenience , The following shall be used pytorch As the environment name
4.3 Use PyTorch Environmental Science
Enter the command :
conda activate pytorch
4.4 install PyTorch
In the use of pytorch After environment , Get into PyTorch Official website (PyTorch Official website ), Choose the corresponding configuration of your computer , The following figure shows the configuration of this machine , As a reference . Be careful Compute Platform Check whether the device graphics card supports CUDA And supported versions .
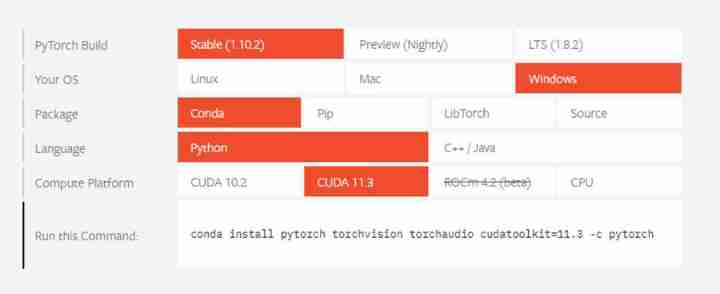
Copy Run this Command The command in to Anaconda Prompt in , enter , You can run . Such as asking questions , All choose y that will do .
thus , Environment configuration installation is complete .
5、 ... and 、YOLOv5 Code
5.1 Code acquisition
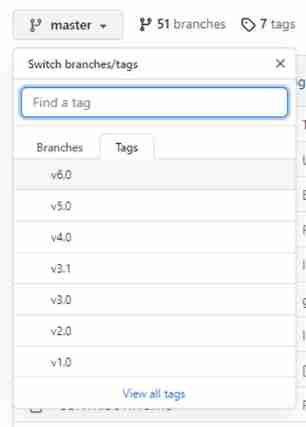
Get into GitHub Go to the official website (ultralytics/yolov5: YOLOv5 in PyTorch > ONNX > CoreML > TFLite (github.com).
Click the branch button in the upper left corner , Click on Tags, You can choose the code version , This article USES the v6.0
Click in the upper right corner Code → Download ZIP
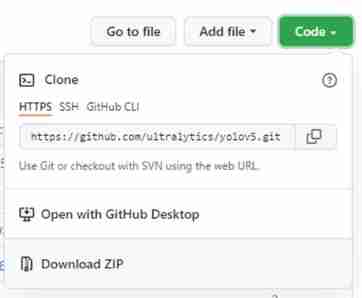
Unzip it and put it in the desired project folder .
5.2 Open the project and environment configuration
Right click the project folder →Open Folder as PyCharm Project

Get into PyCharm after , Select... From the menu bar in the upper left corner File→Settings Enter the setting interface . find Project:xxxx Options →Python Interpreter, Drop down menu to select environment .
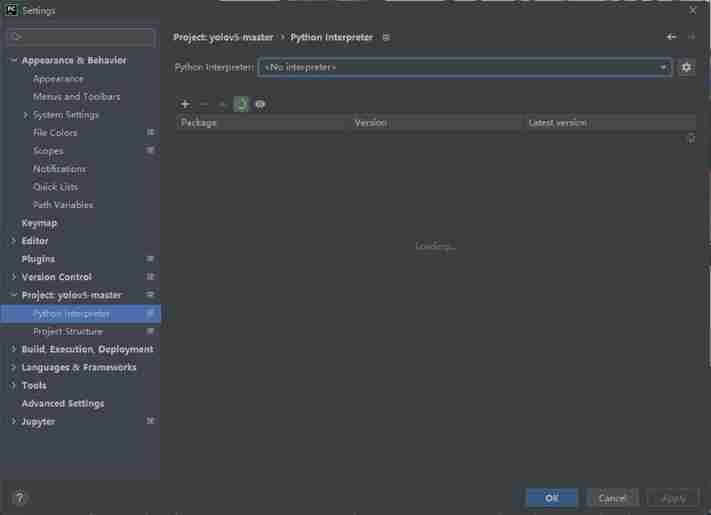
If there is no option , You can click the gear icon on the right , stay Conda Environment→Existing environment Find the appropriate location in , Choose compiler .
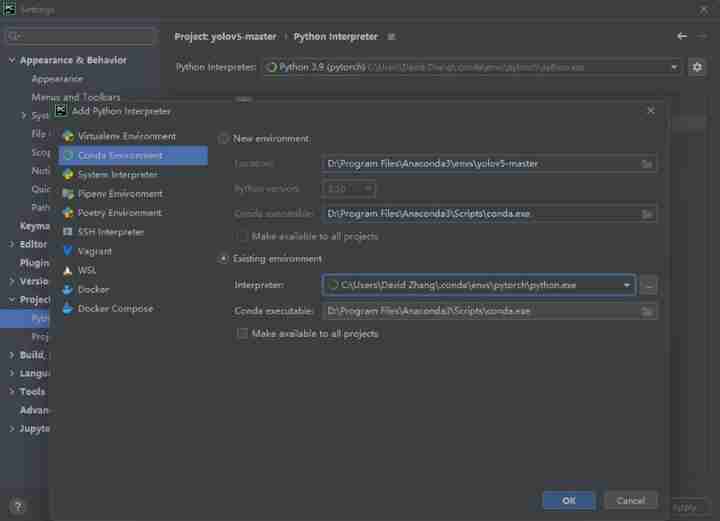
After setting, as shown in the figure , And then click Apply.

Click below Terminal Open the command line window , Input instruction :
conda activate pytorch
pip install -r requirements.txt
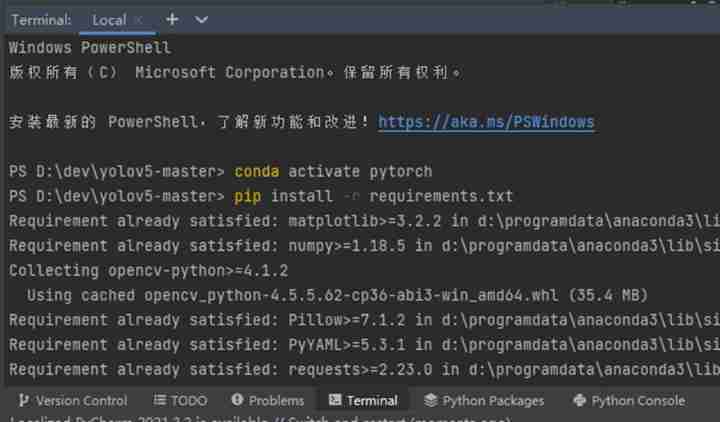
Wait until all required files are installed .
5.3 Code file
Two documents are mainly involved , One is train.py Used for training , One is detect.py Used to detect .
5.3.1 train.py
The main thing to understand is 451 The line parse_opt function , The code is as follows
def parse_opt(known=False):
   parser = argparse.ArgumentParser()
   parser.add_argument('--weights', type=str, default=ROOT / 'yolov5s.pt', help='initial weights path')
   parser.add_argument('--cfg', type=str, default='', help='model.yaml path')
   parser.add_argument('--data', type=str, default=ROOT / 'data/coco128.yaml', help='dataset.yaml path')
   parser.add_argument('--hyp', type=str, default=ROOT / 'data/hyps/hyp.scratch.yaml', help='hyperparameters path')
   parser.add_argument('--epochs', type=int, default=300)
   parser.add_argument('--batch-size', type=int, default=16, help='total batch size for all GPUs, -1 for autobatch')
   parser.add_argument('--imgsz', '--img', '--img-size', type=int, default=640, help='train, val image size (pixels)')
   parser.add_argument('--rect', action='store_true', help='rectangular training')
   parser.add_argument('--resume', nargs='?', const=True, default=False, help='resume most recent training')
   parser.add_argument('--nosave', action='store_true', help='only save final checkpoint')
   parser.add_argument('--noval', action='store_true', help='only validate final epoch')
   parser.add_argument('--noautoanchor', action='store_true', help='disable AutoAnchor')
   parser.add_argument('--evolve', type=int, nargs='?', const=300, help='evolve hyperparameters for x generations')
   parser.add_argument('--bucket', type=str, default='', help='gsutil bucket')
   parser.add_argument('--cache', type=str, nargs='?', const='ram', help='--cache images in "ram" (default) or "disk"')
   parser.add_argument('--image-weights', action='store_true', help='use weighted image selection for training')
   parser.add_argument('--device', default='', help='cuda device, i.e. 0 or 0,1,2,3 or cpu')
   parser.add_argument('--multi-scale', action='store_true', help='vary img-size +/- 50%%')
   parser.add_argument('--single-cls', action='store_true', help='train multi-class data as single-class')
   parser.add_argument('--optimizer', type=str, choices=['SGD', 'Adam', 'AdamW'], default='SGD', help='optimizer')
   parser.add_argument('--sync-bn', action='store_true', help='use SyncBatchNorm, only available in DDP mode')
   parser.add_argument('--workers', type=int, default=8, help='max dataloader workers (per RANK in DDP mode)')
   parser.add_argument('--project', default=ROOT / 'runs/train', help='save to project/name')
   parser.add_argument('--name', default='exp', help='save to project/name')
   parser.add_argument('--exist-ok', action='store_true', help='existing project/name ok, do not increment')
   parser.add_argument('--quad', action='store_true', help='quad dataloader')
   parser.add_argument('--linear-lr', action='store_true', help='linear LR')
   parser.add_argument('--label-smoothing', type=float, default=0.0, help='Label smoothing epsilon')
   parser.add_argument('--patience', type=int, default=100, help='EarlyStopping patience (epochs without improvement)')
   parser.add_argument('--freeze', nargs='+', type=int, default=[0], help='Freeze layers: backbone=10, first3=0 1 2')
   parser.add_argument('--save-period', type=int, default=-1, help='Save checkpoint every x epochs (disabled if < 1)')
   parser.add_argument('--local_rank', type=int, default=-1, help='DDP parameter, do not modify')

   \# Weights & Biases arguments
   parser.add_argument('--entity', default=None, help='W&B: Entity')
   parser.add_argument('--upload_dataset', nargs='?', const=True, default=False, help='W&B: Upload data, "val" option')
   parser.add_argument('--bbox_interval', type=int, default=-1, help='W&B: Set bounding-box image logging interval')
   parser.add_argument('--artifact_alias', type=str, default='latest', help='W&B: Version of dataset artifact to use')

   opt = parser.parse_known_args()[0] if known else parser.parse_args()
   return opt
epochs: It refers to how many times the whole data set will be iterated during the training process .
batch-size: How many pictures do you see at a time before you update the weight , Gradient down mini-batch.
cfg: The configuration file that stores the model structure
data: Storage training 、 File of test data
img-size: Enter the width and height of the picture .
rect: Do rectangular training
resume: Restore the recently saved model and start training
nosave: Save only the final checkpoint
notest: Test only the last epoch
evolve: Evolutionary hyperparameters
bucket:gsutil bucket
cache-images: Cache images to speed up training
weights: Weight file path
name: rename results.txt to results_name.txt
device:cuda device, i.e. 0 or 0,1,2,3 or cpu
adam: Use adam Optimize
multi-scale: Multiscale training ,img-size +/- 50%
single-cls: Single category training set
5.3.2 detect.py
Among them, what we need to know is 216 The line parse_opt function , The code is as follows :
def parse_opt():
    parser = argparse.ArgumentParser()
    parser.add_argument('--weights', nargs='+', type=str, default=ROOT / 'yolov5s.pt', help='model path(s)')
    parser.add_argument('--source', type=str, default=ROOT / 'data/images', help='file/dir/URL/glob, 0 for webcam')
    parser.add_argument('--data', type=str, default=ROOT / 'data/coco128.yaml', help='(optional) dataset.yaml path')
    parser.add_argument('--imgsz', '--img', '--img-size', nargs='+', type=int, default=[640], help='inference size h,w')
    parser.add_argument('--conf-thres', type=float, default=0.25, help='confidence threshold')
    parser.add_argument('--iou-thres', type=float, default=0.45, help='NMS IoU threshold')
    parser.add_argument('--max-det', type=int, default=1000, help='maximum detections per image')
    parser.add_argument('--device', default='', help='cuda device, i.e. 0 or 0,1,2,3 or cpu')
    parser.add_argument('--view-img', action='store_true', help='show results')
    parser.add_argument('--save-txt', action='store_true', help='save results to *.txt')
    parser.add_argument('--save-conf', action='store_true', help='save confidences in --save-txt labels')
    parser.add_argument('--save-crop', action='store_true', help='save cropped prediction boxes')
    parser.add_argument('--nosave', action='store_true', help='do not save images/videos')
    parser.add_argument('--classes', nargs='+', type=int, help='filter by class: --classes 0, or --classes 0 2 3')
    parser.add_argument('--agnostic-nms', action='store_true', help='class-agnostic NMS')
    parser.add_argument('--augment', action='store_true', help='augmented inference')
    parser.add_argument('--visualize', action='store_true', help='visualize features')
    parser.add_argument('--update', action='store_true', help='update all models')
    parser.add_argument('--project', default=ROOT / 'runs/detect', help='save results to project/name')
    parser.add_argument('--name', default='exp', help='save results to project/name')
    parser.add_argument('--exist-ok', action='store_true', help='existing project/name ok, do not increment')
    parser.add_argument('--line-thickness', default=3, type=int, help='bounding box thickness (pixels)')
    parser.add_argument('--hide-labels', default=False, action='store_true', help='hide labels')
    parser.add_argument('--hide-conf', default=False, action='store_true', help='hide confidences')
    parser.add_argument('--half', action='store_true', help='use FP16 half-precision inference')
    parser.add_argument('--dnn', action='store_true', help='use OpenCV DNN for ONNX inference')
    opt = parser.parse_args()
    opt.imgsz *= 2 if len(opt.imgsz) == 1 else 1  # expand
    print_args(FILE.stem, opt)
    return opt
weights: Weight of training
source: Test data , It can be a picture / Video path , It can also be '0'( The computer has its own camera ), It can also be rtsp Equal video stream
output: Pictures after network prediction / The path to save the video
img-size: Network input image size
conf-thres: Confidence threshold
iou-thres: do nms Of iou threshold
device: Set up the device
view-img: Whether to show the picture after prediction / video , Default False
save-txt: Whether to change the predicted frame coordinates to txt Save as file , Default False
classes: Set to keep only a few categories , Form like 0 perhaps 0 2 3
agnostic-nms: Conduct nms Whether to also remove the box between different categories , Default False
augment: Reasoning at multiple scales , Flip and other operations (TTA) Reasoning
update: If True, Then all the models are evaluated strip_optimizer operation , Remove pt Optimizer and other information in the file , The default is False
6、 ... and 、 Training custom datasets
6.1 Folder and data preparation
Create... In the project folder dataset Folder

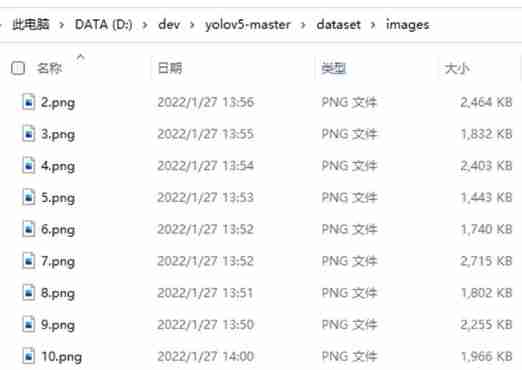
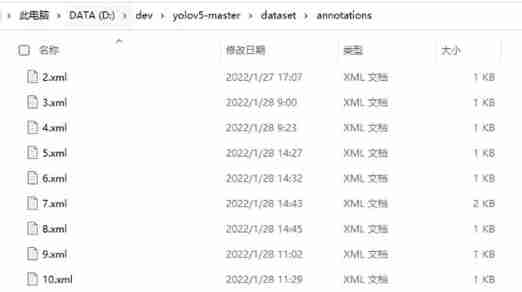
stay dataset Create three folders in the folder :images,annotations,imagesets
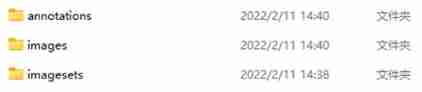
Move the marked picture into images Folder
Generate the dimension xml File move in annotations Folder
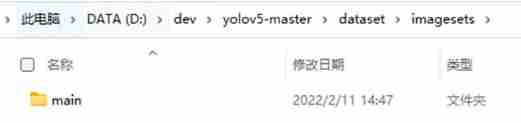
stay imagesets Create in folder main Folder
stay dataset Create in folder python Code split_train_val.py:
# coding:utf-8

import os
import random
import argparse

parser = argparse.ArgumentParser()
#xml File address , Modify according to your own data  xml Generally stored in Annotations Next
parser.add_argument('--xml_path', default='annotations', type=str, help='input xml label path')
# The partition of data sets , Select the address under your own data ImageSets/Main
parser.add_argument('--txt_path', default='imagesets/main', type=str, help='output txt label path')
opt = parser.parse_args()

trainval_percent = 1.0
train_percent = 0.9
xmlfilepath = opt.xml_path
txtsavepath = opt.txt_path
total_xml = os.listdir(xmlfilepath)
if not os.path.exists(txtsavepath):
    os.makedirs(txtsavepath)

num = len(total_xml)
list_index = range(num)
tv = int(num * trainval_percent)
tr = int(tv * train_percent)
trainval = random.sample(list_index, tv)
train = random.sample(trainval, tr)

file_trainval = open(txtsavepath + '/trainval.txt', 'w')
file_test = open(txtsavepath + '/test.txt', 'w')
file_train = open(txtsavepath + '/train.txt', 'w')
file_val = open(txtsavepath + '/val.txt', 'w')

for i in list_index:
    name = total_xml[i][:-4] + '\n'
    if i in trainval:
        file_trainval.write(name)
        if i in train:
            file_train.write(name)
        else:
            file_val.write(name)
    else:
        file_test.write(name)

file_trainval.close()
file_train.close()
file_val.close()
file_test.close()
Note that some of these directories need to be modified to the corresponding directory on your computer
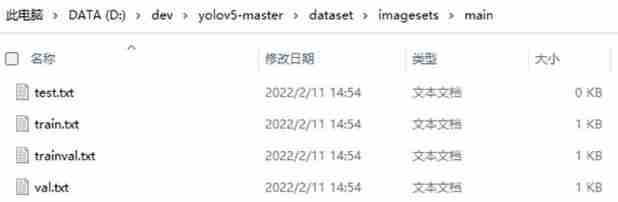
Run code , Will be in main The following four files are automatically generated in the folder :
6.2 Prepare label file
stay dataset New in folder python Code file voc_label.py:
# -*- coding: utf-8 -*-
import xml.etree.ElementTree as ET
import os
from os import getcwd

sets = ['train', 'val', 'test']
classes = ["hat", "no hat"]   #  Change to your own category
abs_path = os.getcwd()
print(abs_path)

def convert(size, box):
    dw = 1. / (size[0])
    dh = 1. / (size[1])
    x = (box[0] + box[1]) / 2.0 - 1
    y = (box[2] + box[3]) / 2.0 - 1
    w = box[1] - box[0]
    h = box[3] - box[2]
    x = x * dw
    w = w * dw
    y = y * dh
    h = h * dh
    return x, y, w, h

def convert_annotation(image_id):
    # Modify the corresponding file directory on your computer
    in_file = open('D:/dev/yolov5-master/dataset/annotations/%s.xml' % (image_id), encoding='UTF-8')
    out_file = open('D:/dev/yolov5-master/dataset/labels/%s.txt' % (image_id), 'w')
    tree = ET.parse(in_file)
    root = tree.getroot()
    size = root.find('size')
    w = int(size.find('width').text)
    h = int(size.find('height').text)
    for obj in root.iter('object'):
        difficult = obj.find('difficult').text
        cls = obj.find('name').text
        if cls not in classes or int(difficult) == 1:
            continue
        cls_id = classes.index(cls)
        xmlbox = obj.find('bndbox')
        b = (float(xmlbox.find('xmin').text), float(xmlbox.find('xmax').text), float(xmlbox.find('ymin').text),
             float(xmlbox.find('ymax').text))
        b1, b2, b3, b4 = b
        #  Mark out of bounds correction
        if b2 > w:
            b2 = w
        if b4 > h:
            b4 = h
        b = (b1, b2, b3, b4)
        bb = convert((w, h), b)
        out_file.write(str(cls_id) + " " + " ".join([str(a) for a in bb]) + '\n')

wd = getcwd()
for image_set in sets:
    # Change it to the corresponding directory on your computer
    if not os.path.exists('D:/dev/yolov5-master/dataset/labels/'):
        os.makedirs('D:/dev/yolov5-master/dataset/labels/')
    image_ids = open('D:/dev/yolov5-master/dataset/imagesets/main/%s.txt' % (image_set)).read().strip().split()
    list_file = open('D:/dev/yolov5-master/dataset/%s.txt' % (image_set), 'w')
    for image_id in image_ids:
        list_file.write(abs_path + '\images\%s.jpg\n' % (image_id))
        convert_annotation(image_id)
    list_file.close()
Pay attention to changing the address in the code to the address in your computer file 、 Change the label category to the annotation category
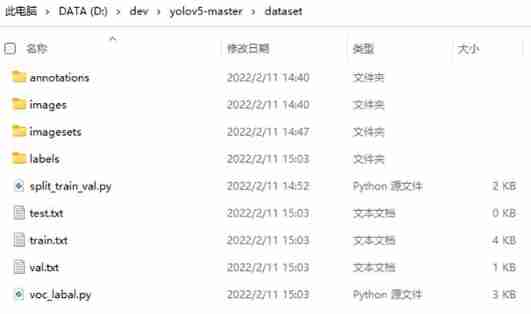
After operation dataset The folder will generate labels Folder , And three txt file :test.txt,train.txt,val.txt, As shown in the figure below :
6.3 Create dataset profile
stay data New in folder CustomData.yaml:
train: D:\dev\yolov5-master\dataset\train.txt
val: D:\dev\yolov5-master\dataset\val.txt
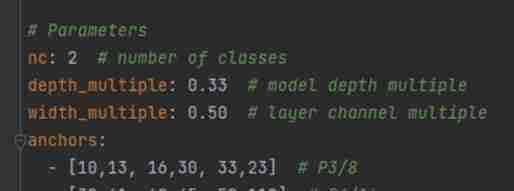
# number of classes
nc: 2
# class names
names: ['hat', 'no hat']
Note that you need to modify the file path 、 Number of label categories 、 And category name
6.4 The model configuration
In the project directory model Under the folder is the configuration file of the model , This way s、m、l、x edition , Gradually increase ( As the architecture grows , The training time is also gradually increasing ), Suppose that yolov5s.yaml, Just modify one parameter , hold nc Change to your own category number
6.5 Training models
stay train.py Modify the model configuration path in the file :

Other parameters can also be modified as needed , Please refer to 5.3.1 train.py
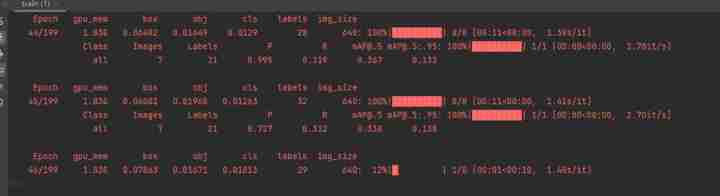
Enter compile run in the command line to start training :
python train.py --img 640 --batch 8 --epoch 200 --data data/CustomData.yaml --cfg models/yolov5s.yaml --weights weights/yolov5s.pt –-device 0
Because this machine has only one graphics card , therefore device Set to 0, If there are multiple graphics cards , May be set as 0,1 etc.
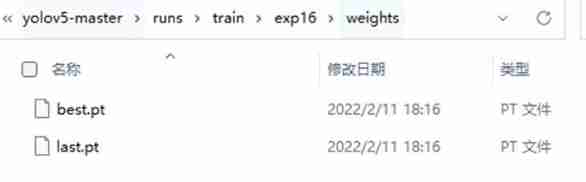
6.6 Training results
The final results will be saved in the project directory runs/train In the folder , Here's the picture :
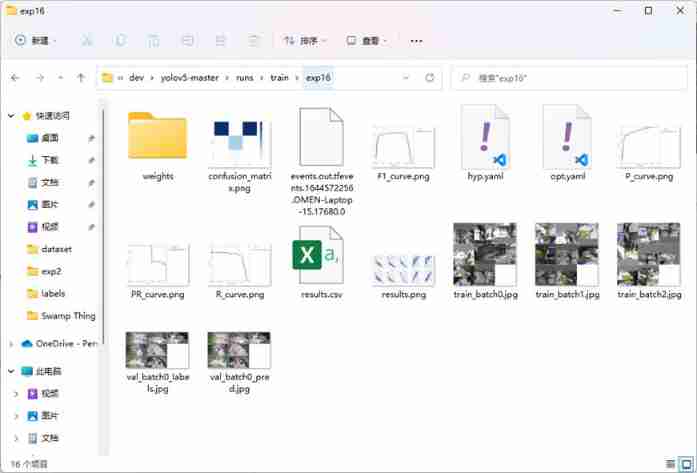
The weight file is in weights In the folder , contain best.pt, Is the best weight , as well as last.pt Is the weight of the last training .
7、 ... and 、 target recognition
The following mainly involves detect.py Code file
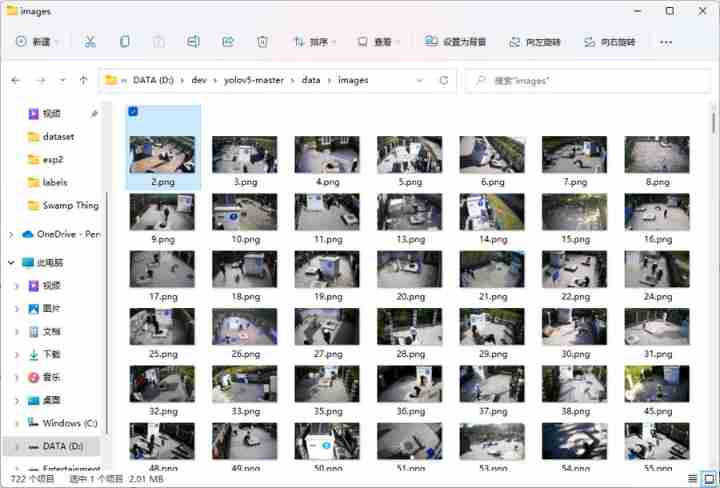
7.1 The target to be tested is stored
--source You can select the source address of the target to be detected , It can be a picture 、 video 、 perhaps rtps Monitoring video source, etc . Save in the project directory data/images Folder as an example , That is, the default folder .
7.2 Select the weight file
Select the weight file just trained best.pt that will do , stay --weights It is changed to the one just trained best.pt The path of , Pictured :

7.3 distinguish
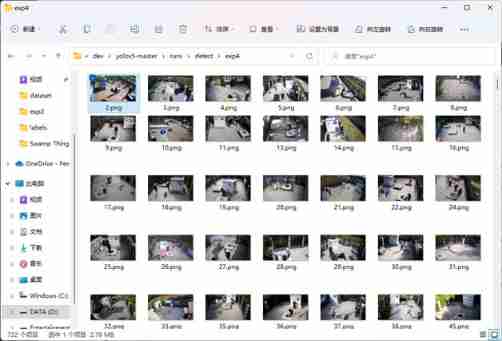
function detect.py that will do , The results are stored in runs/detect in , Pictured :