当前位置:网站首页>Opencv+dlib realizes "matching" glasses for Mona Lisa
Opencv+dlib realizes "matching" glasses for Mona Lisa
2022-07-06 09:07:00 【Guozhou questioner】
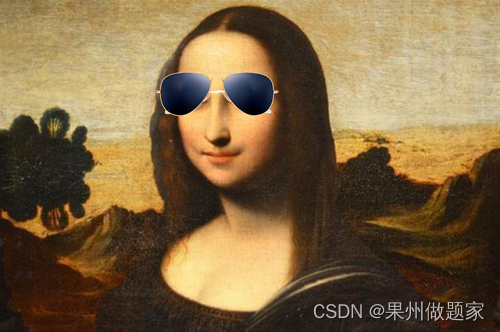
opencv+dlib To Mona Lisa “ with ” glasses
This case uses opencv+dlib To achieve the Mona Lisa wearing glasses .
The main principle is to use dlib Feature point extraction effect of face recognition , And use feature points to add glasses to the face .
Match Mona Lisa with glasses
Import toolkit
import cv2
import numpy as np
import dlib
from PIL import Image, ImageDraw, ImageFont
from imutils import face_utils, translate, rotate, resize
# Import python mapping matplotlib
import matplotlib.pyplot as plt
# Use ipython The magic method of , Embed the drawn image directly in notebook In the cell
%matplotlib inline
# Define visual image functions
def look_img(img):
    '''opencv The format of the read image is BGR,matplotlib The visualization format is RGB, So we need to BGR turn RGB'''
    img_RGB = cv2.cvtColor(img,cv2.COLOR_BGR2RGB)
    plt.imshow(img_RGB)
    plt.show()
Import model
#  Create a face detector
det_face = dlib.get_frontal_face_detector()
#  Load the marker detector
det_landmarks = dlib.shape_predictor("shape_predictor_68_face_landmarks.dat")  # 68 spot
Single picture processing
max_width = 500
img=cv2.imread('mnls.jpg')
img=resize(img,width=max_width)
deal = Image.open("0.png") # Glasses pictures
img_gray = cv2.cvtColor(img, cv2.COLOR_BGR2GRAY)
rects = det_face(img_gray, 0)
img = Image.fromarray(cv2.cvtColor(img, cv2.COLOR_BGR2RGB))
for rect in rects:
face = {
}
shades_width = rect.right() - rect.left()
# A predictor used to detect the position and direction of the current face
shape = det_landmarks(img_gray, rect)
shape = face_utils.shape_to_np(shape)
# Capture the outline of each eye from the input image
leftEye = shape[36:42]
rightEye = shape[42:48]
# Calculate the center of each eye
leftEyeCenter = leftEye.mean(axis=0).astype("int")
rightEyeCenter = rightEye.mean(axis=0).astype("int")
# Calculate the included angle between the eyes
dY = leftEyeCenter[1] - rightEyeCenter[1]
dX = leftEyeCenter[0] - rightEyeCenter[0]
angle = np.rad2deg(np.arctan2(dY, dX))
# Picture rewriting
current_deal = deal.resize((shades_width, int(shades_width * deal.size[1] / deal.size[0])),
resample=Image.Resampling.LANCZOS)
current_deal = current_deal.rotate(angle, expand=True)
current_deal = current_deal.transpose(Image.Transpose.FLIP_TOP_BOTTOM)
face['glasses_image'] = current_deal
left_eye_x = leftEye[0,0] - shades_width // 4
left_eye_y = leftEye[0,1] - shades_width // 6
face['final_pos'] = (left_eye_x, left_eye_y)
current_animation=1 # Parameter adjustment
glasses_on=1 # Parameter adjustment
current_y = int(current_animation / glasses_on * left_eye_y)
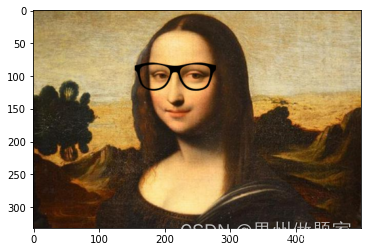
img.paste(current_deal, (left_eye_x, current_y-20), current_deal) # Adjust the position of glasses
display(img)
Complete code
#  Complete code :
import cv2
import numpy as np
import dlib
from PIL import Image, ImageDraw, ImageFont
from imutils import face_utils, translate, rotate, resize
# Import python mapping matplotlib
import matplotlib.pyplot as plt
# Use ipython The magic method of , Embed the drawn image directly in notebook In the cell
%matplotlib inline

# Define visual image functions
def look_img(img):
    '''opencv The format of the read image is BGR,matplotlib The visualization format is RGB, So we need to BGR turn RGB'''
    img_RGB = cv2.cvtColor(img,cv2.COLOR_BGR2RGB)
    plt.imshow(img_RGB)
    plt.show()

#  Create a face detector
det_face = dlib.get_frontal_face_detector()
#  Load the marker detector
det_landmarks = dlib.shape_predictor("shape_predictor_68_face_landmarks.dat")  # 68 spot

max_width = 500
img=cv2.imread('mnls.jpg')     # Face photos
img=resize(img,width=max_width)
deal = Image.open("./Glasses/1.png")      # Glasses pictures
img_gray = cv2.cvtColor(img, cv2.COLOR_BGR2GRAY)
rects = det_face(img_gray, 0)
img = Image.fromarray(cv2.cvtColor(img, cv2.COLOR_BGR2RGB))

for rect in rects:
    face = {
    }
    shades_width = rect.right() - rect.left()

    #  A predictor used to detect the position and direction of the current face
    shape = det_landmarks(img_gray, rect)
    shape = face_utils.shape_to_np(shape)

    #  Capture the outline of each eye from the input image
    leftEye = shape[36:42]
    rightEye = shape[42:48]

    #  Calculate the center of each eye
    leftEyeCenter = leftEye.mean(axis=0).astype("int")
    rightEyeCenter = rightEye.mean(axis=0).astype("int")

    #  Calculate the included angle between the eyes
    dY = leftEyeCenter[1] - rightEyeCenter[1]
    dX = leftEyeCenter[0] - rightEyeCenter[0]
    angle = np.rad2deg(np.arctan2(dY, dX))

    #  Picture rewriting
    current_deal = deal.resize((shades_width, int(shades_width * deal.size[1] / deal.size[0])),
                           resample=Image.Resampling.LANCZOS)
    current_deal = current_deal.rotate(angle, expand=True)
    current_deal = current_deal.transpose(Image.Transpose.FLIP_TOP_BOTTOM)
    face['glasses_image'] = current_deal
    left_eye_x = leftEye[0,0] - shades_width // 4
    left_eye_y = leftEye[0,1] - shades_width // 6
    face['final_pos'] = (left_eye_x, left_eye_y)
    current_animation=1   # Parameter adjustment
    glasses_on=0.8          # Parameter adjustment
    current_y = int(current_animation / glasses_on * left_eye_y)
    img.paste(current_deal, (left_eye_x, current_y-20), current_deal)   # Adjust the position of glasses

#PIL Image to CV2 Images
cv2_img = cv2.cvtColor(np.asarray(img), cv2.COLOR_RGB2BGR)
look_img(cv2_img)
Picture synthesis gif
import imageio

def compose_gif():
    gif_images = []
    for path in img_paths:
        gif_images.append(imageio.imread(path))
    imageio.mimsave("test.gif",gif_images,fps=1)

data_path='./output'   # Data folder
images=os.listdir(data_path)
img_paths=[]
for i in images:
    img_paths+=[os.path.join(data_path,i)]
compose_gif()
Effect display :
边栏推荐
- LeetCode:124. Maximum path sum in binary tree
- Leetcode: Sword finger offer 42 Maximum sum of continuous subarrays
- Compétences en mémoire des graphiques UML
- 一改测试步骤代码就全写 为什么不试试用 Yaml实现数据驱动?
- 五层网络体系结构
- BMINF的后训练量化实现
- [OC-Foundation框架]--<Copy对象复制>
- LeetCode:剑指 Offer 03. 数组中重复的数字
- 如何正确截取字符串(例:应用报错信息截取入库操作)
- [OC]-<UI入门>--常用控件-UIButton
猜你喜欢
![[OC]-<UI入门>--常用控件-UIButton](/img/4d/f5a62671068b26ef43f1101981c7bb.png)
[OC]-<UI入门>--常用控件-UIButton
Simclr: comparative learning in NLP
BN折叠及其量化

MYSQL卸载方法与安装方法

UML图记忆技巧

Digital people anchor 618 sign language with goods, convenient for 27.8 million people with hearing impairment

Once you change the test steps, write all the code. Why not try yaml to realize data-driven?
After reading the programmer's story, I can't help covering my chest...
![[embedded] cortex m4f DSP Library](/img/83/ab421d5cc18e907056ec2bdaeb7d5c.png)
[embedded] cortex m4f DSP Library

Booking of tourism products in Gansu quadrupled: "green horse" became popular, and one room of B & B around Gansu museum was hard to find
随机推荐
Using C language to complete a simple calculator (function pointer array and callback function)
Intel distiller Toolkit - Quantitative implementation 1
【shell脚本】使用菜单命令构建在集群内创建文件夹的脚本
[text generation] recommended in the collection of papers - Stanford researchers introduce time control methods to make long text generation more smooth
UML圖記憶技巧
Selenium+Pytest自动化测试框架实战(下)
LeetCode:124. Maximum path sum in binary tree
MySQL uninstallation and installation methods
LeetCode:836. Rectangle overlap
LeetCode:39. 组合总和
Leetcode: Jianzhi offer 03 Duplicate numbers in array
LeetCode:214. Shortest palindrome string
[OC foundation framework] - [set array]
Simclr: comparative learning in NLP
LeetCode:124. 二叉树中的最大路径和
Nacos 的安装与服务的注册
Selenium+pytest automated test framework practice (Part 2)
LeetCode:221. Largest Square
LeetCode:498. Diagonal traversal
LeetCode:836. 矩形重叠