当前位置:网站首页>Face recognition_ recognition
Face recognition_ recognition
2022-07-06 11:24:00 【imxlw00】
Github Open source face recognition project face_recognition,face_recognition Is a powerful 、 Simple 、 Open source project of face recognition
install
pip install face_recognition
Import face_recognition modular
import face_recognition
load_image_file Load image
call face_recognition.load_image_file() Read image . The output image is rgb Format (opencv Medium is bgr Format )
import face_recognition
image = face_recognition.load_image_file("../datas/obama.jpg")
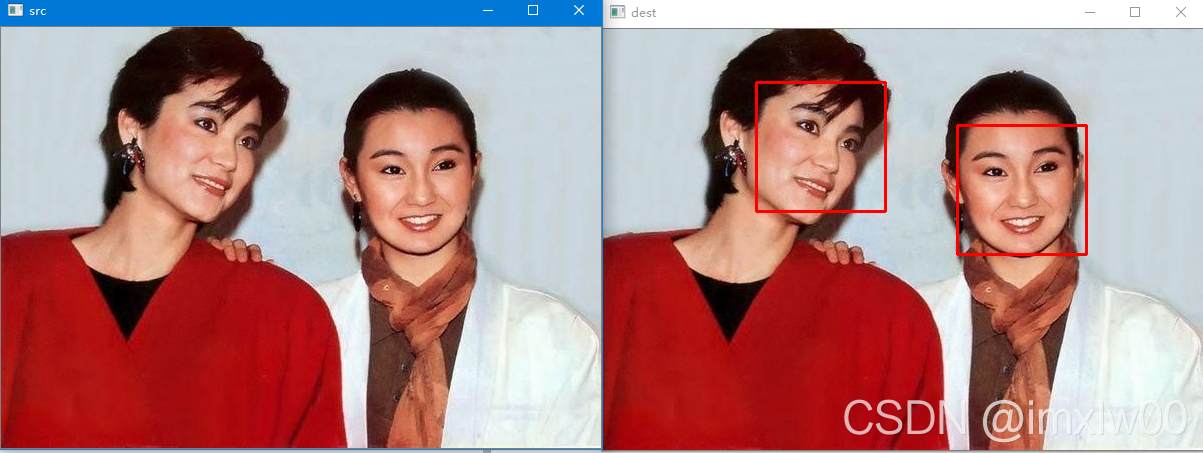
face_locations Face detection
It can locate the face position information recognized in all images , The return value is in list form , Each line in the list is the location information of a face , Include [top, right, bottom, left]
import face_recognition
import  cv2
# Load the image file
image = face_recognition.load_image_file("../datas/hz.png")
image2 = cv2.cvtColor(image,cv2.COLOR_BGR2RGB)
cv2.imshow("src",image2)

face_locations = face_recognition.face_locations(image)
#  Loop through all the faces found
for face_location in face_locations:
        #  Print the position information of each face
        top, right, bottom, left = face_location
        print("A face is located at pixel location Top: {}, Left: {}, Bottom: {}, Right: {}".format(top, left, bottom, right))
        #  Specify the location information of the face , Then display the face picture
        # face_image = image2[top:bottom, left:right]
        # cv2.imshow("src2", face_image)
        #  Rectangle box
        cv2.rectangle(image2, (left, top), (right, bottom), (0, 0, 255), 2)
cv2.imshow("dest",image2)
cv2.waitKey(0)
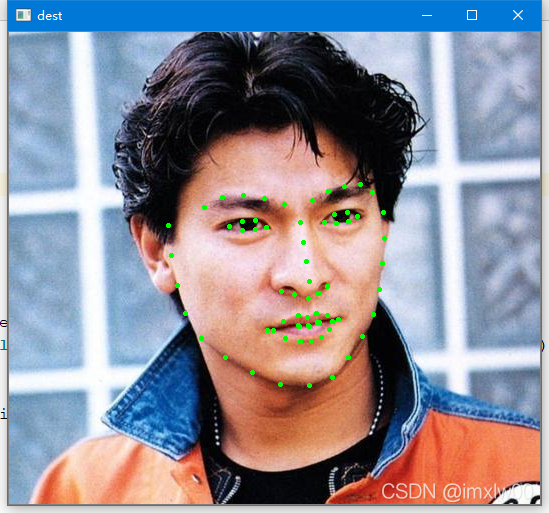
face_landmarks() Key points of face recognition
call face_recognition.face_landmarks(image) The key point information of human face can be recognized , Including eyes 、 nose 、 Mouth and Chin
The return value is the list containing the facial feature dictionary , Each item in the list corresponds to a face , Include nose_bridge、right_eyebrow、right_eye、chine、left_eyebrow、bottom_lip、nose_tip、top_lip、left_eye Several parts , Each part contains several feature points (x,y), All in all 68 Characteristic points .
import cv2
import face_recognition
# Load the image file
image = face_recognition.load_image_file("images/ldh2.jpg")
image2 = cv2.cvtColor(image,cv2.COLOR_BGR2RGB)

face_landmarks_list = face_recognition.face_landmarks(image)

facial_features = [
        'chin',
        'left_eyebrow',
        'right_eyebrow',
        'nose_bridge',
        'nose_tip',
        'left_eye',
        'right_eye',
        'top_lip',
        'bottom_lip'
    ]
thickness = 2
point_size = 1
point_color = (0, 255, 0)  # BGR

for face_landmarks in face_landmarks_list:

    for facial_feature in  face_landmarks:
        points_list = face_landmarks[facial_feature]
        print("The {} in this face has the following points: {}".format(facial_feature, points_list))
        #  Draw each face feature in the image !
        for point in points_list:
            cv2.circle(image2, point, point_size, point_color, thickness)

cv2.imshow("dest",image2)
cv2.waitKey(0)
face_encodings() Face coding
Get the face code of each face in each image file , Every face is a 128 Dimension vector
import face_recognition
# Load the image file
image = face_recognition.load_image_file("images/ldh2.jpg")

face_encodings = face_recognition.face_encodings(image)
for face_encoding in face_encodings:
    print("face_encoding len = {} \nencoding:{}\n\n".format(len(face_encoding),face_encoding))
face_encoding len = 128
encoding:[-0.12857245 0.2251953 -0.05680346 -0.009356 -0.07961649 -0.01976449
-0.03006363 -0.2188953 0.18227896 -0.06380306 0.23052536 -0.00517259
-0.24484953 -0.1024491 -0.07127093 0.10542907 -0.15712184 -0.24606238
-0.04181587 0.01180026 0.09390671 0.01014723 0.03316356 0.08216273
-0.08543567 -0.27527595 -0.10761252 -0.08561324 0.09562894 -0.06388975
-0.07860459 -0.01040951 -0.21186014 -0.10162984 0.09300554 0.08929634
-0.01133628 -0.02549033 0.25640246 -0.03459882 -0.22288607 0.06690408
0.05515105 0.31292963 0.14994277 0.06461242 0.00211182 -0.18974975
0.11956067 -0.07477805 0.09382927 0.21616243 0.18040094 0.02733615
0.03574533 -0.20213988 -0.00134893 0.08189995 -0.1417242 -0.00179647
0.10290838 -0.06461908 -0.01702856 -0.11400557 0.20824584 0.04568703
-0.07567319 -0.24240926 0.12750657 -0.16503944 -0.10546687 0.14743967
-0.13195604 -0.13922986 -0.26378733 -0.00479815 0.42761648 0.13261758
-0.17136547 0.09223576 -0.04313177 -0.03386433 0.07099032 0.1085121
-0.10494502 0.06504983 -0.15515642 -0.00395807 0.2313281 -0.01442198
-0.08458654 0.14688034 -0.00217457 0.07351732 0.06130501 0.01452726
-0.10001963 0.01601498 -0.12459313 -0.06574792 0.00460516 -0.01154638
-0.00899489 0.13434561 -0.14506203 0.06423949 -0.01264461 0.03912276
-0.06142928 0.01014899 -0.07765882 -0.04298633 0.10122736 -0.29780281
0.25160897 0.09939459 0.02078611 0.08443137 0.10742732 0.06015015
-0.00302691 -0.00466454 -0.20120506 -0.10478879 0.12094288 -0.0389271
0.19183818 -0.00275789]
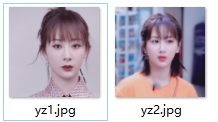
compare_faces() Face matching
compare_faces() The method can match two facial feature codes , Using the inner product of two vectors to measure the similarity , Confirm whether it is the same face according to the threshold
The first parameter gives a list of face codes ( Many faces )
The second parameter gives a single face code ( A face )
Default parameters :tolerance=0.6, It can be changed according to your own needs ,tolerance The smaller the size, the tighter the match
The face that matches successfully returns True, Matching failed returns False, The order is consistent with the order of faces in the first parameter
matches ==face_recognition.compare_faces(known_face_encodings,face_encoding,tolerance=0.39)
import face_recognition
#  Load pictures of known faces
known_image = face_recognition.load_image_file("images/yz1.jpg")

#  Load pictures of unknown faces
unknown_image = face_recognition.load_image_file("images/yz2.jpg")

#  load 2 A picture of a known face
ldh_encoding = face_recognition.face_encodings(known_image)[0]
unknown_encoding = face_recognition.face_encodings(unknown_image)[0]

#  Calculate the distance between the unknown picture and the known picture
results = face_recognition.compare_faces([ldh_encoding], unknown_encoding,tolerance=0.39)[0]
print(results)
Reference link :https://blog.csdn.net/weixin_42213622/article/details/108193123
边栏推荐
- AcWing 1294. Cherry Blossom explanation
- SSM整合笔记通俗易懂版
- FRP intranet penetration
- 基于apache-jena的知识问答
- ES6 Promise 对象
- 牛客Novice月赛40
- The virtual machine Ping is connected to the host, and the host Ping is not connected to the virtual machine
- L2-006 树的遍历 (25 分)
- When you open the browser, you will also open mango TV, Tiktok and other websites outside the home page
- Deoldify project problem - omp:error 15:initializing libiomp5md dll,but found libiomp5md. dll already initialized.
猜你喜欢
One click extraction of tables in PDF
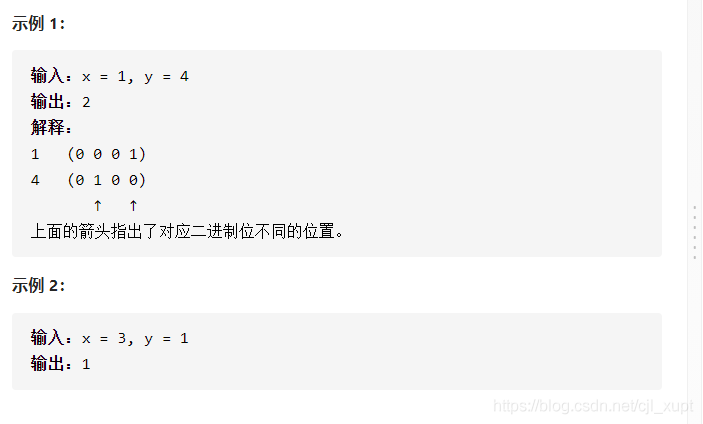
Leetcode 461 Hamming distance
C语言读取BMP文件

AcWing 1298.曹冲养猪 题解
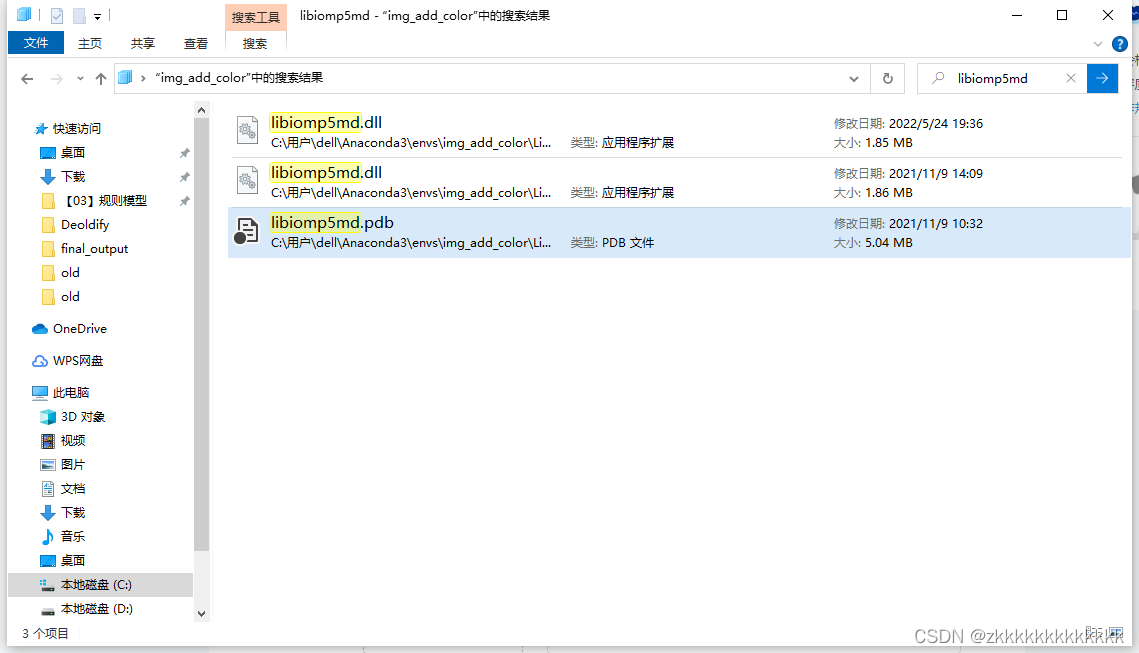
Deoldify项目问题——OMP:Error#15:Initializing libiomp5md.dll,but found libiomp5md.dll already initialized.

csdn-Markdown编辑器
![[recommended by bloggers] asp Net WebService background data API JSON (with source code)](/img/04/c721e6177b578b30cbbf334cb1b6c9.png)
[recommended by bloggers] asp Net WebService background data API JSON (with source code)

double转int精度丢失问题

Why can't I use the @test annotation after introducing JUnit
QT creator test
随机推荐
Ansible practical Series III_ Task common commands
Learning question 1:127.0.0.1 refused our visit
[蓝桥杯2017初赛]方格分割
Swagger、Yapi接口管理服务_SE
02 staff information management after the actual project
Classes in C #
Ansible practical series I_ introduction
C语言读取BMP文件
基于apache-jena的知识问答
Redis的基础使用
一键提取pdf中的表格
Ansible实战系列一 _ 入门
机器学习--人口普查数据分析
How to set up voice recognition on the computer with shortcut keys
[recommended by bloggers] C MVC list realizes the function of adding, deleting, modifying, checking, importing and exporting curves (with source code)
01项目需求分析 (点餐系统)
02-项目实战之后台员工信息管理
[蓝桥杯2020初赛] 平面切分
AcWing 242. A simple integer problem (tree array + difference)
QT creator specifies dependencies