当前位置:网站首页>[paper reproduction] cyclegan (based on pytorch framework) {unfinished}
[paper reproduction] cyclegan (based on pytorch framework) {unfinished}
2022-07-06 14:08:00 【Carp King's growth path】
CycleGAN( be based on PyTorch frame )
0. Brief introduction of the paper
CycleGAN It is a model to realize style migration , Its papers can be found on major platforms . We are aixiv You can find :https://arxiv.org/pdf/1703.10593.pdf.
The code we reproduced is from the following github Warehouse :https://github.com/junyanz/pytorch-CycleGAN-and-pix2pix.
It seems so simple , But it's really difficult for beginners , Let's take a closer look at the structure of the code .
0.1 The main work of this paper
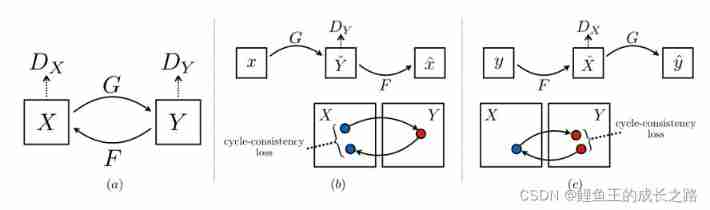
- When the training set is missing , Transfer pictures from one style to another . I hope to learn a mapping rule G, bring G(X)=Y.
- Hope to find G Reversible transformation of F bring F(G(X))=X.
- This paper has made many attempts in terms of tasks , And compare with the previous method .
0.2 introduction
- Overview of the overall steps : Capture style 1 The image features of , Convert it to style without training set prompts 2 Characteristics of .
- Research background : There are some difficulties in obtaining paired data of different styles .
- Specific implementation : Although it is impossible to obtain image level supervision ( Lack of labeled image pairs ), But set level supervision is available (X and Y There is a set of images in each , We don't know X A graph in corresponds to Y Which picture in , But we can know X and Y These two sets correspond to each other ). After training , bring y ̂=G(X) And y Indistinguishable , That is to make y ̂ and y The distribution of is as consistent as possible .
- Problems encountered : The first is that it is impossible to determine which pair is meaningful ( There may be many group mappings G), The second is that it is difficult to optimize and fight against losses independently ( The pairing program will convert all input mapping images into the same output image ).
- Solutions : Add cyclic consistency loss , hold F(G(X)) And x、G(F(Y)) And y The losses of are also added to the losses of the confrontation network .
0.3 Method
- Overall loss items : The loss function is 4 Parts of , Two of them are fighting losses , Two are the loss of cyclic consistency . The four items are :(1)D_Y: Used to measure y ̂=G(x) And y The loss of ;(2)D_X: Used to measure x ̂=F(y) And x The loss of ;(3)F(G(x)) And x The loss between ;(4)G(F(y)) And y The loss of .
- Against the loss : The basic formula is as follows .

The idea of optimization is :
- Loss of cycle consistency . The basic formula is as follows :

- The total loss function
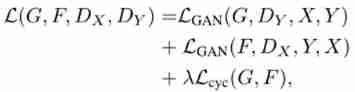
The optimization goal is
1. The code structure
1.1 Files in the root directory
Let's focus on the root directory .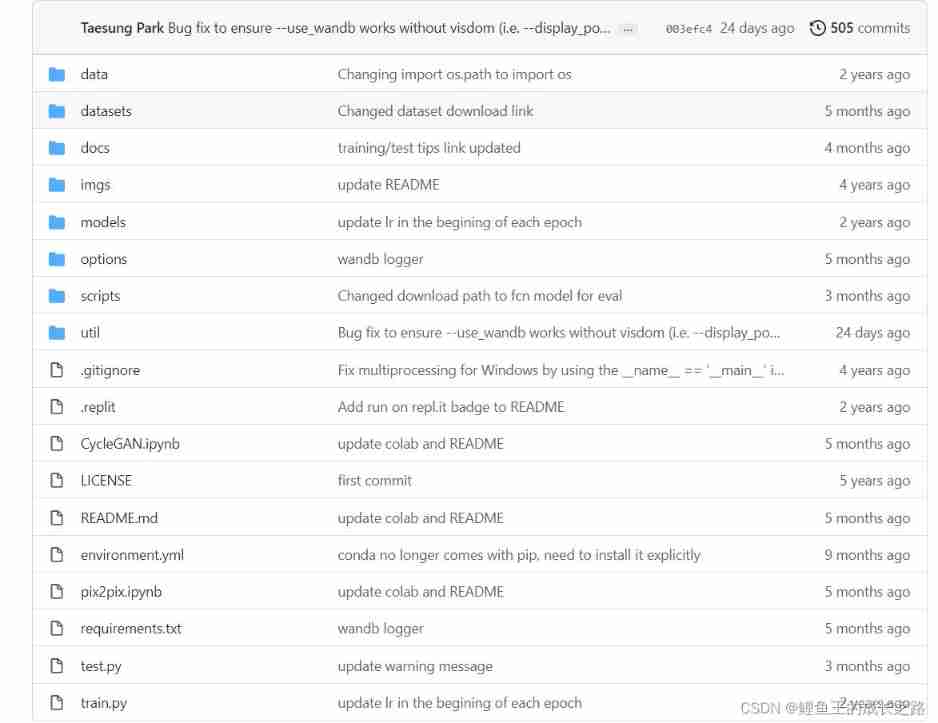
Inside this , Let's first look at the files in the root directory :
- README.md It's the instructions .
- requirements.txt It describes the versions of various packages required by such a warehouse .
- .gitignore Files are things to ignore when uploading ( Not all data needs to be commit Go to the warehouse , Sometimes you just need to hand in the source code ).
- LICENSE File is a license file , Will tell us what kind of authority we have ( For example, the code of this project can be downloaded and modified locally , However, you cannot modify the contents of the remote warehouse ).
- .replit The document provides the information used , Easy to run code in the browser , In this way, there is no need to configure the environment locally . This is using cloud editor repl.it Settings that may be used when .
- environment.yml This document is equivalent to Python+requirement.txt, We can use it directly
conda env create -f environment.ymlTo create a environment.yml The environment specified in the document ( What kind of bag is inside 、 What is the environment name 、Python What is the version ). Of course , If you have such an environment now , You want to export the corresponding environment.yml, Just use the following commandconda env export | grep -v "^prefix: " > environment.yml. - train.py Is the main script for training , You can specify what data sets and models to use . We use –model Option can specify which model to use ( for example :pix2pix, cyclegan, colorization), adopt –dataset_mode Specify the data mode ( for example :aligned, unaligned, single, colorization), adopt –dataroot Specify the data set path , adopt –name Specify the name of the experiment . Here is a command for reference
python train.py --dataroot ./datasets/maps --name maps_cyclegan --model cycle_gan. - test.py Is the main script for testing , adopt –checkpoints_dir You can set the path of model reading , adopt –results_dir You can set the path to save the results , adopt –dataroot You can set the path of the dataset , adopt –name You can set the task name , adopt –model Set the model used . about CycleGAN Two way test , You can use the command
python test.py --dataroot ./datasets/maps --name maps_cyclegan --model cycle_ganTo achieve , Among them –model cycle_gan It will change the mode of data import into two-way . about CycleGAN Single inspection of , You can use the commandpython test.py --dataroot datasets/horse2zebra/testA --name horse2zebra_pretrained --model test --no_dropoutTo achieve .–no_dropout It means no need dropout;–model test It refers to one-way verification CycleGAN Model , This will make –dataset_mode Automatic transformation single, That is, import a single set of data . - CycleGAN.ipynb and pix2pix.ipynb There are running tutorials of two models ( stay jupyter notebook).
1.2 Folder in the root directory
after , Let's take a look at what's going on in each folder .
1.2.1 docs Folder
docs Not much about folders , There are various description documents .
1.2.2 .git Folder
.git I won't say much about folders , This is a tool for distributed version management , What exactly is git Please Baidu . In my 【 Tutorial handling 】 There is also a special introduction under the column of git 's blog post .
1.2.3 data Folder
data Folder , There are various and data loading 、 Processing module .
1.2.3.1 template_dataset.py
First, let's focus on a template file , That is to say template_dataset.py, Here we only give some explanations , After reading, I think it doesn't matter to be abstract , We also have examples later (1.2.3.2 After the festival ), Slowly realize , Just read it slowly .
This file mainly serves as a template , Is a reference , The details are as follows :
- This script can be used as a template , Used to create new data types . If we want to create a new data type at this moment dummy, You need to create a directory named dummy_dataset.py The file of , You need to define a class , named DummyDataset, And this class needs to inherit the parent class BaseDataset( Of course, this class is in data In folder base_dataset.py In ), In the class DummyDataset There are four important functions that need to be realized , We will analyze it carefully later .
- How to use it after creation ? Can pass –dataset_mode template To specify the , But we need to pay attention , The name of the class you created class TemplateDataset、 stay –data_mode Specified later template、 file name template_dataset.py These three should be consistent , In practical application template Change to your own dataset name . The specific naming conventions are template_dataset.py This script is stated in front .
Okay , We have just explained the function of this template function , Now let's talk about the specific function to be realized :
- __len__ function , Used to count how much data there is in the data set , There is no need to say much about it , You need to pass in a self Parameters , This is obviously the object after instantiation . The return value is generally len(self.A_path), The content in brackets is access self Path properties of .
- modify_commandline_options function , Used to add options specific to this dataset , This script is just an example .
- __getitem__ function , This function will be used to get data points , The last thing to return is the data and the path of the data ,{‘data_A’: data_A, ‘data_B’: data_B, ‘path’: path}, All information is contained in such a dictionary .
- __init__ function , Notice that it needs to pass in two parameters , One is self, The other is opt, The former is the object that instantiates the class , Never mind ; The latter is the option we added , stay options There are some in the folder BaseOption, our opt It must be a subset . Then you have to inherit it first BaseDataset.__init__ This method , Then you need to get the path of the data set here , And we also need to preprocess the input data .
For your understanding __init__ function , I list. single_dataset.py The contents of this script are illustrated .
    def __init__(self, opt):
        """Initialize this dataset class. Parameters: opt (Option class) -- stores all the experiment flags; needs to be a subclass of BaseOptions """
        #  call BaseDataset.__init__ Method , The created object self And you in the training order opt Pass in .
        BaseDataset.__init__(self, opt)
        #  use opt.dataroot Resolve the data path ,opt.max_dataset_size Resolve the maximum allowable data set size .
        # make_dataset Function is used to make data sets , The return value is a list of pictures .
        #  Finally using sorted Function to sort the pictures .
        self.A_paths = sorted(make_dataset(opt.dataroot, opt.max_dataset_size))
        #  This is the part of processing the input .
        input_nc = self.opt.output_nc if self.opt.direction == 'BtoA' else self.opt.input_nc
        self.transform = get_transform(opt, grayscale=(input_nc == 1))
Read what I wrote above , You may be confused , Don't worry , We will use examples to analyze .
1.2.3.2 init.py
This script mainly provides interfaces . It is divided into two parts , The first part has three functions , The second part is a class , There are also several functions .
Let's move on to the first part .
- Let's first look at the first function find_dataset_using_name, This function has never been used outside this script , It is speculated that this function is used to find the corresponding dataset Class . We can simply understand the function of this function as , Given a dataset name , for example Single, We will singledataset.py Script SingleDataset This class is instantiated , And back to . The whole function looks hard to understand at first glance , It's not . first line
dataset_filename = "data." + dataset_name + "_dataset"It's a simple disassembly , Easy The second linedatasetlib = importlib.import_module(dataset_filename)Import , Some people will wonder what this second line is doing , This line is importing objects dynamically ,dataset_filename It's just an index , The result of import is an object after class instantiation datasetlib. At this time, the children may ask me again , Why is an object after class instantiation ? Because you pay attention to the left data Under the folder , Any data set ( such as single) Are they all corresponding to a script ( for example :single_dataset.py), Is there a class named SingleDataset. in the future , Any object imported after instantiation of this class , You need to import objects dynamically . Some children will ask again , Why do we import objects of this class , Don't you want to import datasets ? very good , Let's see if this class has __getitem__ function , Your data is read like this , You can understand it as , The data set is stored in the instantiated object of this class . The third line Define a variable and initializedataset = None. In the fourth rowtarget_dataset_name = dataset_name.replace('_', '') + 'dataset', Simple text editing . Lines five to eight It's about to officially enter the cycle , Let's seedatasetlib.__dict__.items(), Interested students can check __dict__ What is it python in __dict__ What is the role of ? Please see the __dict__ Usage of
,__dict_ It is also a magic function , You can return the attributes and methods defined in a class as a dictionary , anddatasetlib.__dict__.items()In fact, it is convenient for this cycle to traverse this dictionary , Some children may ask , Why should we traverse ? I'll tell you , Because there are many key value pairs formed by attributes or methods in this class , What we need is only those key value pairs composed of image names and images , That's why we are in this cycle if Function to determine its key name name Is it the class name we need , Then if it is also BaseDataset Subset , That means the current one in the traversal process cls Is the class corresponding to the data set we need . Read it out for dataset. The ninth to tenth lines are error messages , If the conditional statement in line 9 is triggered , So on line 10 raise The error message will be automatically executed ,raise yes Python A common grammar . Last , This method obviously returns line 11 dataset,return dataset. Be careful , This place dataset In fact, it is an instantiated object formed by a class , Don't think there are only pictures in it . - Look at the second function get_option_setter. This function returns a static method , This method is responsible for the option Editing ( And these commands are what we usually start training / The commands used when testing scripts ), And this method exists in dataset_class In this class , How to get this class ? The answer is in the above function .
- Let's look at the third function create_dataset, This time according to the given option Really make a data set ( No longer return a class like the first function ), The code structure is also very simple , One line instantiation , One line calls load_data() Method , Finally, return the required data set . But we haven't seen CustomDatasetDataLoader This class . Don't worry. , Let's move on .
Let's move on to the second part ,CustomDatasetDataLoader This class .
- Have a look first __init__ Function , One of the parameters that need to be passed in is self, Is the object after instantiation , The other is opt, That is, various options . The first line is self The nature of , That is to say self.opt, This is equal to the parameter you passed in opt, The second line , The code is
dataset_class = find_dataset_using_name(opt.dataset_mode), What is this doing ? The return value of the function on the right is an instantiated object , in other words dataset_class Just a corresponding Dataset The object after instantiation of this class ( From above find_dataset_using_name The explanation of function can reveal one or two ), And then convert it into self.dataset, and self.dataset It is also an instantiated object , This is to be transferred to torch.utils.data.DataLoader Medium , And you read torch.utils.data.DataLoader You will find out how to use , The first parameter must be an instantiated object .torch.utils.data.DataLoader This is a very common Pytorch Things for importing data , For specific usage, see torch.utils.data.DataLoader Usage of , And in this function , The first 75-79 These lines of code are not difficult to understand , So I'm not going to repeat it . - Then let's see load_data function , This one doesn't say , Is to read data , Then return self In fact, it is to return the instantiated object , That is, export the data set .
- __len__ I won't talk about the function , Everyone understands the specific role .
- __iter__ The function generates a batch of data (batch) And iterate .enumerate() Function is used to traverse a data object ( As listing 、 Tuples or strings ) Combined into an index sequence , List both data and data index , Generally used in for Cycle of .yield The use of can be found from this link yield Use Get the answer , Its function is to generate an iteration ( Common iterations, such as Fibonacci series ).
To make a long story short , This script is around create_dataset Such a function expands , The purpose is based on opt Make datasets , It's just an interface .
1.2.4 imgs Folder
Here are two sample pictures , It can also be used to store renderings .
2. preparation
- First clone the remote warehouse
git clone https://github.com/junyanz/pytorch-CycleGAN-and-pix2pixAnd adjust the current directory to the project root directory :cd pytorch-CycleGAN-and-pix2pix - Install the required package
pip install -r requirements.txt
Three level title
The fourth level title
Five level titles
Six level title
Reference resources :https://blog.csdn.net/Joe9800/article/details/103224383
边栏推荐
- List and data frame of R language experiment III
- 7-4 散列表查找(PTA程序设计)
- 记一次api接口SQL注入实战
- 7-1 output all primes between 2 and n (PTA programming)
- [dark horse morning post] Shanghai Municipal Bureau of supervision responded that Zhong Xue had a high fever and did not melt; Michael admitted that two batches of pure milk were unqualified; Wechat i
- Detailed explanation of network foundation
- 实验四 数组
- SRC挖掘思路及方法
- [MySQL database learning]
- Get started with typescript
猜你喜欢
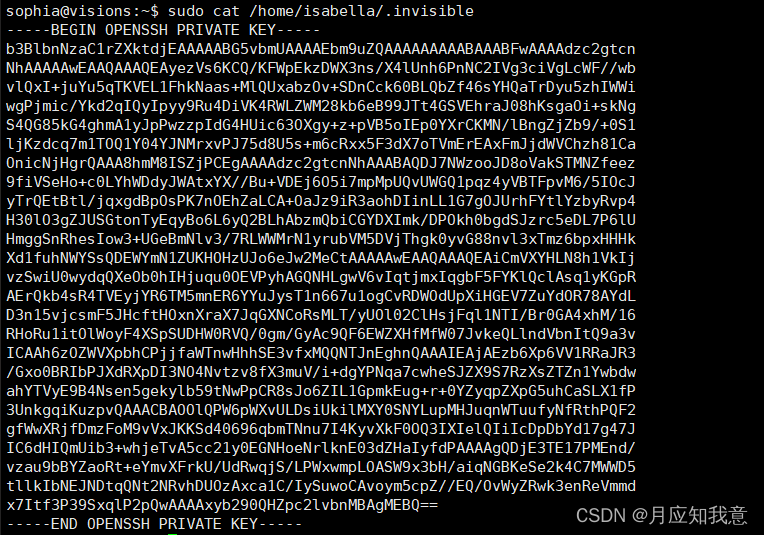
HackMyvm靶机系列(3)-visions
Yugu p1012 spelling +p1019 word Solitaire (string)
网络层—简单的arp断网
HackMyvm靶机系列(4)-vulny
Attack and defense world misc practice area (simplerar, base64stego, no matter how high your Kung Fu is, you are afraid of kitchen knives)
Tencent map circle
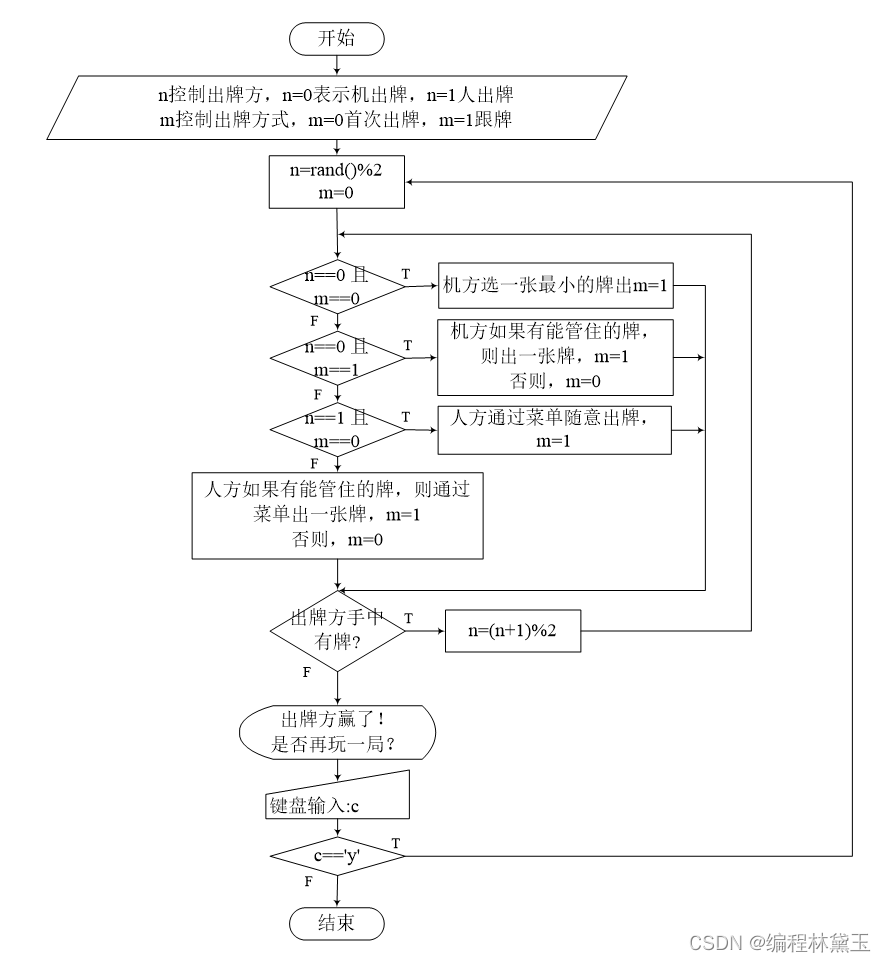
扑克牌游戏程序——人机对抗

Canvas foundation 2 - arc - draw arc
Renforcer les dossiers de base de l'apprentissage

HackMyvm靶机系列(7)-Tron
随机推荐
Get started with typescript
Brief introduction to XHR - basic use of XHR
Web vulnerability - File Inclusion Vulnerability of file operation
强化學習基礎記錄
Principles, advantages and disadvantages of two persistence mechanisms RDB and AOF of redis
HackMyvm靶机系列(1)-webmaster
实验四 数组
JS several ways to judge whether an object is an array
Hackmyvm Target Series (3) - vues
List and data frame of R language experiment III
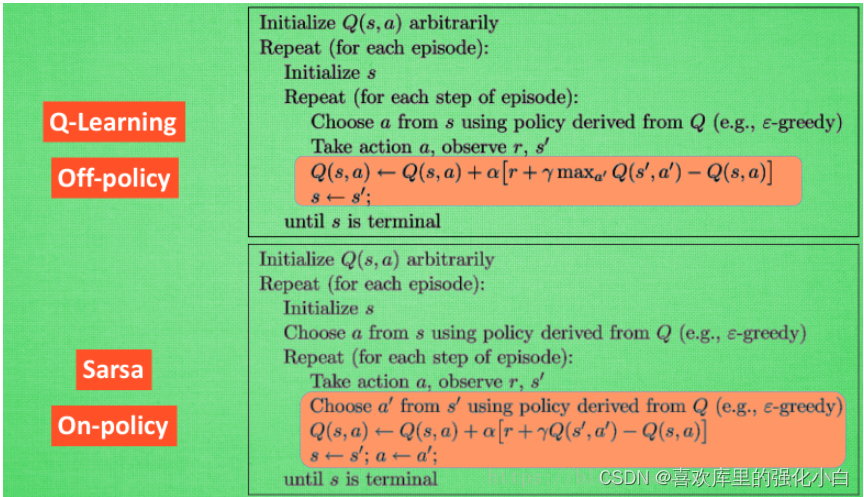
Reinforcement learning series (I): basic principles and concepts
Hackmyvm target series (4) -vulny
Attach the simplified sample database to the SQLSERVER database instance
Safe driving skills on ice and snow roads
强化学习基础记录
Beautified table style
[insert, modify and delete data in the headsong educator data table]
强化学习基础记录
HackMyvm靶机系列(2)-warrior
Spot gold prices rose amid volatility, and the rise in U.S. prices is likely to become the key to the future