当前位置:网站首页>快速集成认证服务-HarmonyOS平台
快速集成认证服务-HarmonyOS平台
2022-07-07 05:38:00 【华为开发者论坛】
我们可以通过在应用中集成认证服务SDK来轻松快速地向用户推出注册、登录等相关功能。下面来介绍如何在HarmonyOS平台集成使用AGC认证服务。
集成内容
通过harmony sdk插件集成AGC 验证服务,在AGC上开启认证服务,并添加手机验证与邮箱验证两种方式,同时端侧集成SDK调用后由AGC发送验证码至手机或邮箱,输入验证码和密码后完成用户注册。
集成准备
- 安装DevEco Studio开发工具,并熟悉Harmony应用的开发流程。
- AGC创建工程并开通服务。
a)在AGC创建Harmony应用并开通验证服务。


启用手机和邮箱验证

3、DevEco Studio中创建Harmony工程
a)打开IDE工具,选择File-New-New project,选择Java语言编译模板后,点击Next进入创建工程配置界面。

注意选择应用(Application),包名和AGC创建的应用包名相同。

b)将agconnect-services.json文件拷贝到项目的entry模块的目录下

c)配置Maven仓地址和AGC插件地址。
打开harmony项目级build.gradle文件。
在allprojects ->repositories里面配置maven仓地址。
在buildscript->repositories中配置maven仓地址。
在buildscript->dependencies中配置AppGallery Connect插件地址。
测试环境需要配置内部私仓地址,正式环境需要配置外部正式仓。
buildscript { repositories { maven { url 'https://repo.huaweicloud.com/repository/maven/' } maven { url 'https://developer.huawei.com/repo/' } maven { url 'http://language.cloudartifact.dgg.dragon.tools.huawei.com/artifactory/product_maven' } maven { url 'http://szg1.artifactory.inhuawei.com/artifactory/sz-maven-public/' } jcenter() } dependencies { classpath 'com.huawei.ohos:hap:2.4.4.2' classpath 'com.huawei.ohos:decctest:1.2.4.0' classpath 'com.huawei.agconnect:agcp-harmony:1.2.0.200' }}allprojects { repositories { maven { url 'https://repo.huaweicloud.com/repository/maven/' } maven { url 'https://developer.huawei.com/repo/' } maven { url 'http://language.cloudartifact.dgg.dragon.tools.huawei.com/artifactory/product_maven' } maven { url 'http://szg1.artifactory.inhuawei.com/artifactory/sz-maven-public/' } jcenter() }}d)添加编译依赖和集成SDK。
打开harmony项目应用级(entry)的build.gradle文件,添加插件地址。
apply plugin: 'com.huawei.ohos.hap'apply plugin: 'com.huawei.ohos.decctest'apply plugin: 'com.huawei.agconnect'在“dependencies”中添加添加agconnect-core的编译依赖和crash SDK。
dependencies { implementation fileTree(dir: 'libs', include: ['*.jar', '*.har']) implementation 'com.huawei.agconnect:agconnect-auth-harmony:1.2.0.1-snapshot' implementation 'com.huawei.agconnect:agconnect-tasks-harmony:1.2.0.1-snapshot'}e)entry (hap)模块添加配置信息
enrty模块的config.json文件的module/abilities中,加入如下配置,注意包名的替换。
{ "permissions": [ "com.huawei.agconnect.core.DataAbilityShellProvider.PROVIDER" ], "name": "com.huawei.agconnect.core.provider.AGConnectInitializeAbility", "type": "data", "uri": "dataability://com.huawei.agconnect.auth.AGConnectInitializeAbility"}f)同步工程配置

4、配置签名信息
Harmony应用安装到真机进行测试,需要配置签名信息,有手动签名和自动签名两种方式,具体可以参见:配置签名信息。建议优先使用自动签名方式,如自动签名失败,可以选择手动签名方式。这里使用自动签名方式:
a)连接真机设备,确保DevEco Studio与真机设备已连接,真机连接成功后如下图所示

b)进入File > Project Structure > Project > Signing Configs界面,点击“Sign In”按钮进行登录,选择Debug,勾选Automatically generate signing,点击try again即可自动进行签名。自动生成签名所需的密钥(.p12)、数字证书(.cer)和Profile文件(.p7b)会存放到用户user目录下的.ohos\config目录下。

设置完签名信息后,点击OK进行保存,然后可以在工程下的build.gradle中查看签名的配置信息。

登录AGC,进入“用户与访问”-“证书管理”,点击新增证书,上传前面生成的.csr文件,类型选择调试证书
完成签名配置后即可点击安装应用到调试设备。
功能实现
手机验证登录布局设计

参考如上布局,四个文本框输入分别输入国家码、手机号、密码、验证码,点击验证后收到验证码短信,输入验证码,点击登录,完成注册和登录布局代码如下:
<?xml version="1.0" encoding="utf-8"?><DirectionalLayout xmlns:ohos="http://schemas.huawei.com/res/ohos" ohos:width="match_parent" ohos:height="match_parent"> <TextField ohos:id="$+id:countryCode" ohos:height="match_content" ohos:width="150vp" ohos:hint="Your countryCode" ohos:text_input_type="pattern_number" ohos:text_size="50" ohos:top_margin="10vp" /> <TextField ohos:id="$+id:phoneNumber" ohos:height="match_content" ohos:width="150vp" ohos:hint="Your phone" ohos:text_input_type="pattern_number" ohos:text_size="50" ohos:bottom_margin="10vp" /> <TextField ohos:id="$+id:password" ohos:height="match_content" ohos:width="150vp" ohos:hint="Password" ohos:text_input_type="pattern_password" ohos:text_size="50" ohos:bottom_margin="10vp" /> <TextField ohos:id="$+id:verifyCode" ohos:height="match_content" ohos:width="150vp" ohos:hint="verifyCode" ohos:text_input_type="pattern_number" ohos:text_size="50" ohos:bottom_margin="10vp" /> <DirectionalLayout ohos:height="match_content" ohos:width="match_parent" ohos:orientation="horizontal"> <Button ohos:id="$+id:Verify" ohos:height="match_content" ohos:width="100vp" ohos:background_element="$graphic:background_ability_main" ohos:left_margin="15vp" ohos:text="Verify" ohos:text_size="16fp"/> <Button ohos:id="$+id:Login" ohos:height="match_content" ohos:width="100vp" ohos:background_element="$graphic:background_ability_main" ohos:left_margin="15vp" ohos:text="Login" ohos:text_size="16fp"/> </DirectionalLayout></DirectionalLayout>验证和登录:
输入国家码、手机号、后点击Verify,返回验证码发送成功日志,手机收到验证码,输入密码和验证码后点击Login返回登录成功日志:

页面跳转到登录成功页面:

验证和登录代码如下:
private void verify() { String countryCode = getCountryCode(); String phoneNumber = getPhoneNumber(); int action = VerifyCodeSettings.ACTION_REGISTER_LOGIN; VerifyCodeSettings settings = VerifyCodeSettings.newBuilder() .action(action) .sendInterval(30) .build(); HarmonyTask<VerifyCodeResult> task = AGConnectAuth.getInstance() .requestVerifyCode(countryCode, phoneNumber, settings); task.addOnSuccessListener(TaskExecutors.uiThread(), new OnSuccessListener<VerifyCodeResult>() { @Override public void onSuccess(VerifyCodeResult verifyCodeResult) { log("verifyPhoneCode success"); } }).addOnFailureListener(TaskExecutors.uiThread(), new OnFailureListener() { @Override public void onFailure(Exception e) { log("verifyPhoneCode fail:" + e); } });}private void login() { String countryCode = getCountryCode(); String phoneNumber = getPhoneNumber(); String password = getPassword(); String verifyCode = getVerify(); AGConnectAuthCredential phoneAuthCredential = PhoneAuthProvider.credentialWithVerifyCode(countryCode, phoneNumber, password, verifyCode); /* signIn */ HarmonyTask<SignInResult> task = AGConnectAuth.getInstance().signIn(phoneAuthCredential); task.addOnSuccessListener(new OnSuccessListener<SignInResult>() { @Override public void onSuccess(SignInResult signInResult) { log("signIn success"); showUser(signInResult.getUser()); } }).addOnFailureListener(new OnFailureListener() { @Override public void onFailure(Exception e) { log("signInWithCode fail:" + e); } });}2、邮箱验证登录布局设计

参考如上布局,三个文本框输入分别输入邮箱号、密码、验证码,点击验证后收到验证码短信,输入验证码,点击登录,完成注册和登录,布局代码如下:
<?xml version="1.0" encoding="utf-8"?><DirectionalLayout xmlns:ohos="http://schemas.huawei.com/res/ohos" ohos:width="match_parent" ohos:height="match_parent"> <TextField ohos:id="$+id:phoneNumber" ohos:height="match_content" ohos:width="150vp" ohos:hint="Your phone" ohos:text_input_type="pattern_number" ohos:text_size="50" ohos:bottom_margin="10vp" /> <TextField ohos:id="$+id:password" ohos:height="match_content" ohos:width="150vp" ohos:hint="Password" ohos:text_input_type="pattern_password" ohos:text_size="50" ohos:bottom_margin="10vp" /> <TextField ohos:id="$+id:verifyCode" ohos:height="match_content" ohos:width="150vp" ohos:hint="verifyCode" ohos:text_input_type="pattern_number" ohos:text_size="50" ohos:bottom_margin="10vp" /> <DirectionalLayout ohos:height="match_content" ohos:width="match_parent" ohos:orientation="horizontal"> <Button ohos:id="$+id:Verify" ohos:height="match_content" ohos:width="100vp" ohos:background_element="$graphic:background_ability_main" ohos:left_margin="15vp" ohos:text="Verify" ohos:text_size="16fp"/> <Button ohos:id="$+id:Login" ohos:height="match_content" ohos:width="100vp" ohos:background_element="$graphic:background_ability_main" ohos:left_margin="15vp" ohos:text="Login" ohos:text_size="16fp"/> </DirectionalLayout></DirectionalLayout>输入邮箱号后点击Verify,返回验证码发送成功日志,邮箱收到验证码,输入密码和验证码后点击Login返回登录成功日志:

页面跳转到登录成功页面:

邮箱验证和登录代码如下:
private void verify() { //String countryCode = getCountryCode(); String emailStr = getEmailStr(); int action = VerifyCodeSettings.ACTION_REGISTER_LOGIN; VerifyCodeSettings settings = VerifyCodeSettings.newBuilder() .action(action) .sendInterval(30) .build(); HarmonyTask<VerifyCodeResult> task = AGConnectAuth.getInstance() .requestVerifyCode(emailStr, settings); task.addOnSuccessListener(TaskExecutors.uiThread(), new OnSuccessListener<VerifyCodeResult>() { @Override public void onSuccess(VerifyCodeResult verifyCodeResult) { log("verifyEmailCode success"); } }).addOnFailureListener(TaskExecutors.uiThread(), new OnFailureListener() { @Override public void onFailure(Exception e) { log("verifyEmailCode fail:" + e); } });}private void login() { //String countryCode = getCountryCode(); String emailStr = getEmailStr(); String password = getPassword(); String verifyCode = getVerify(); AGConnectAuthCredential emailAuthCredential = EmailAuthProvider.credentialWithVerifyCode(emailStr, password, verifyCode); /* signIn */ HarmonyTask<SignInResult> task = AGConnectAuth.getInstance().signIn(emailAuthCredential); task.addOnSuccessListener(new OnSuccessListener<SignInResult>() { @Override public void onSuccess(SignInResult signInResult) { log("signIn success"); showUser(signInResult.getUser()); } }).addOnFailureListener(new OnFailureListener() { @Override public void onFailure(Exception e) { log("signInWithCode fail:" + e); } });}功能测试
在登陆成功后,打开AGC验证服务,在后台查询数据:
使用手机和邮箱注册的用户在后台均有显示账号信息和验证次数,验证次数与请求验证次数相同;


在AGC上删除账户,再次使用相同用户名和密码登录会报用户名或密码错误

在停用账户后登录会报账户已禁用错误。

欲了解更多更全技术文章,欢迎访问https://developer.huawei.com/consumer/cn/forum/?ha_source=zzh
边栏推荐
- 如何理解分布式架构和微服务架构呢
- [quick start of Digital IC Verification] 13. SystemVerilog interface and program learning
- 使用SwinUnet训练自己的数据集
- Coquette data completes the cloud native transformation through rainbow to realize offline continuous delivery to customers
- [machine learning] watermelon book data set_ data sharing
- [kuangbin]专题十五 数位DP
- Ebpf cilium practice (2) - underlying network observability
- Implementation method of data platform landing
- Golang 编译约束/条件编译 ( // +build <tags> )
- iptables 之 state模块(ftp服务练习)
猜你喜欢

Pvtv2--pyramid vision transformer V2 learning notes
Fluentd is easy to use. Combined with the rainbow plug-in market, log collection is faster

Exercise arrangement 2.10, 11
SSM integration
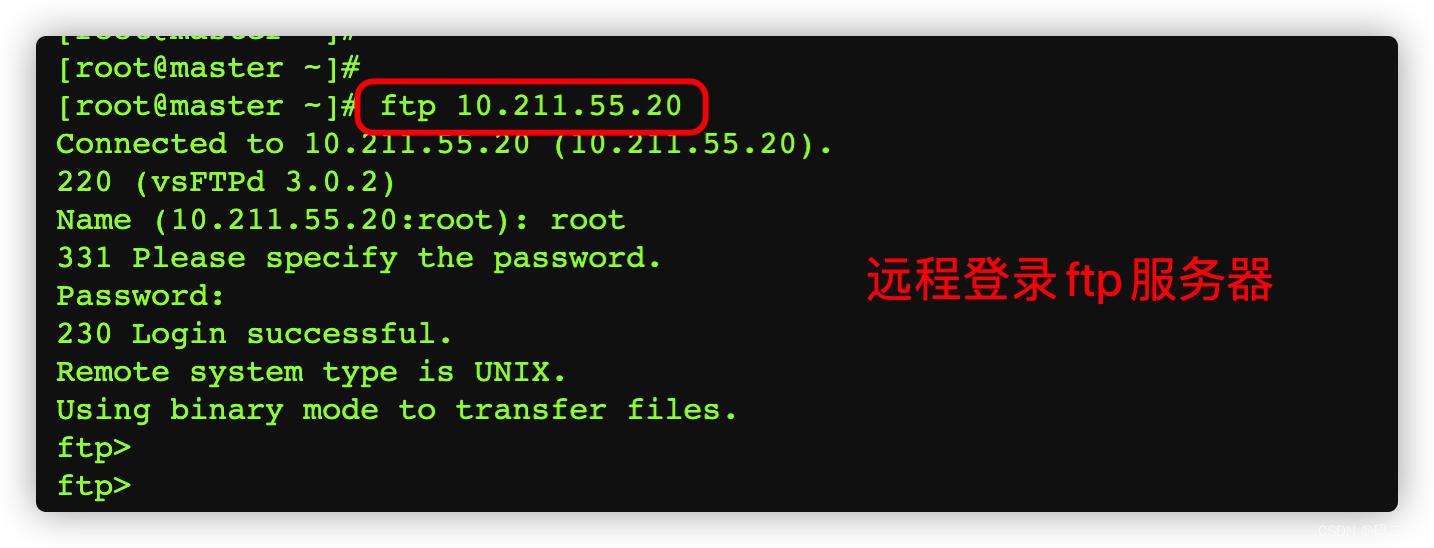
Iptables' state module (FTP service exercise)
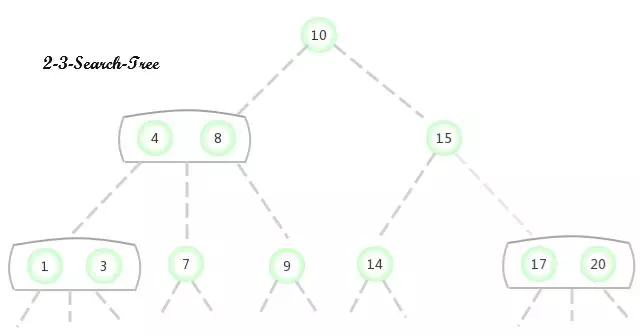
2-3查找树

opencv学习笔记四——膨胀/腐蚀/开运算/闭运算
Ebpf cilium practice (2) - underlying network observability

Don't stop chasing the wind and the moon. Spring mountain is at the end of Pingwu
![[untitled]](/img/b5/348b1d8b5d34cf10e715522b9871f2.png)
[untitled]
随机推荐
In go language, function is a type
JEditableTable的使用技巧
基本数据类型和string类型互相转化
机器人教育在动手实践中的真理
Ebpf cilium practice (1) - team based network isolation
Several ways of lambda used in functions in kotlin (higher-order functions)
Rainbow version 5.6 was released, adding a variety of installation methods and optimizing the topology operation experience
【无标题】
Xcit learning notes
Train your dataset with swinunet
Interpreting the practical application of maker thinking and mathematics curriculum
解析创新教育体系中的创客教育
Interface as a parameter (interface callback)
eBPF Cilium实战(1) - 基于团队的网络隔离
OpenVSCode云端IDE加入Rainbond一体化开发体系
使用BiSeNet实现自己的数据集
[machine learning] watermelon book data set_ data sharing
Iptables' state module (FTP service exercise)
How to realize the high temperature alarm of the machine room in the moving ring monitoring system
Domain specific language / DSL in kotlin